Setting up a charter school network in Charter Lottery and building its own application. Every picture is a full 1440 × 900 laptop window, or a phone where it shows what families see, from the current application, seen as an Organization Admin, using a made-up network, Riverbend Charter Schools, and a made-up admin, Dana Whitfield.
Companion to the organization and school admin guide and the School Admin walkthrough.
Decide first
| Question | Answer |
|---|---|
| One application or several? | Most organizations build one Custom application that every school follows. Give a school its own only when it asks different questions, or keep it on Standard. |
| Which priority questions stay? | The standard application asks five self-reported priorities. Hide one only if no school weights it: a hidden question is saved as "no" for every family. |
| What else must you ask? | Your own questions never change priority or eligibility. Social Security numbers, immigration status and citizenship are refused; questions on race, religion, disability or grades get a warning. |
| Who writes the Spanish? | Every question needs English and Spanish text, and families read their own language. Have a fluent Spanish speaker review it. |
| When do you switch? | Switching changes open and draft cycles with no applications at once; cycles with applications keep theirs. Switch before the first cycle opens. |
| Who are your organization admins? | At least two people. Only organization admins change the application, invite staff or change settings. |
Gather first
- The invitation email, opened within 7 days, a phone with an authenticator app and a password manager
- Each campus: name, public phone and email, street address, time zone
- Staff: name, work email, role, and which campuses each person runs
- The application you use today, with every question you need to keep
- Spanish wording for each question, from someone who writes Spanish fluently
- Your logo as PNG or JPG (no SVG), about 400 × 200 px, and each school's priority weights and required documents
Part 1 · Sign in for the first time
Step 1. Open the invitation
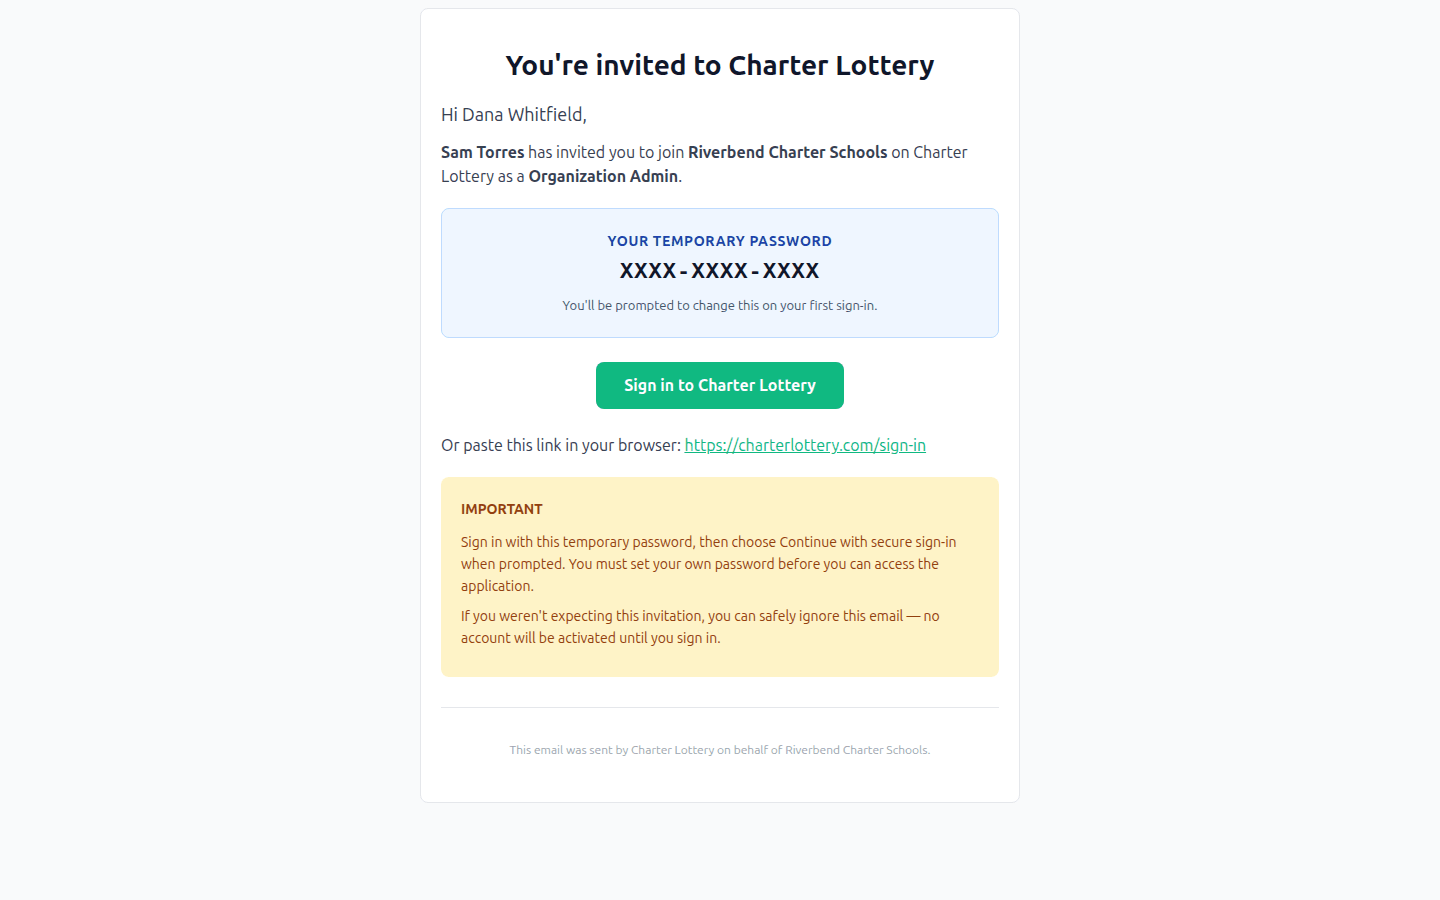
The person who set up your organization invites you as an Organization Admin. The email comes from noreply@charterlottery.com with a temporary password valid for 7 days. If it has expired, ask them to resend it.
Step 2. Sign in and set your password
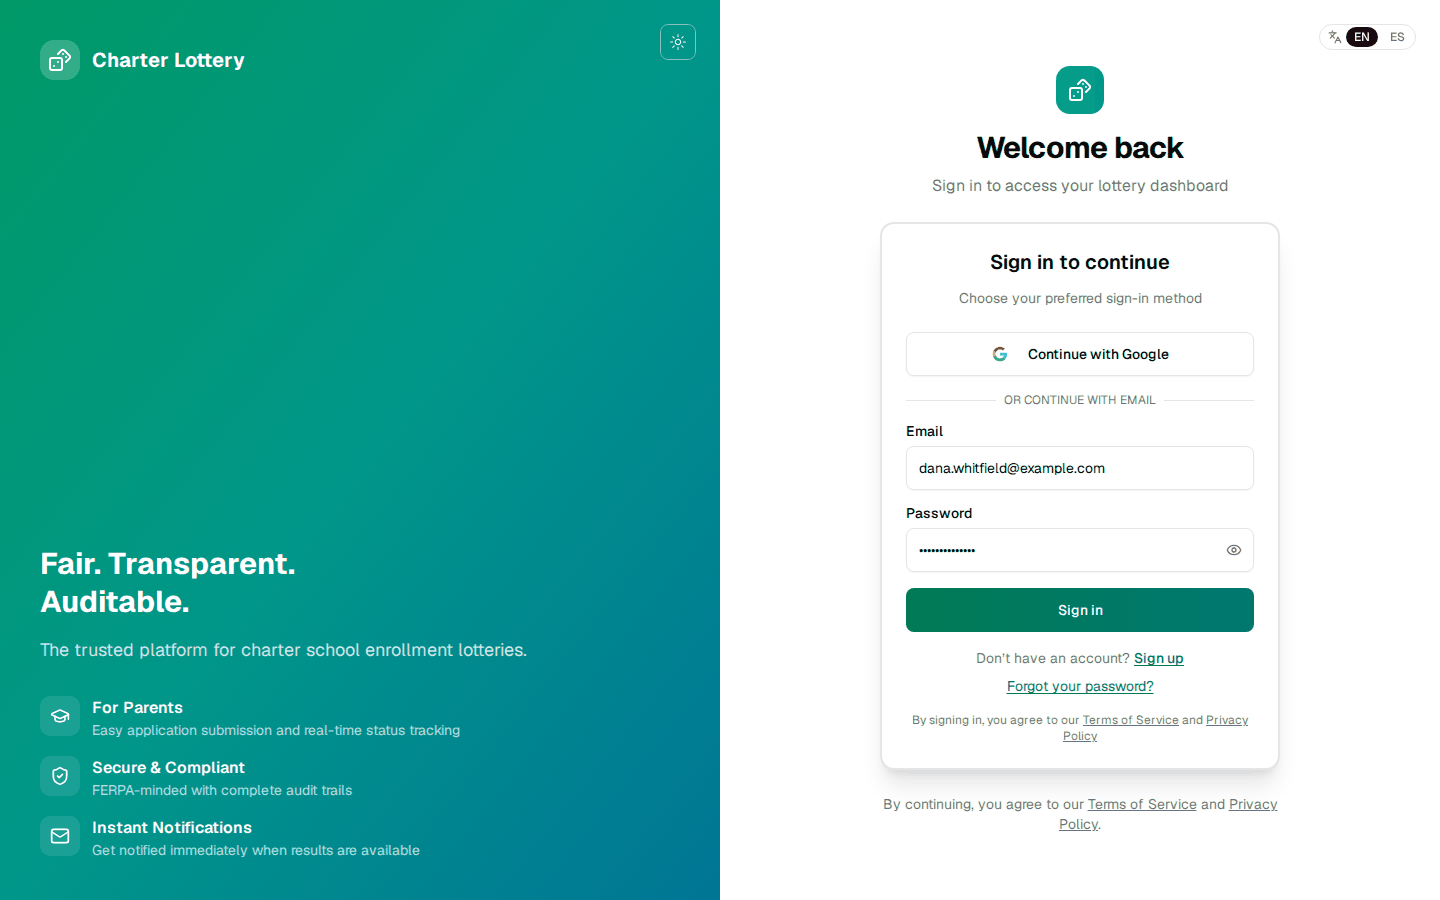
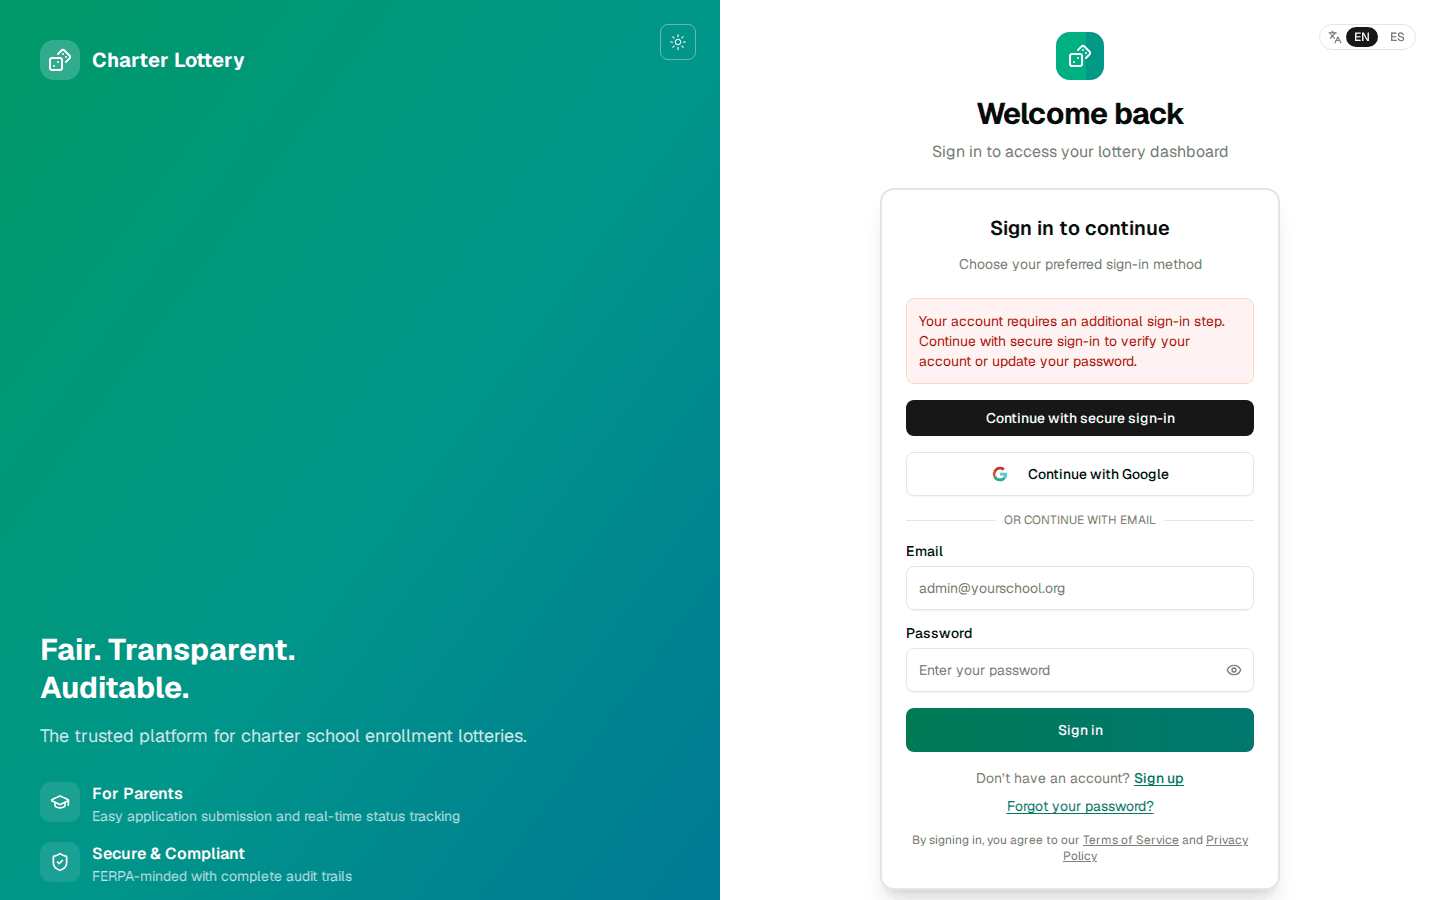
Enter your email and the temporary password, then select Sign in. Select Continue with secure sign-in and choose your own password on the page that opens, which is not pictured.
If your Google Workspace account uses the same email, you can use Continue with Google instead.
Step 3. Set up two-step sign-in
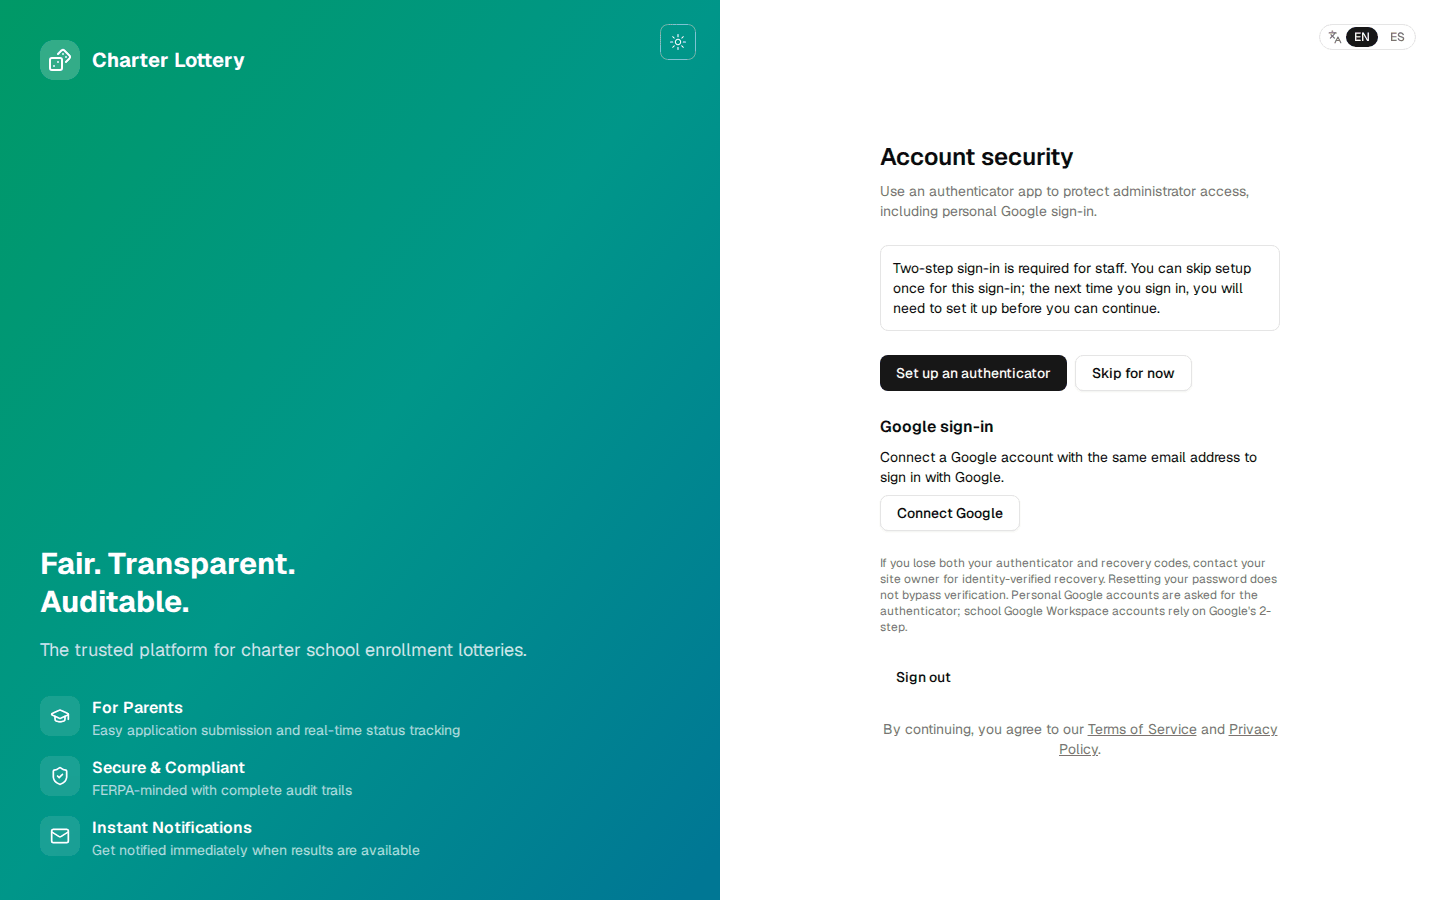
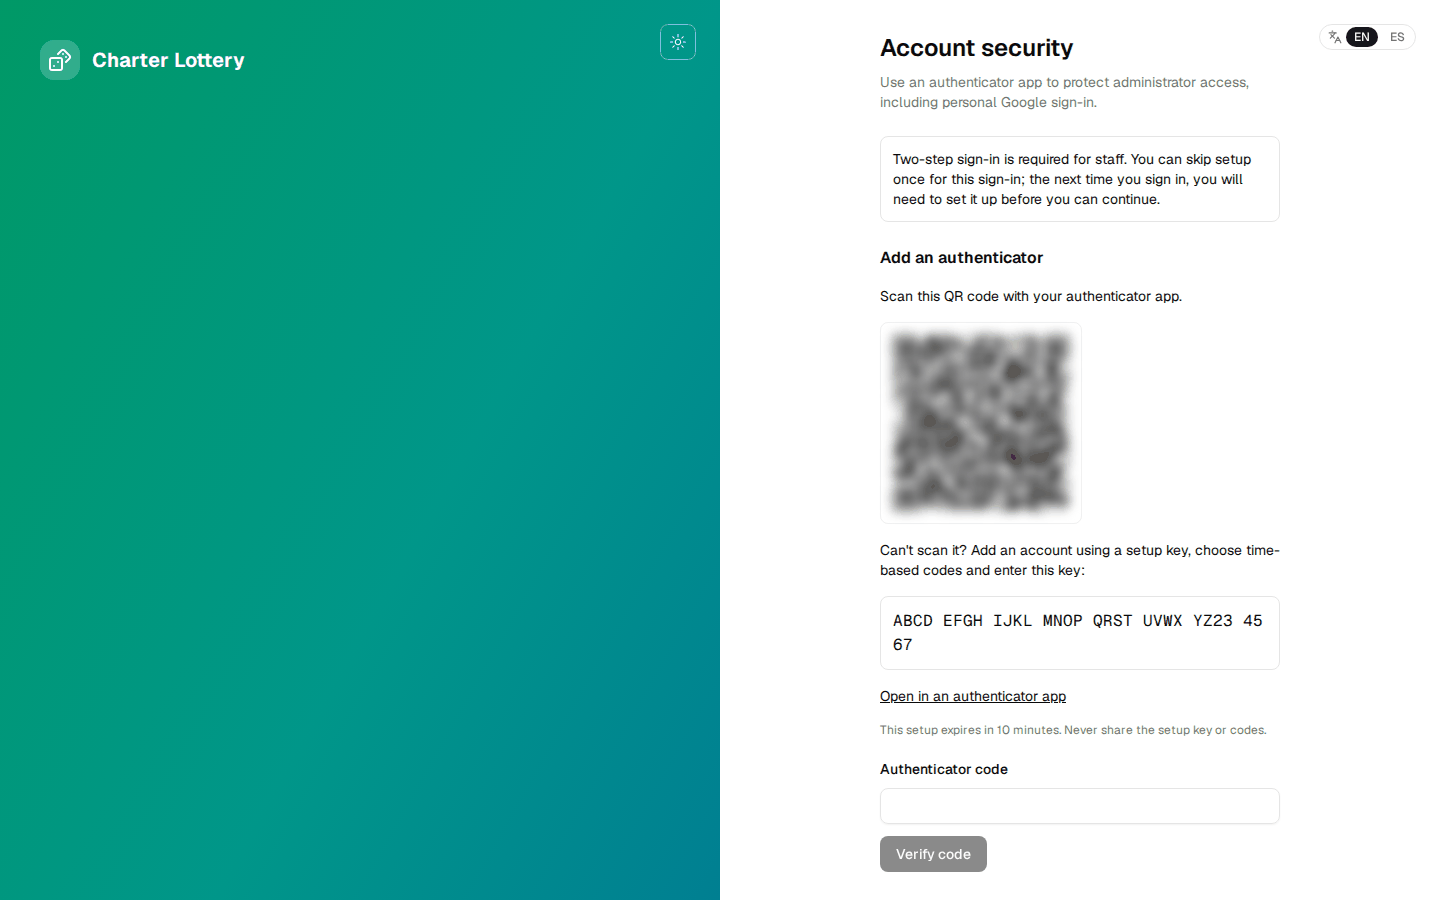
Select Set up an authenticator, scan the code with an authenticator app and enter the six-digit code.
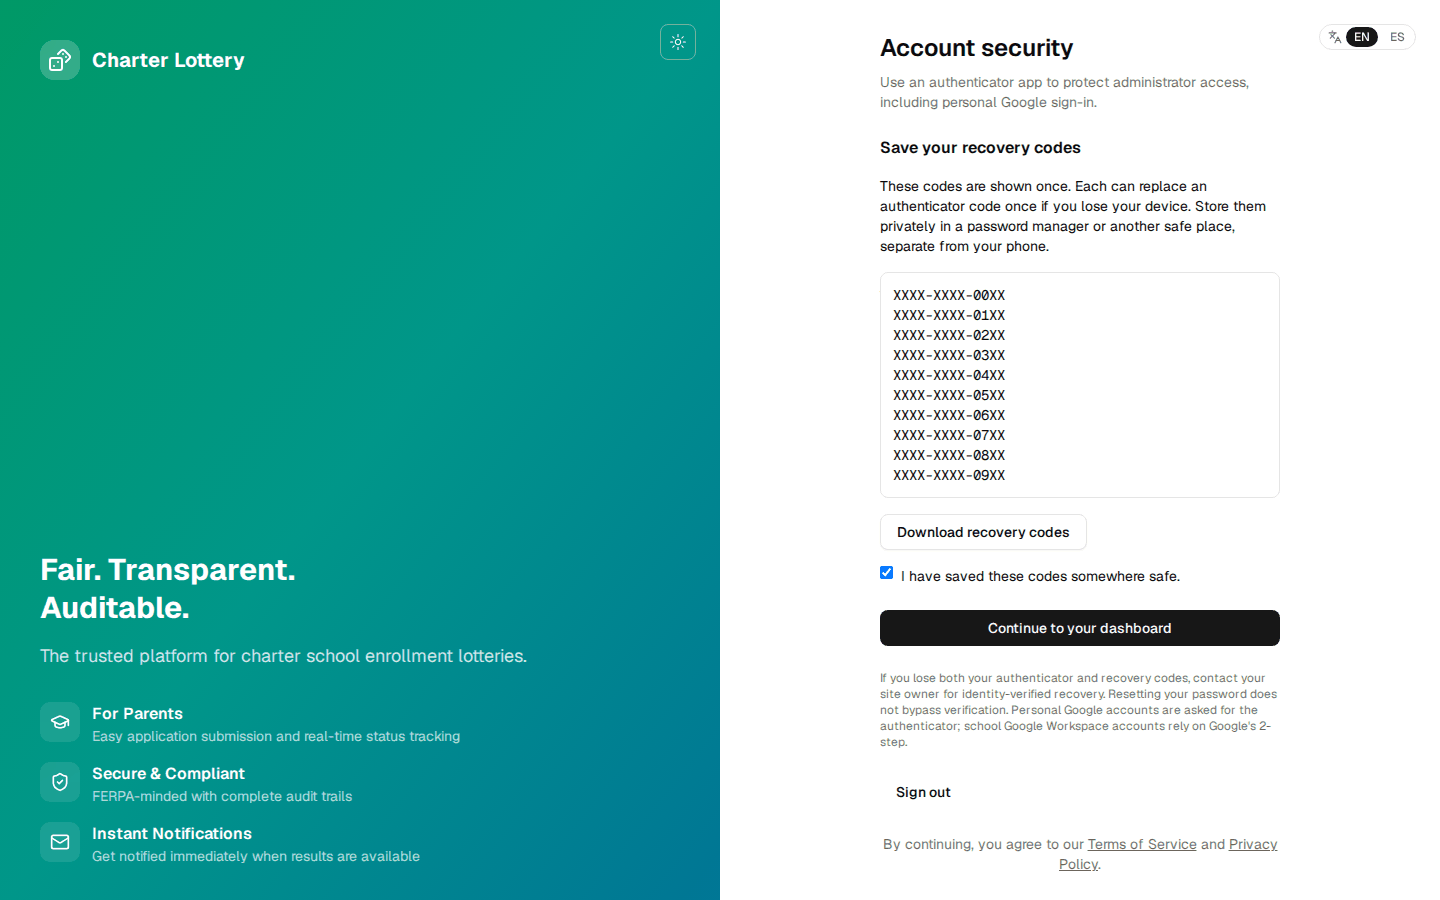
The 10 recovery codes are shown once: save them in a password manager, tick the box and select Continue to your dashboard. Google Workspace sign-ins skip this; Google's 2-Step Verification applies.
Step 4. Take or close the welcome tour
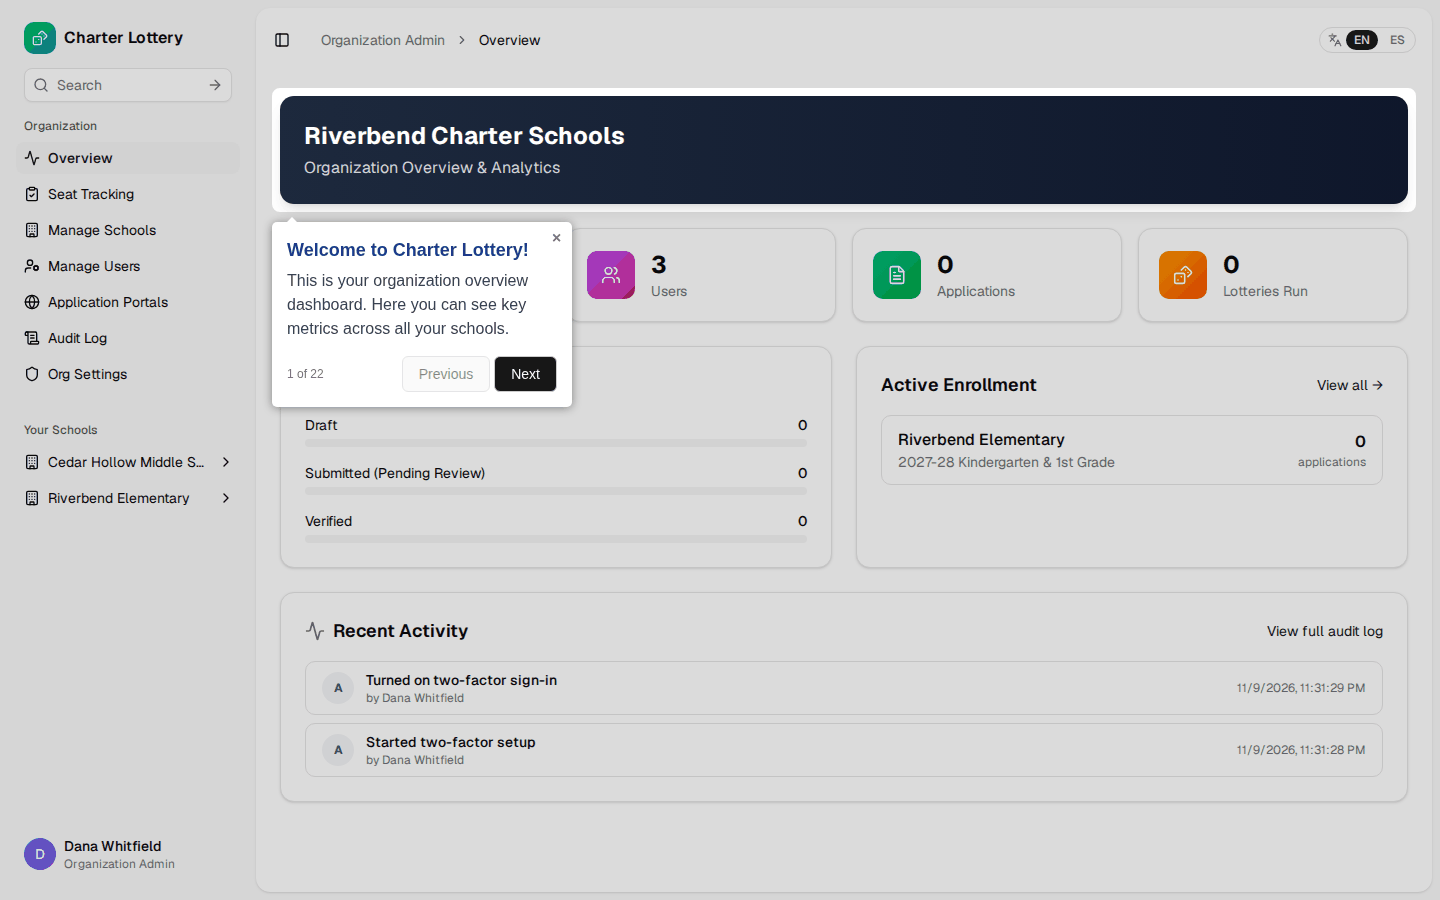
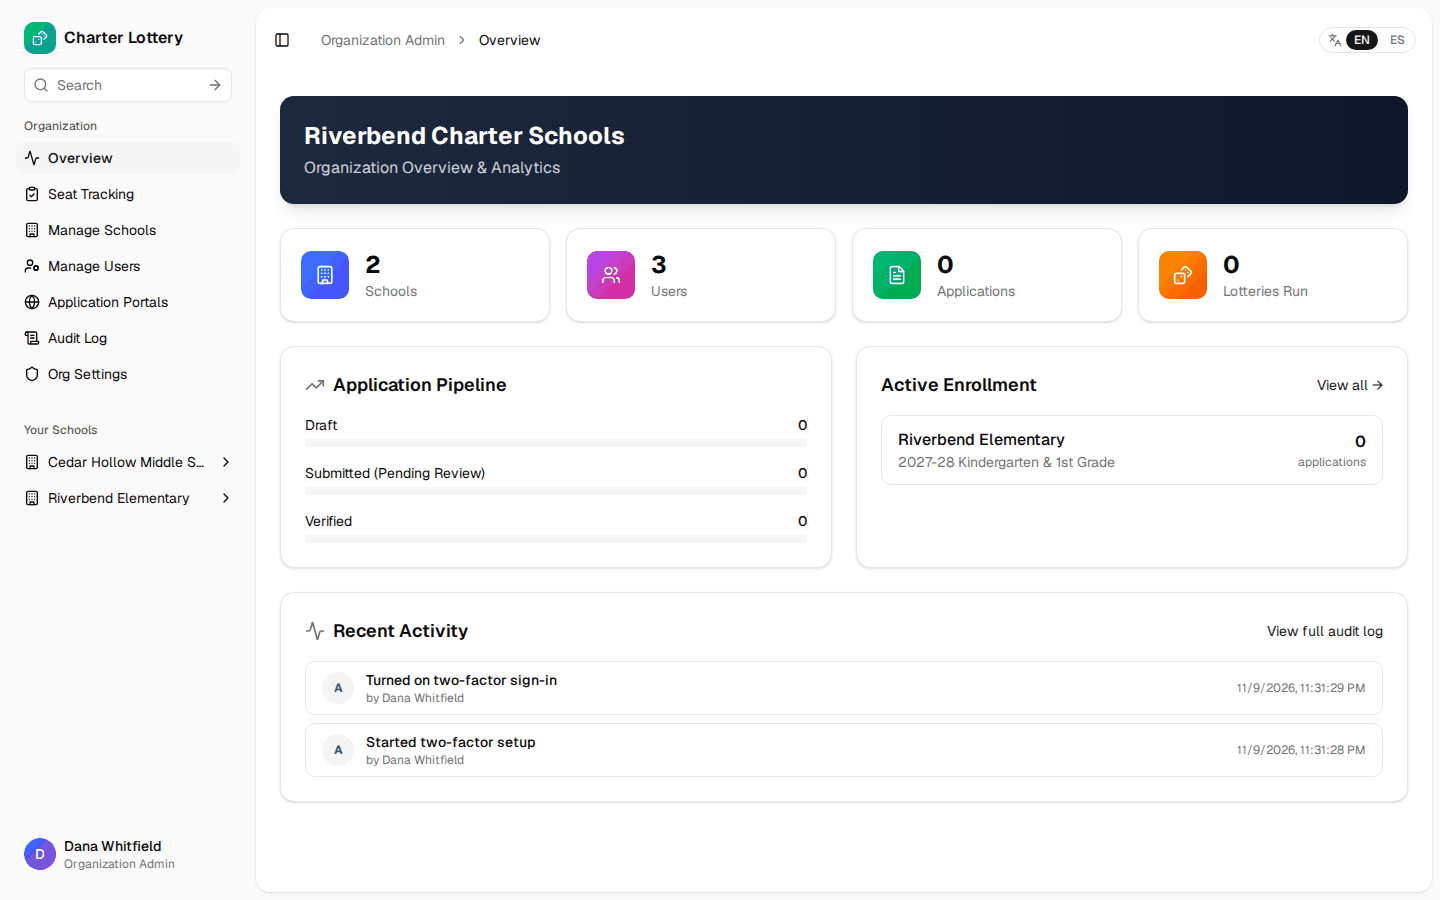
Organization Admins get a 22-step tour on first arrival. Close it with × and restart it later from Account Settings. Overview then shows your schools, users, applications and open cycles.
Part 2 · Your organization
Step 5. Add a school
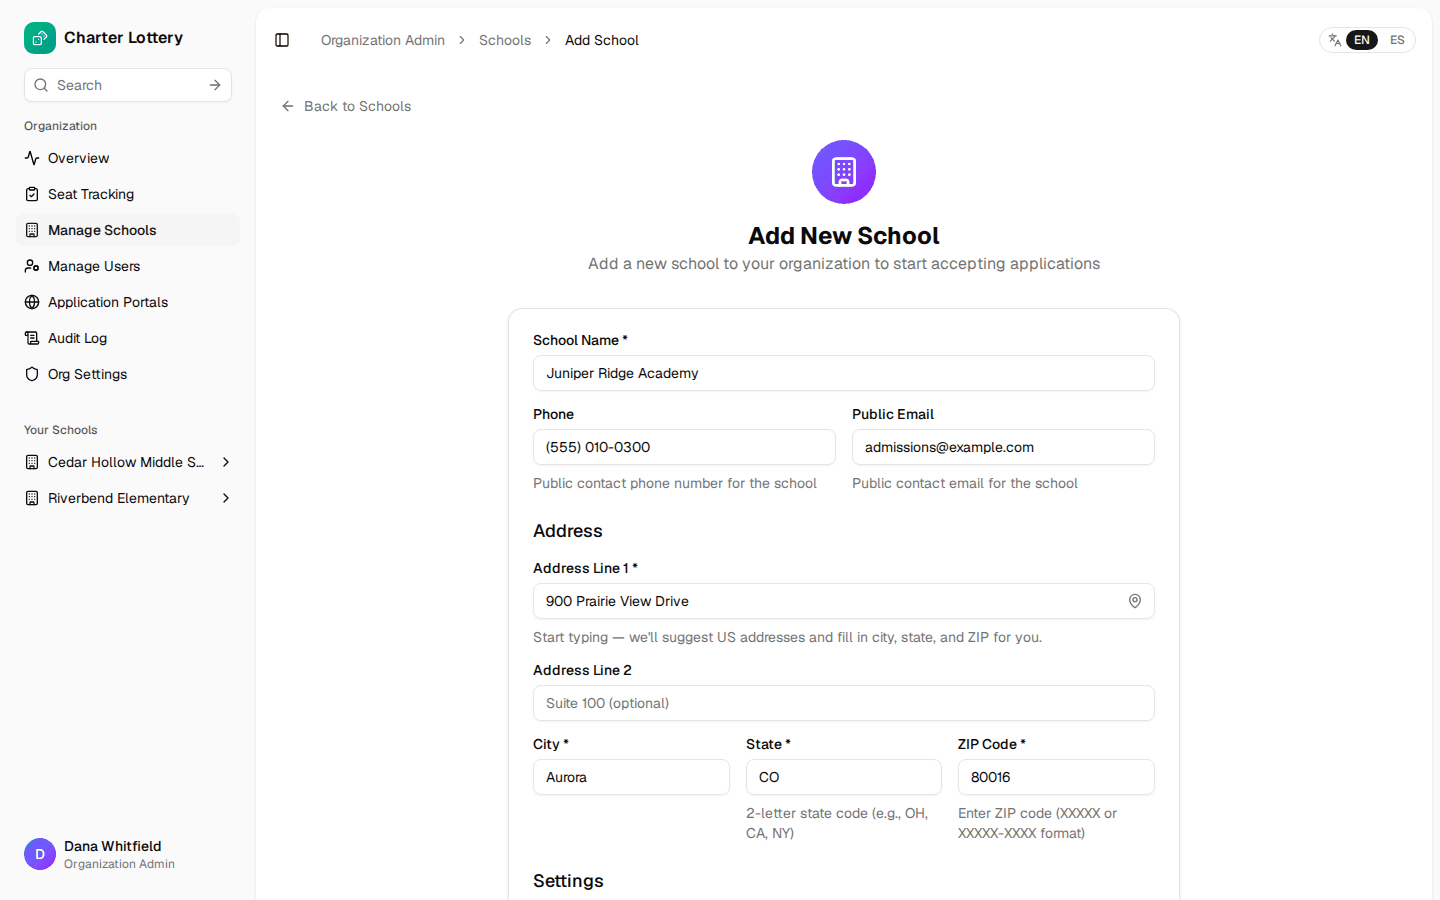
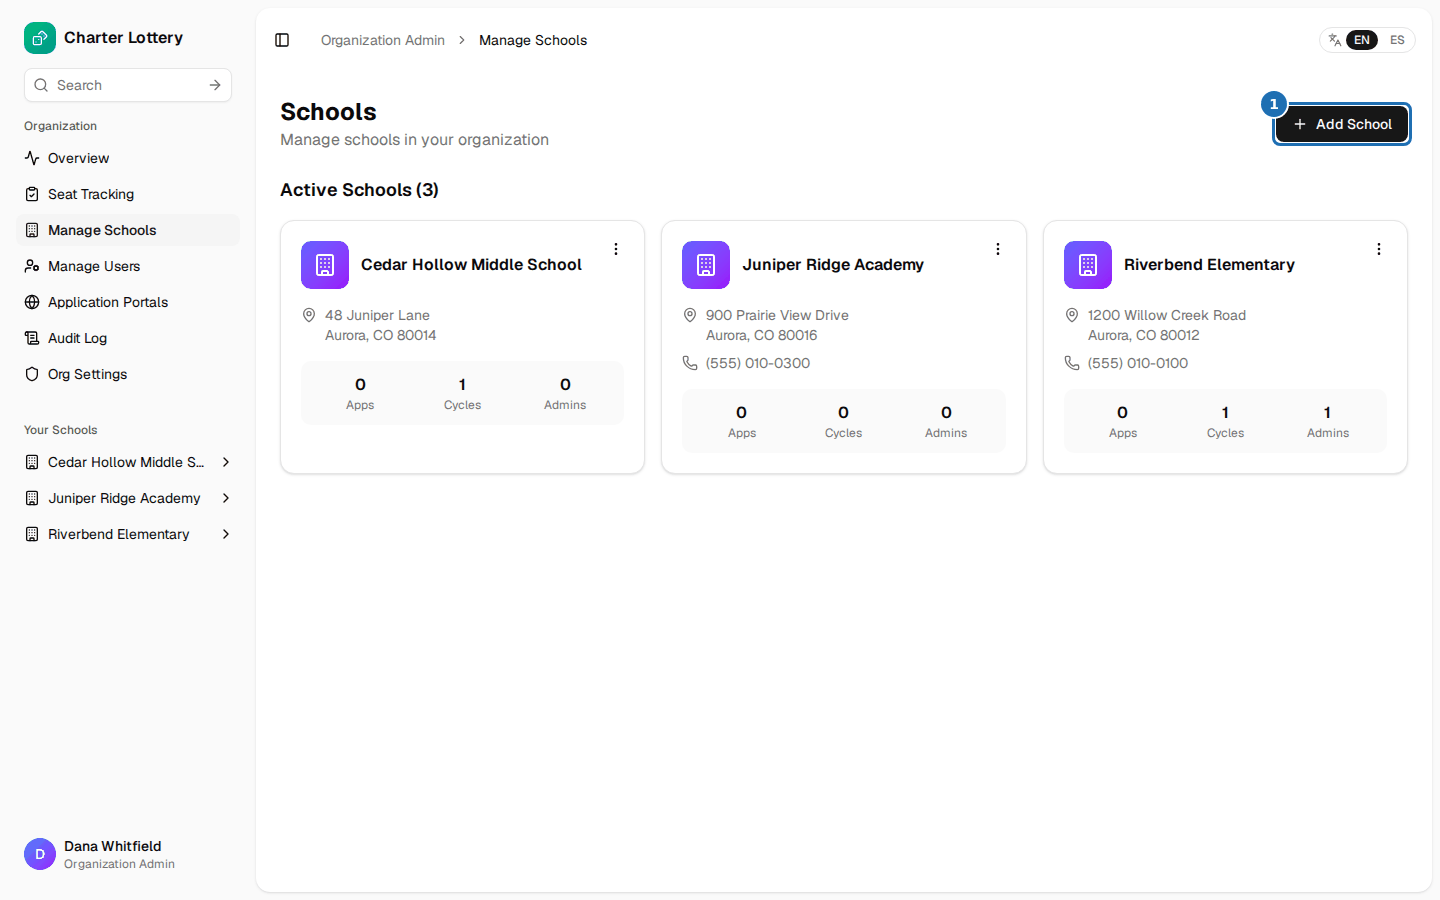
Choose Manage Schools, then Add School. On the live site, typing the street address offers suggestions that fill in city, state and ZIP. Check the Timezone, because deadlines show in it, and select Create School.
Each campus runs its own lotteries and has its own subscription.
Step 6. Invite a school admin
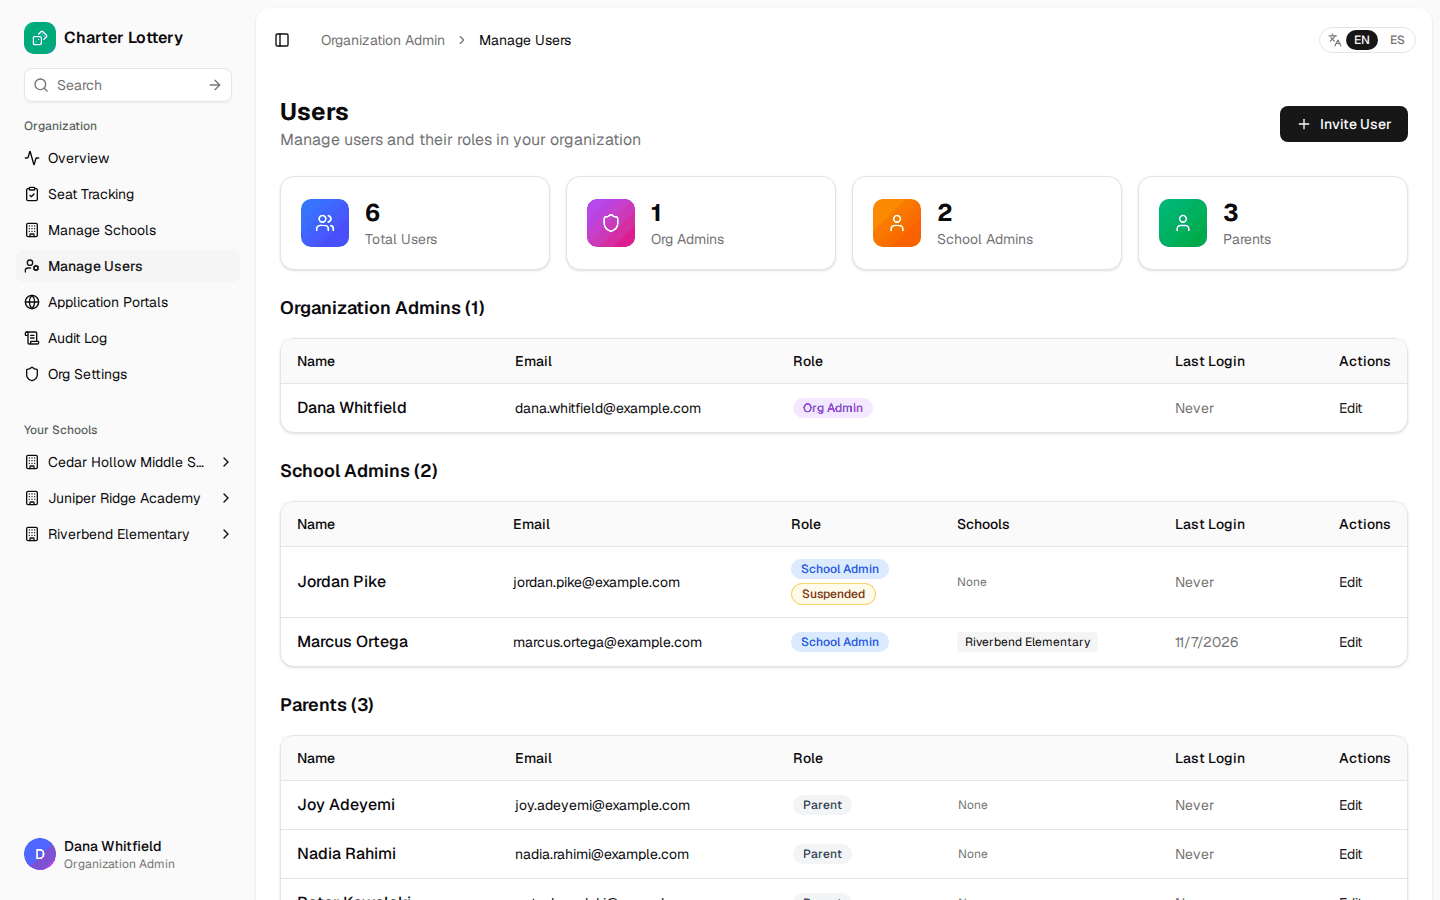
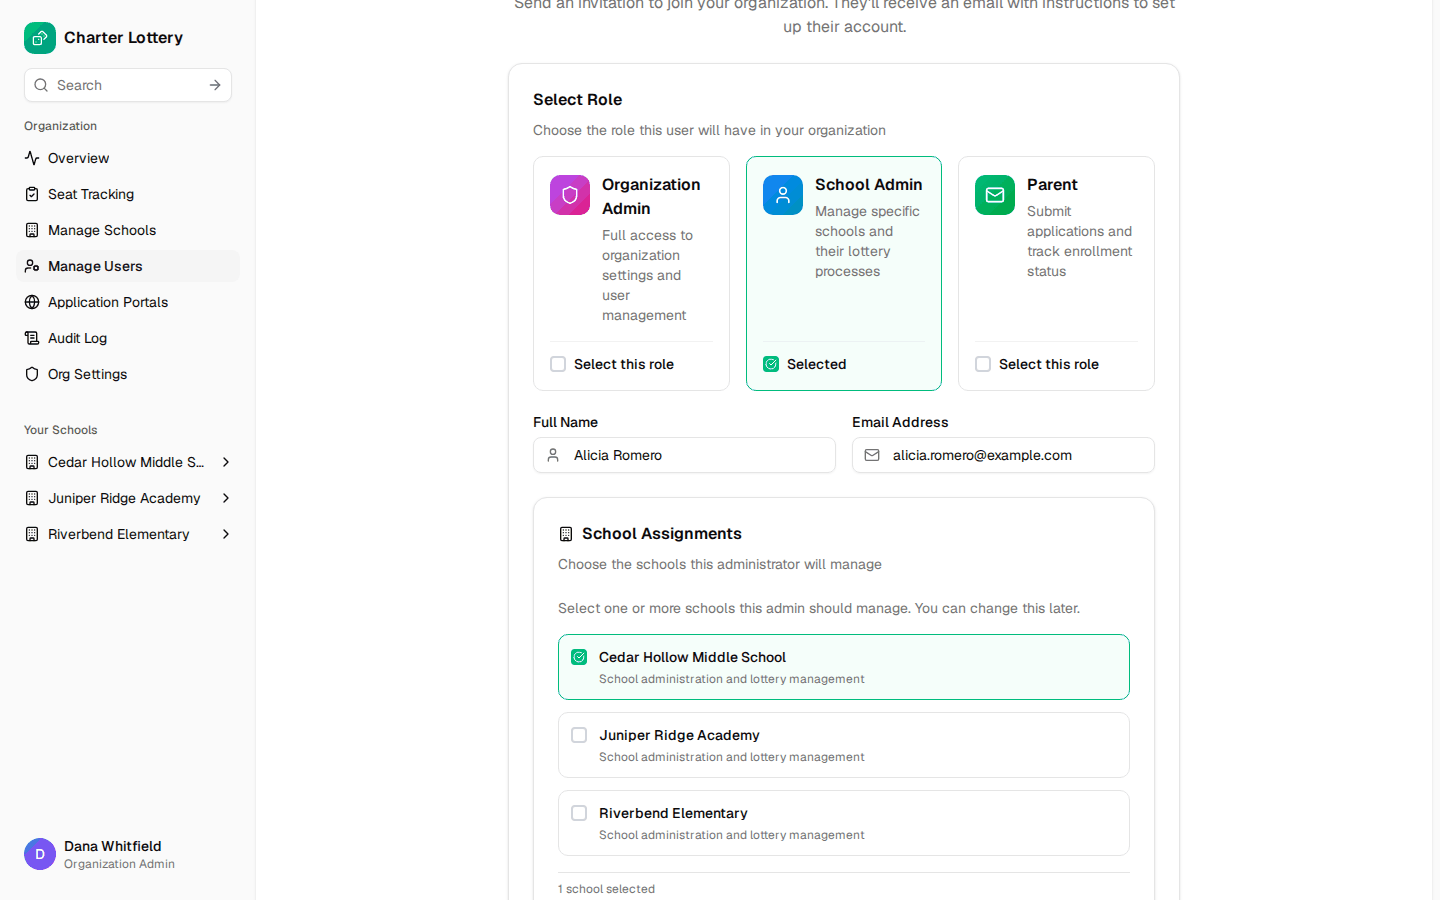
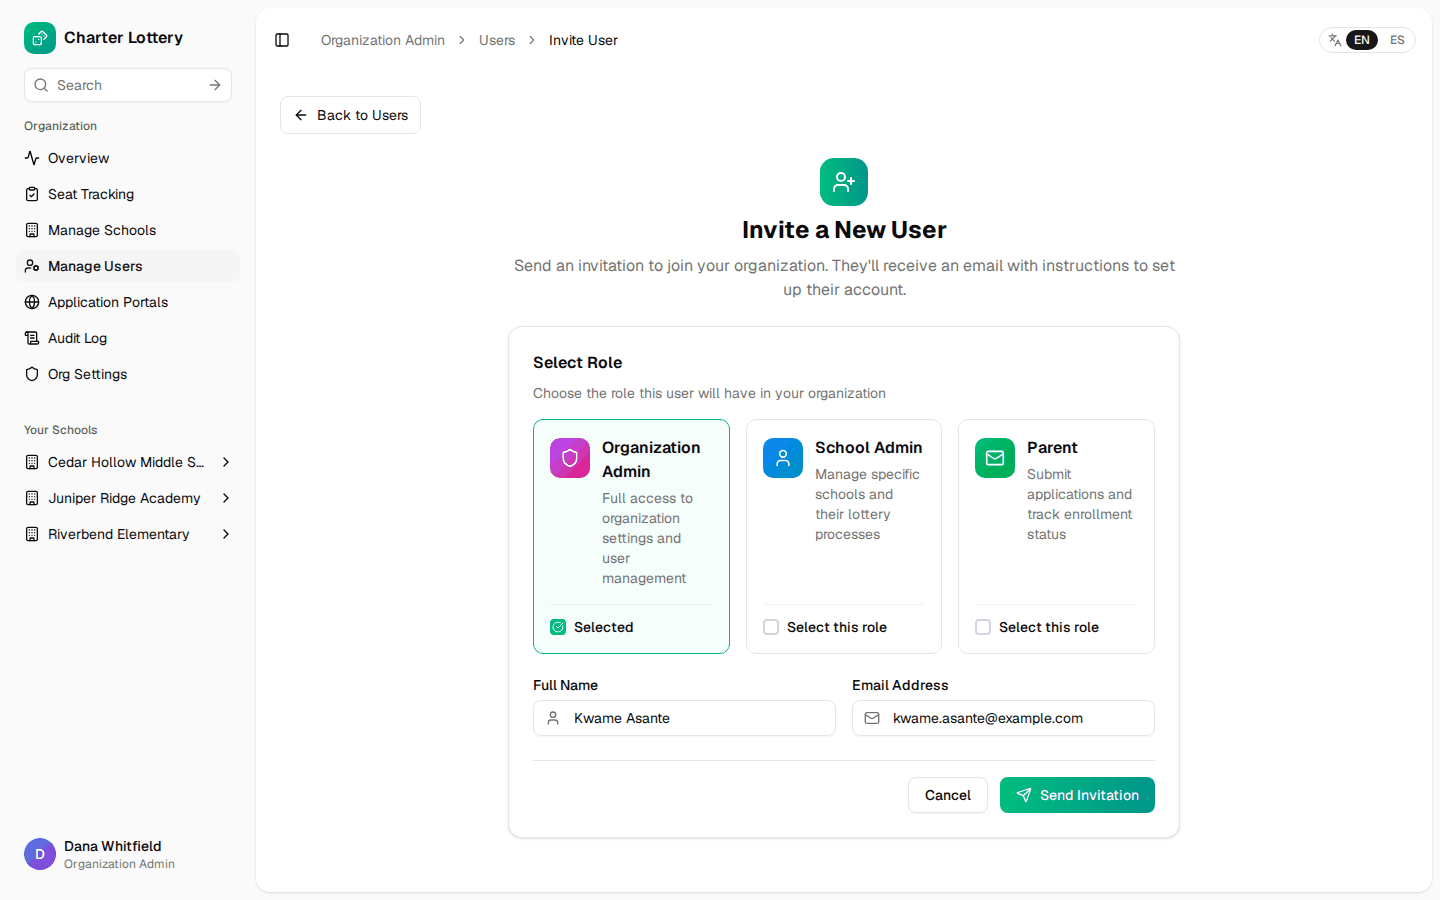
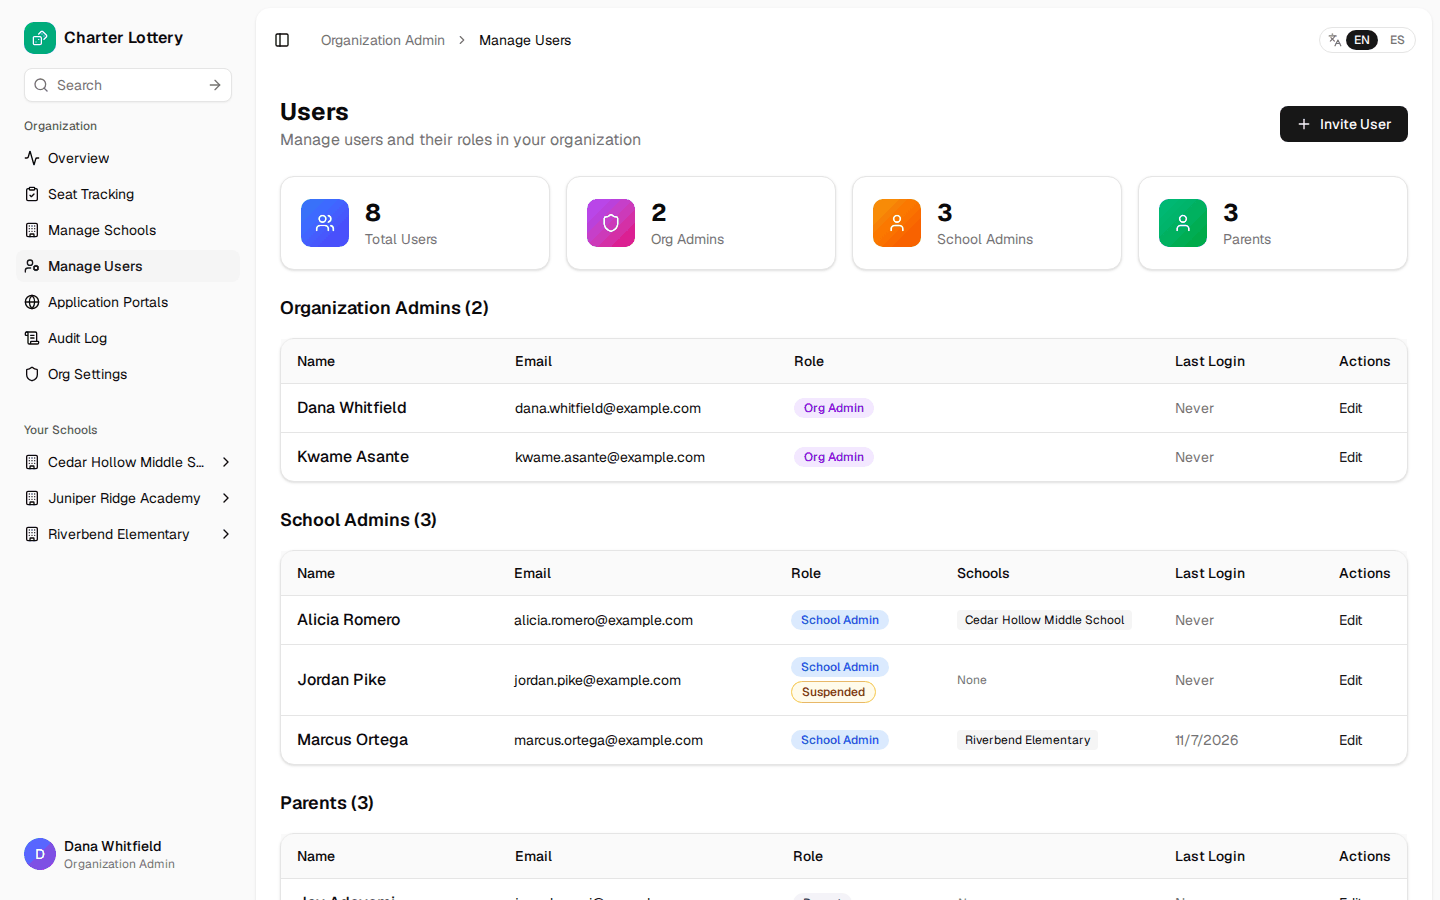
Manage Users lists everyone by role and marks suspended accounts. Select Invite User, choose School Admin, enter the name and email and tick the schools this person runs. Select Send Invitation.
Step 7. Invite another organization admin
Choose Organization Admin instead. An organization admin covers every school, the users, the settings, billing and the application, so there is no school list. Name at least two.
Step 8. Change someone's schools or role
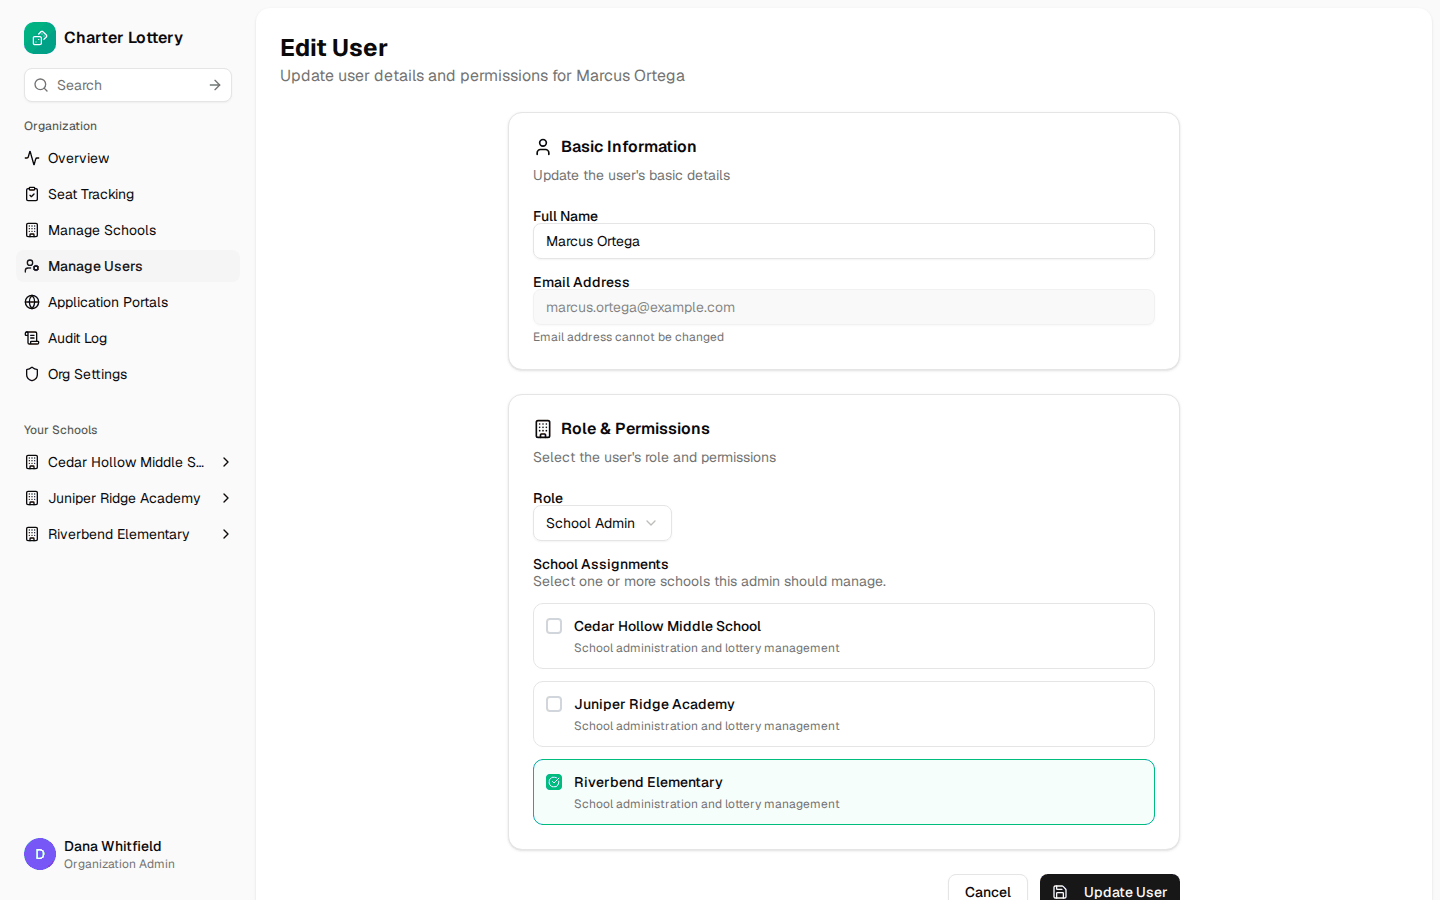
Edit beside a person changes their name, role or schools. Suspend account signs a school admin out until you reinstate them.
School admins run their own schools' seasons. They cannot invite staff, change settings or portals, edit the application, or invalidate a draw.
Part 3 · Settings that reach families
Step 9. Organization settings
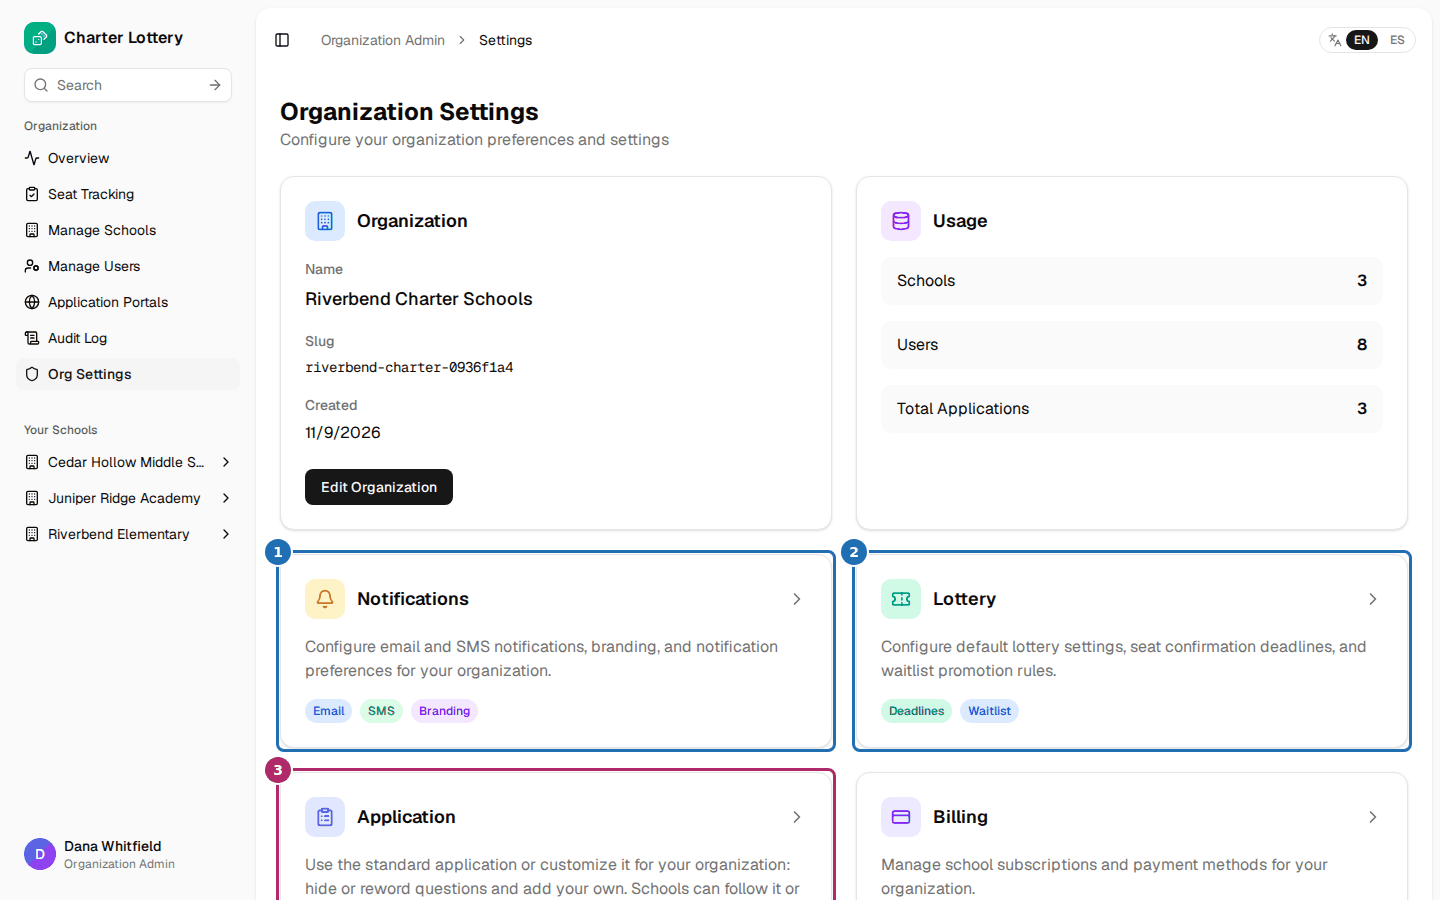
Org Settings links to Notifications (1), Lottery (2) and the Application (3), which most of this guide is about. Billing is there too: $999 per school per year, needed when a school runs its lottery.
Step 10. Your logo and colors
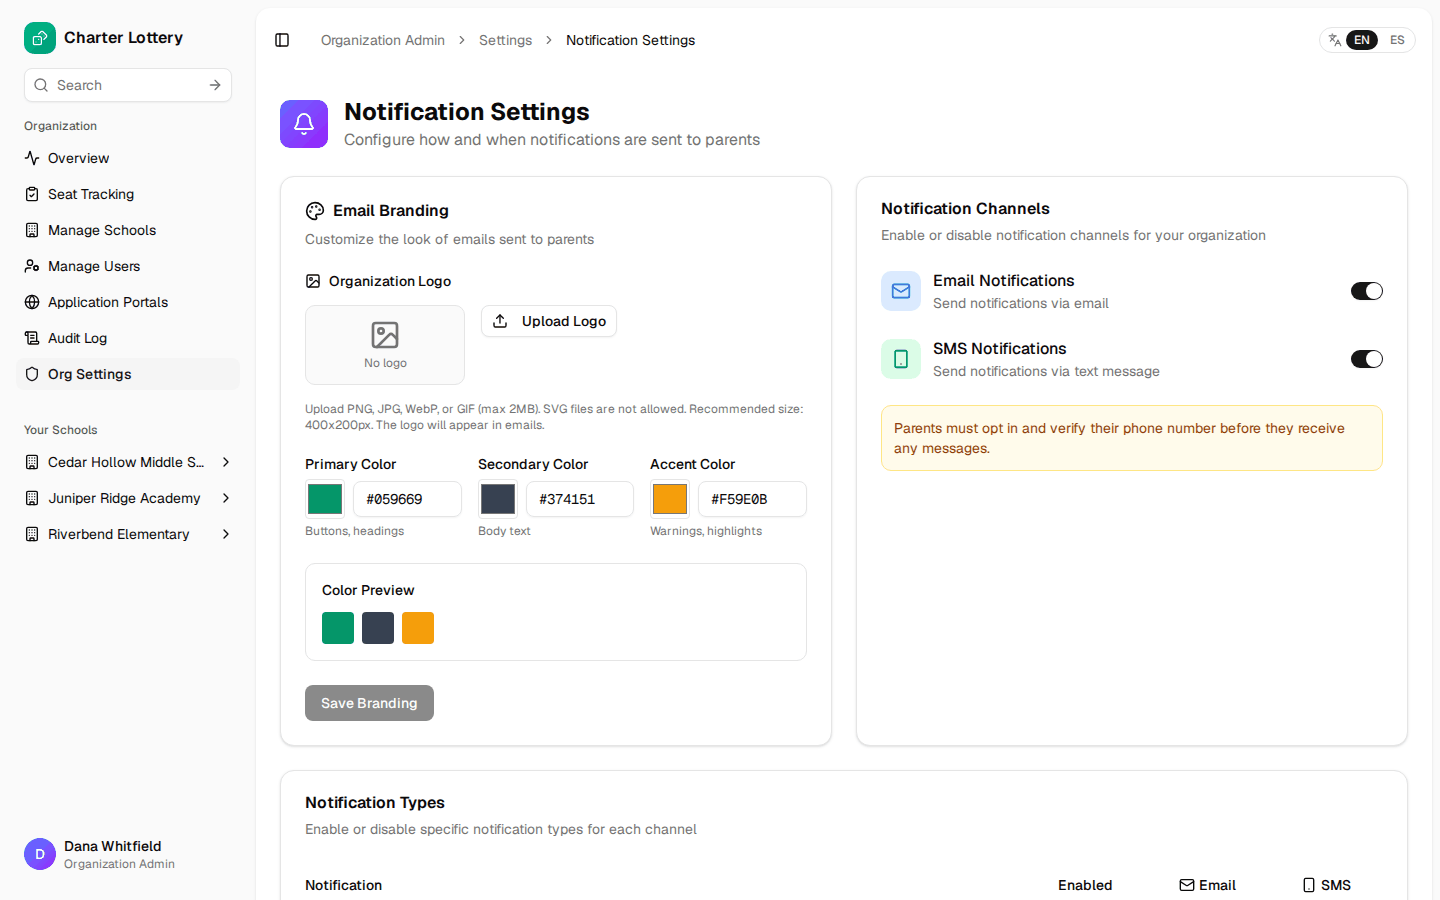
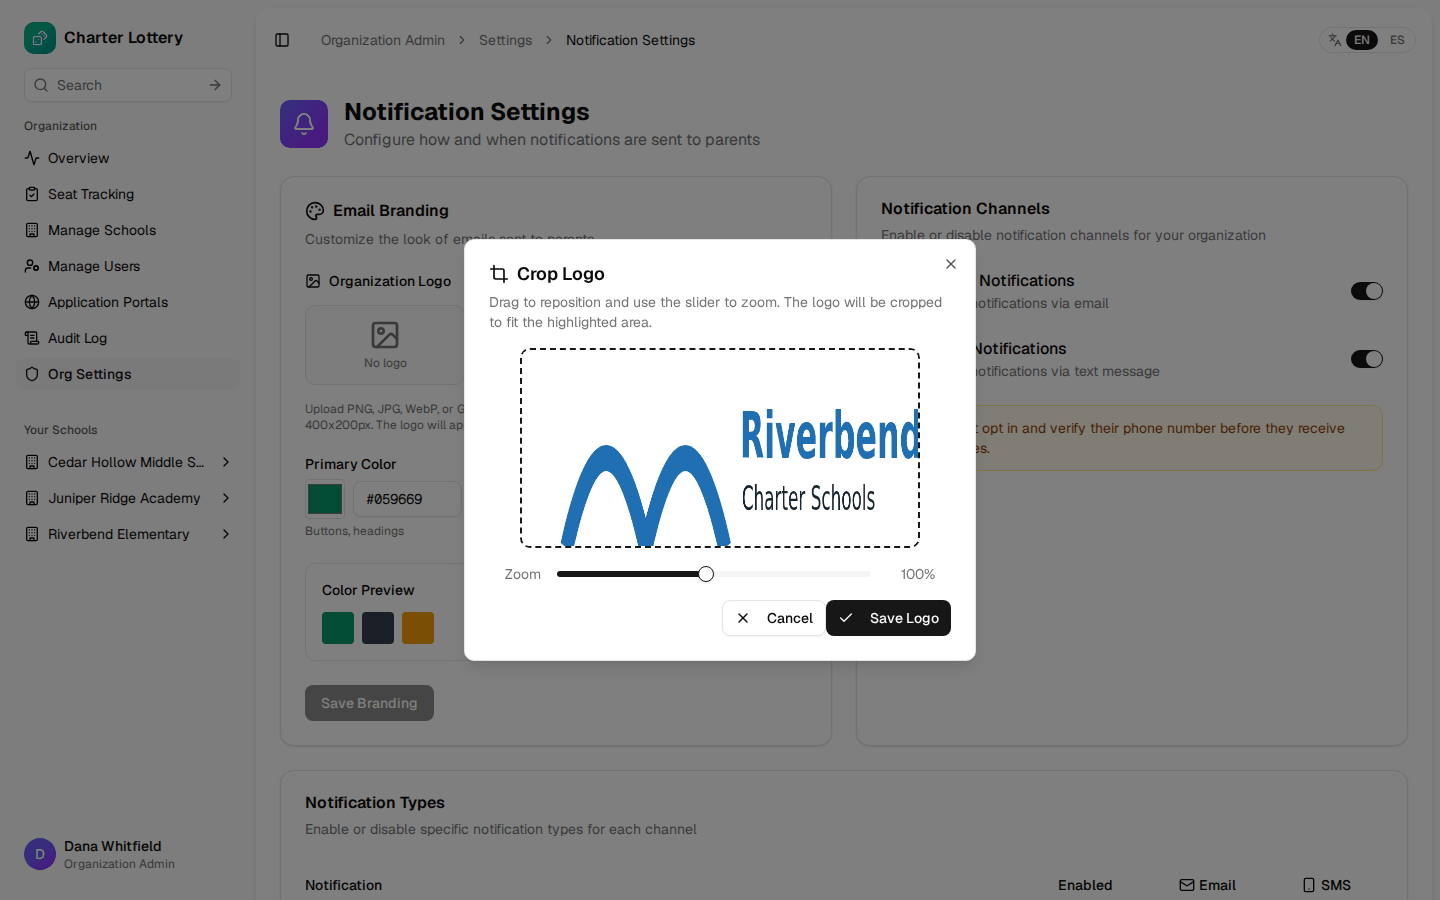
Under Notifications, select Upload Logo. PNG, JPG, WebP or GIF up to 2 MB is accepted; SVG is not. Crop it to the box, select Save Logo, then set the colors and select Save Branding. The logo appears at the top of the emails families receive.
Step 11. Which notices go out
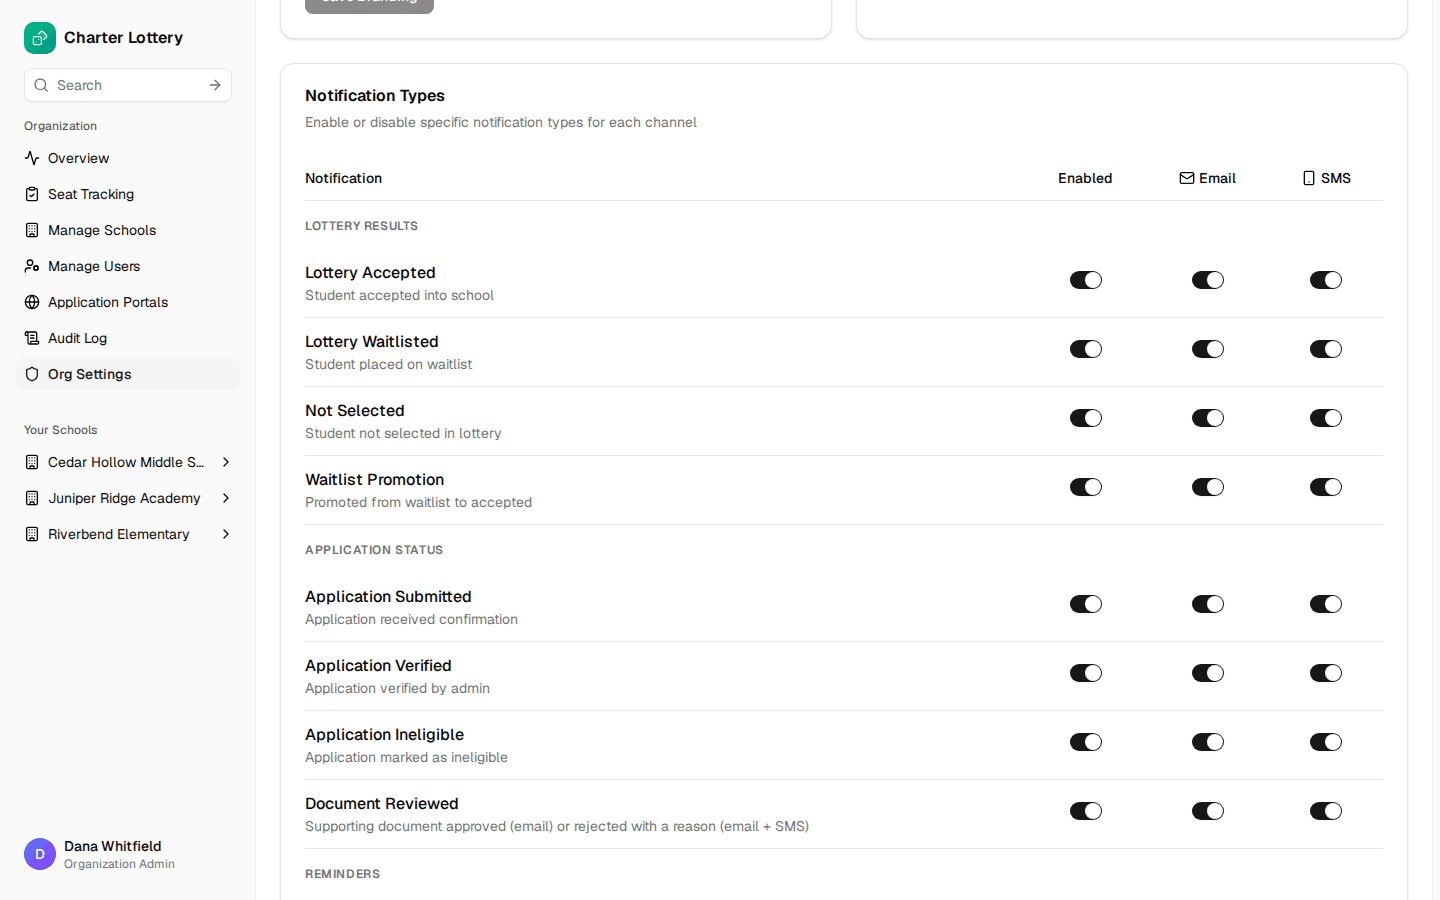
Turn email and text messages on or off for the organization, then choose each notice by channel. Families also have to verify a mobile number and agree before they get any text.
Step 12. Lottery defaults
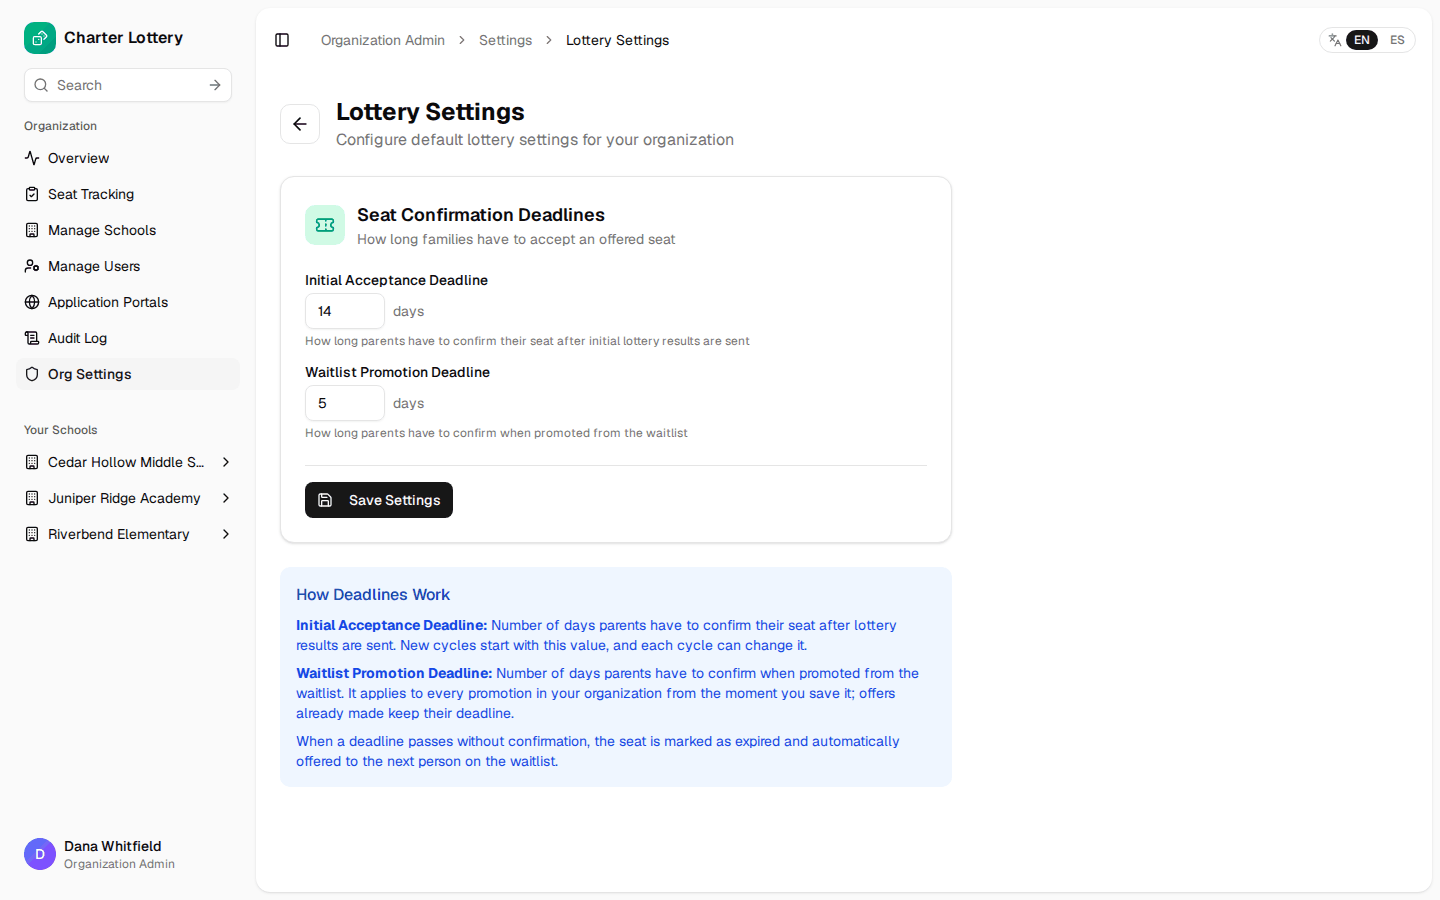
Set how long families have to accept a first offer and how long they have when promoted from the waitlist. Each new cycle starts with the first value and can change it; the second applies to every promotion.
Part 4 · Build your application
Step 13. Open the Application page
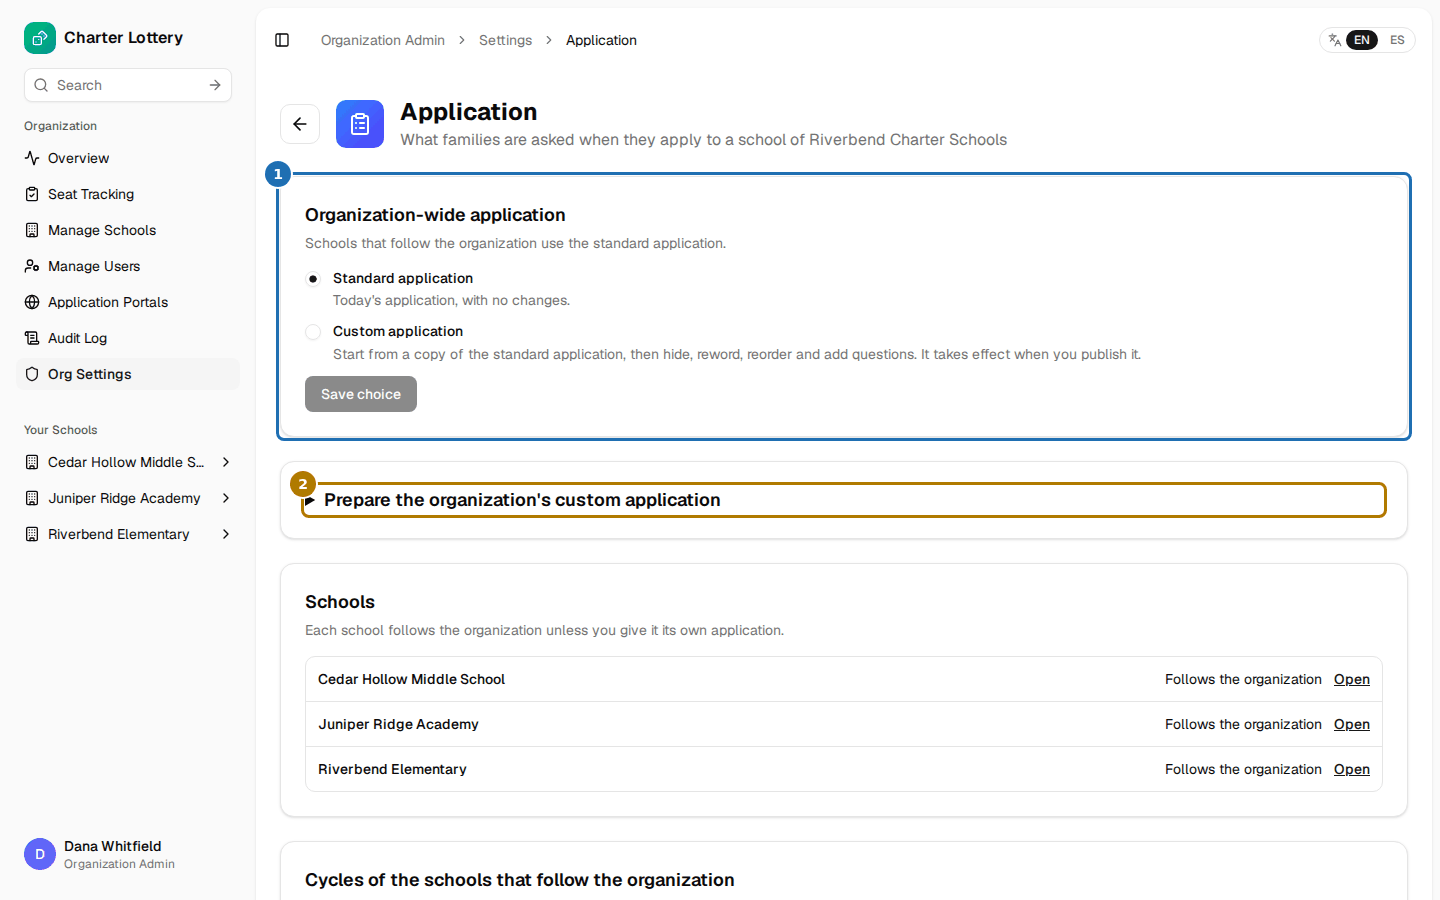
Choose Org Settings → Application. Every organization starts on the Standard application (1); Custom application starts from a copy of it.
Prepare the organization's custom application (2) builds and publishes it while schools keep the standard one. This guide does that, then switches.
Step 14. Start from the standard copy
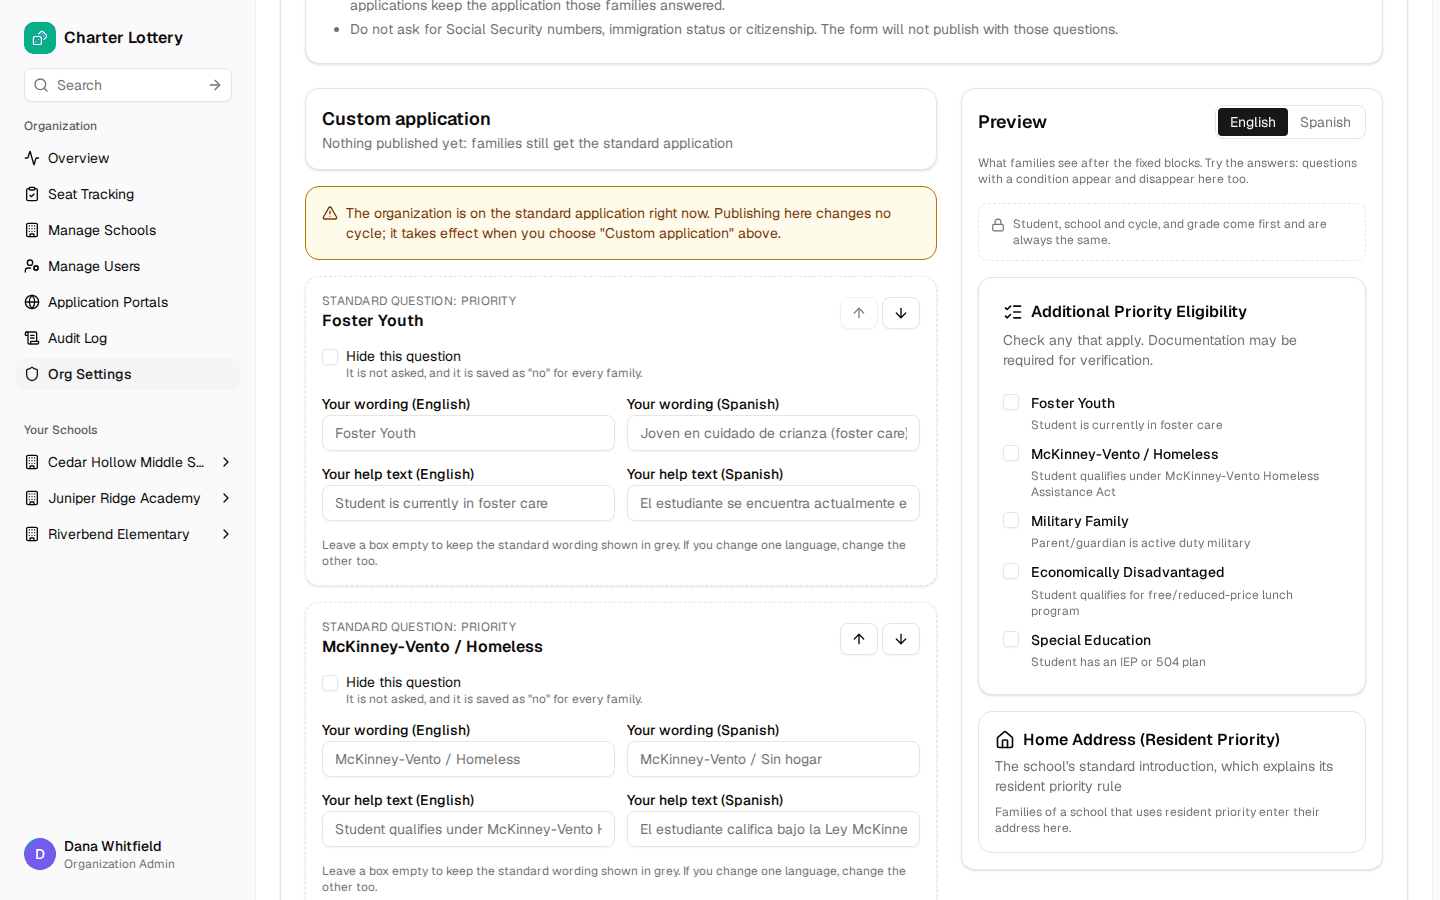
Open Prepare the organization's custom application. The editor lists the five priority questions and the address block, with a live Preview.
Student, school and cycle, and grade always come first and cannot change. The amber note confirms no cycle changes yet.
Step 15. Hide a priority question
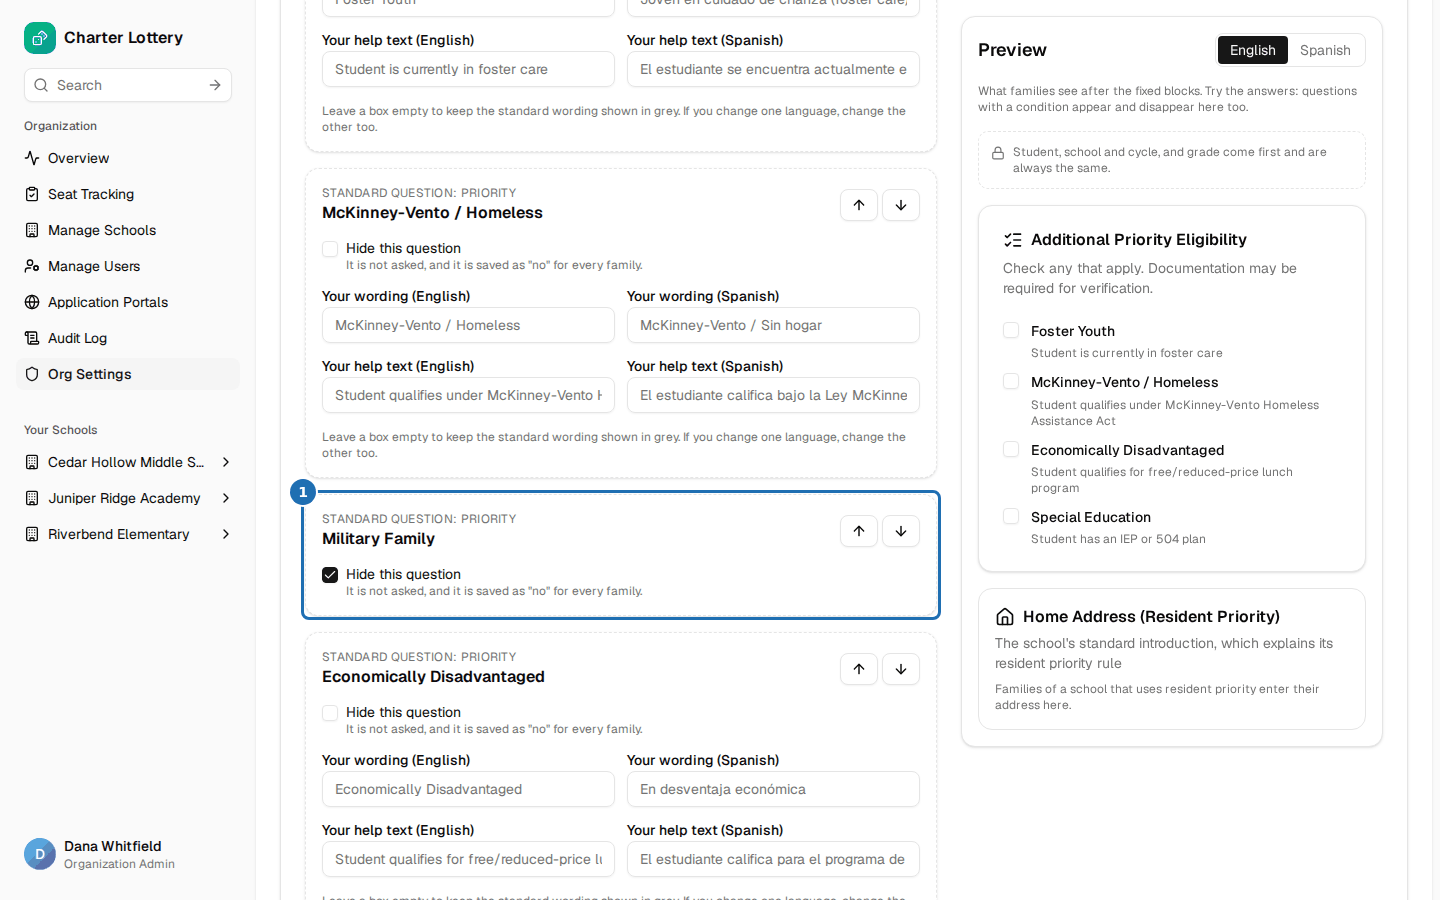
Tick Hide this question on a priority no school gives a weight to, here Military Family (1). It disappears from the preview. It is not asked and is saved as "no" for every family; staff can still set it with an audited priority override.
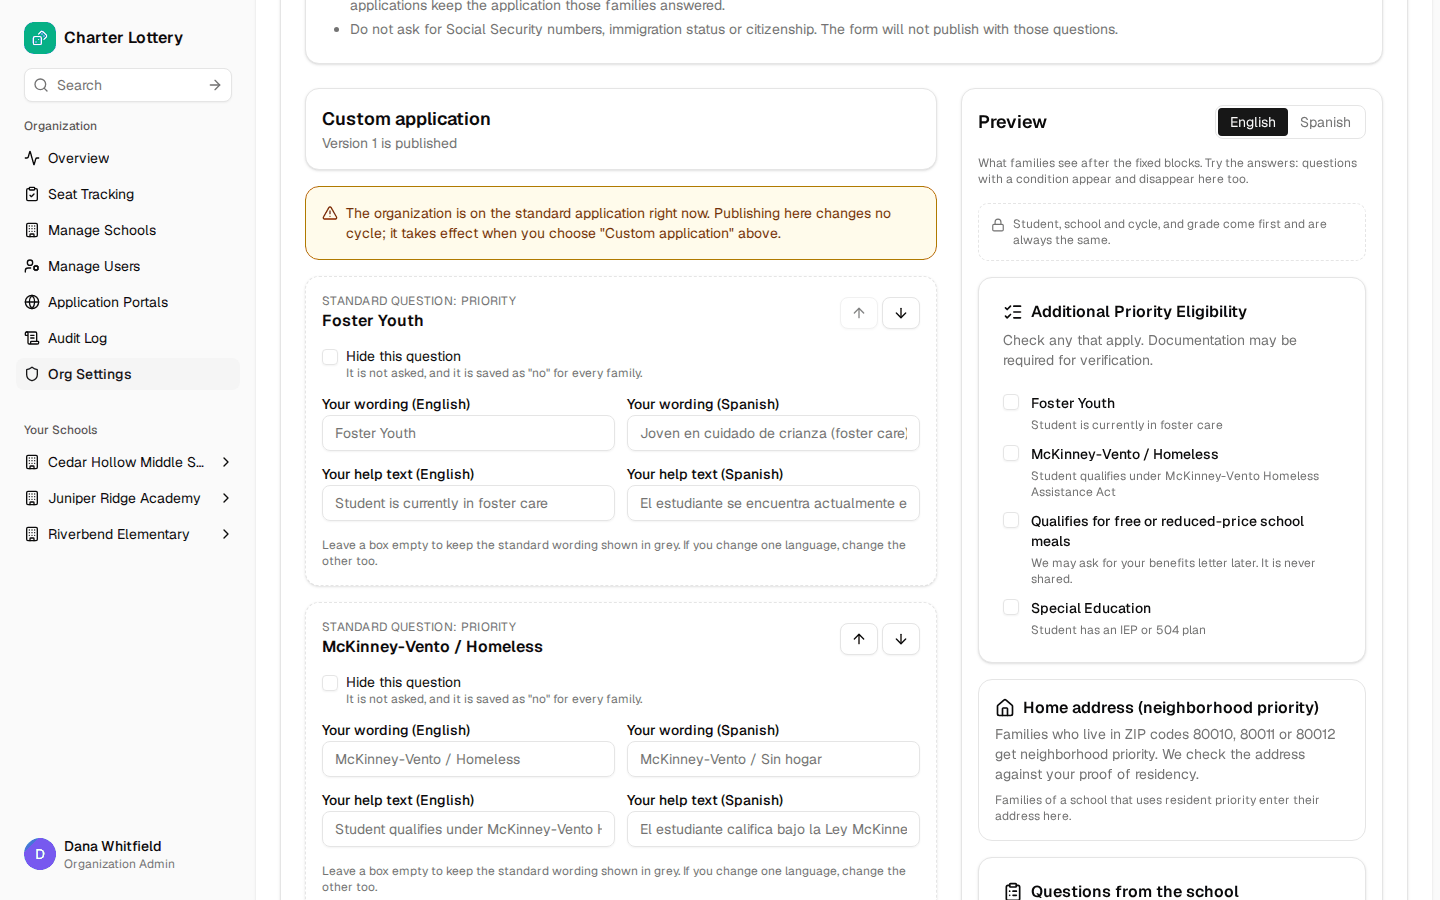
Step 16. Reword a standard question
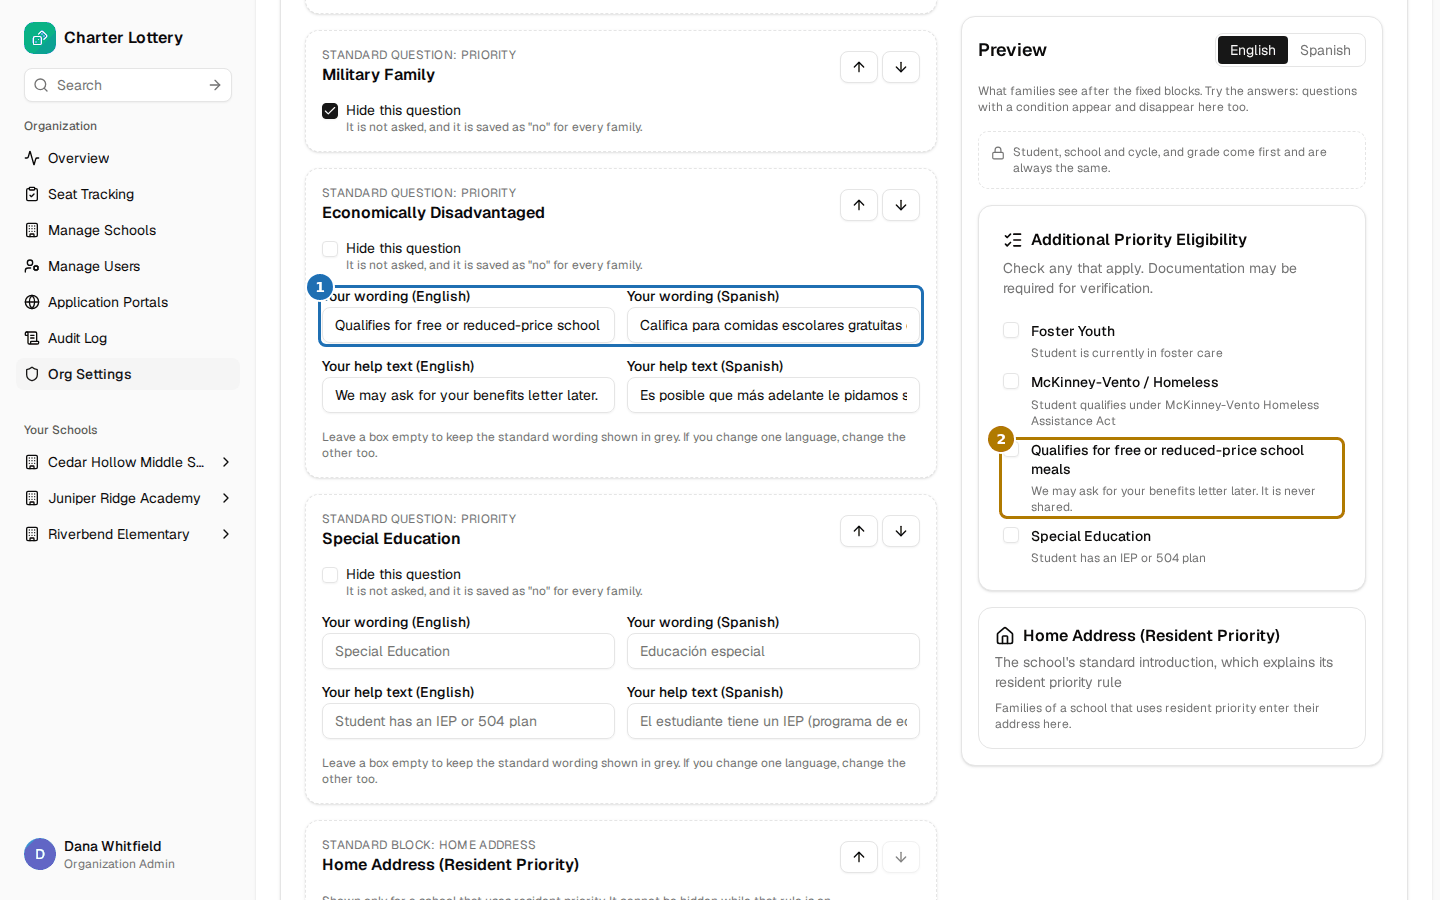
Type your wording in English and Spanish (1). The preview (2) shows it at once. Leave a box empty to keep the standard wording shown in grey, and change both languages together.
Step 17. Reword the home address block
The address block appears only at schools that use resident priority, and it cannot be hidden while that rule is on. You can give it your own title and introduction in both languages, for example naming the qualifying ZIP codes.
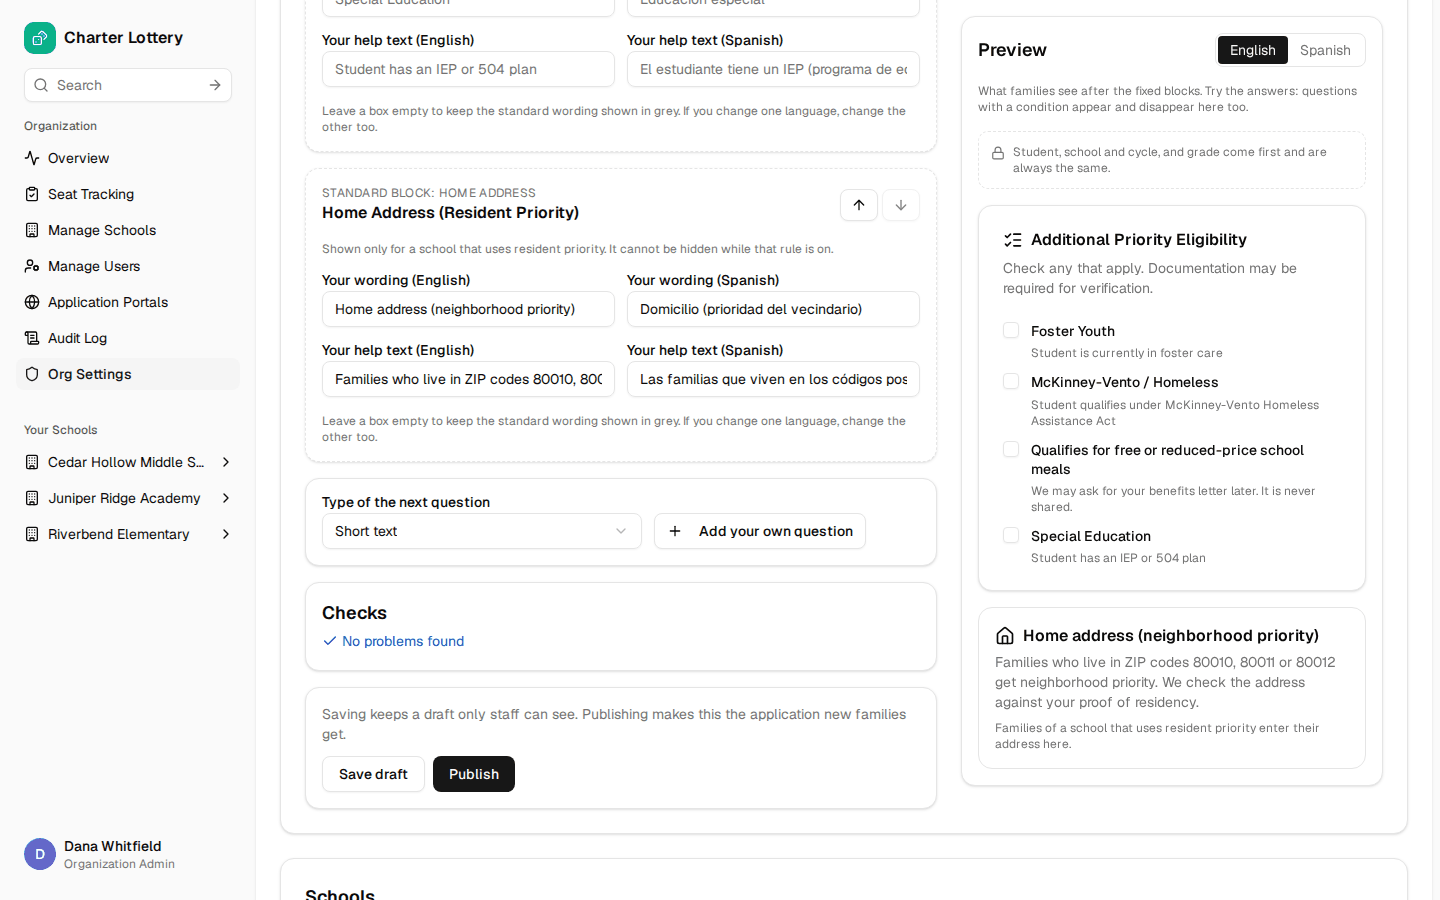
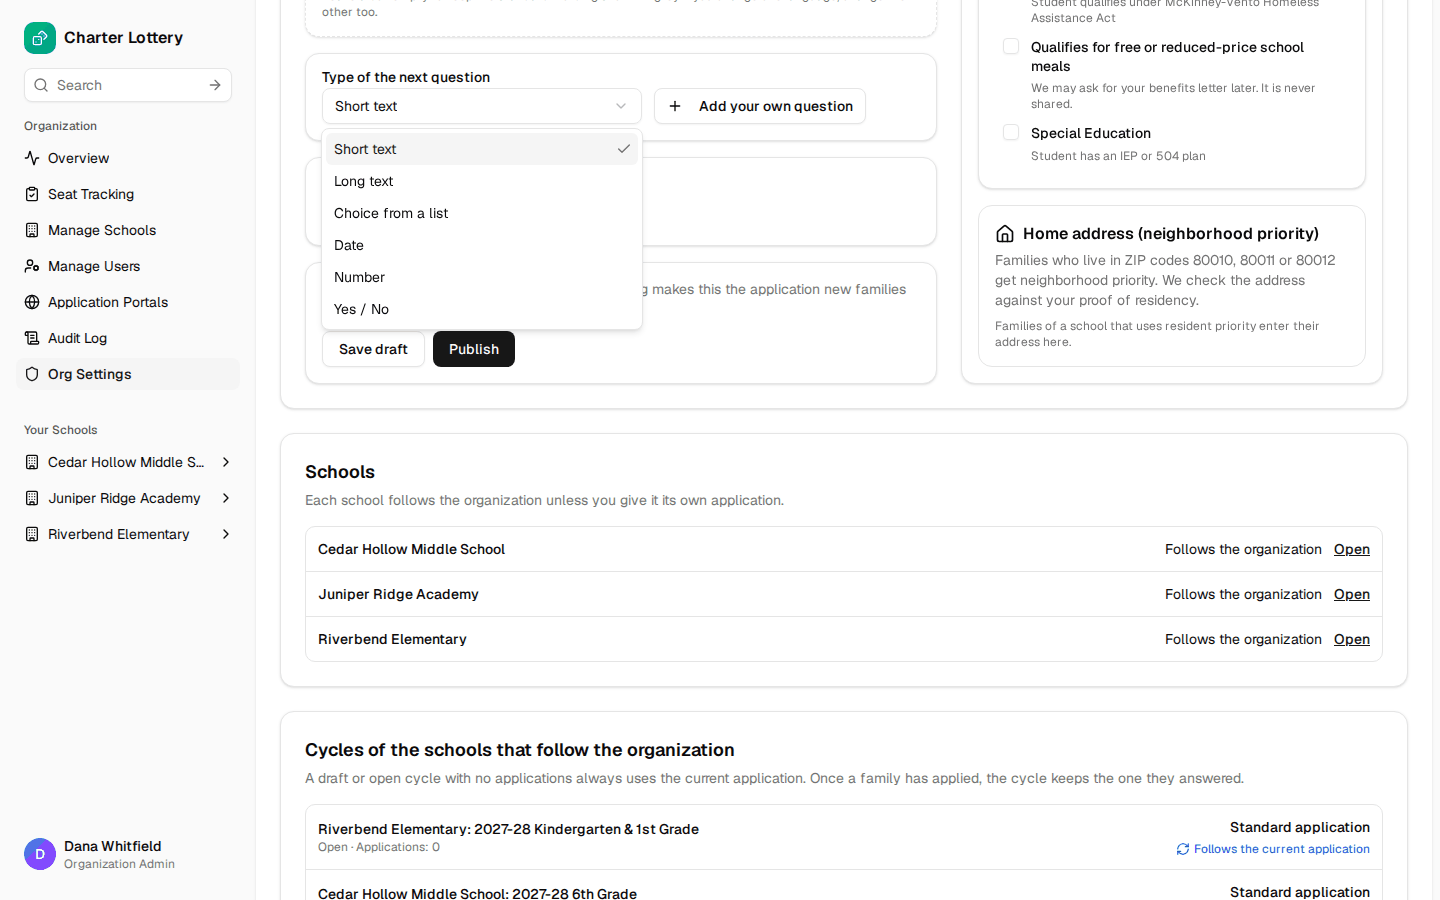
Step 18. Add your own question
Choose the Type of the next question: short text, long text, choice from a list, date, number or yes / no. Select Add your own question.
Write the question and its help text in English and Spanish. Tick Families must answer to make it required.
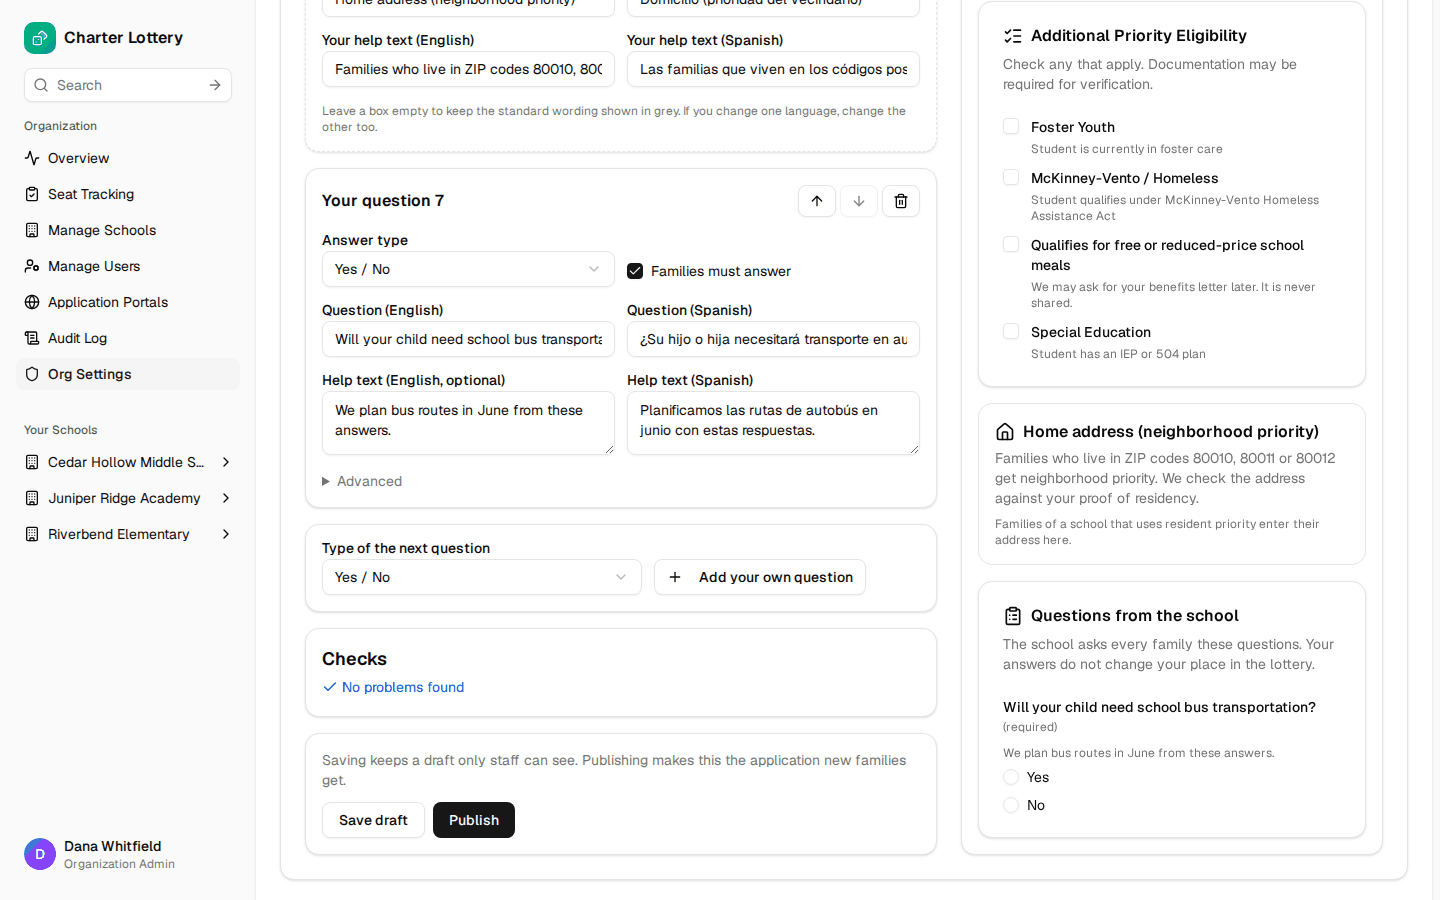
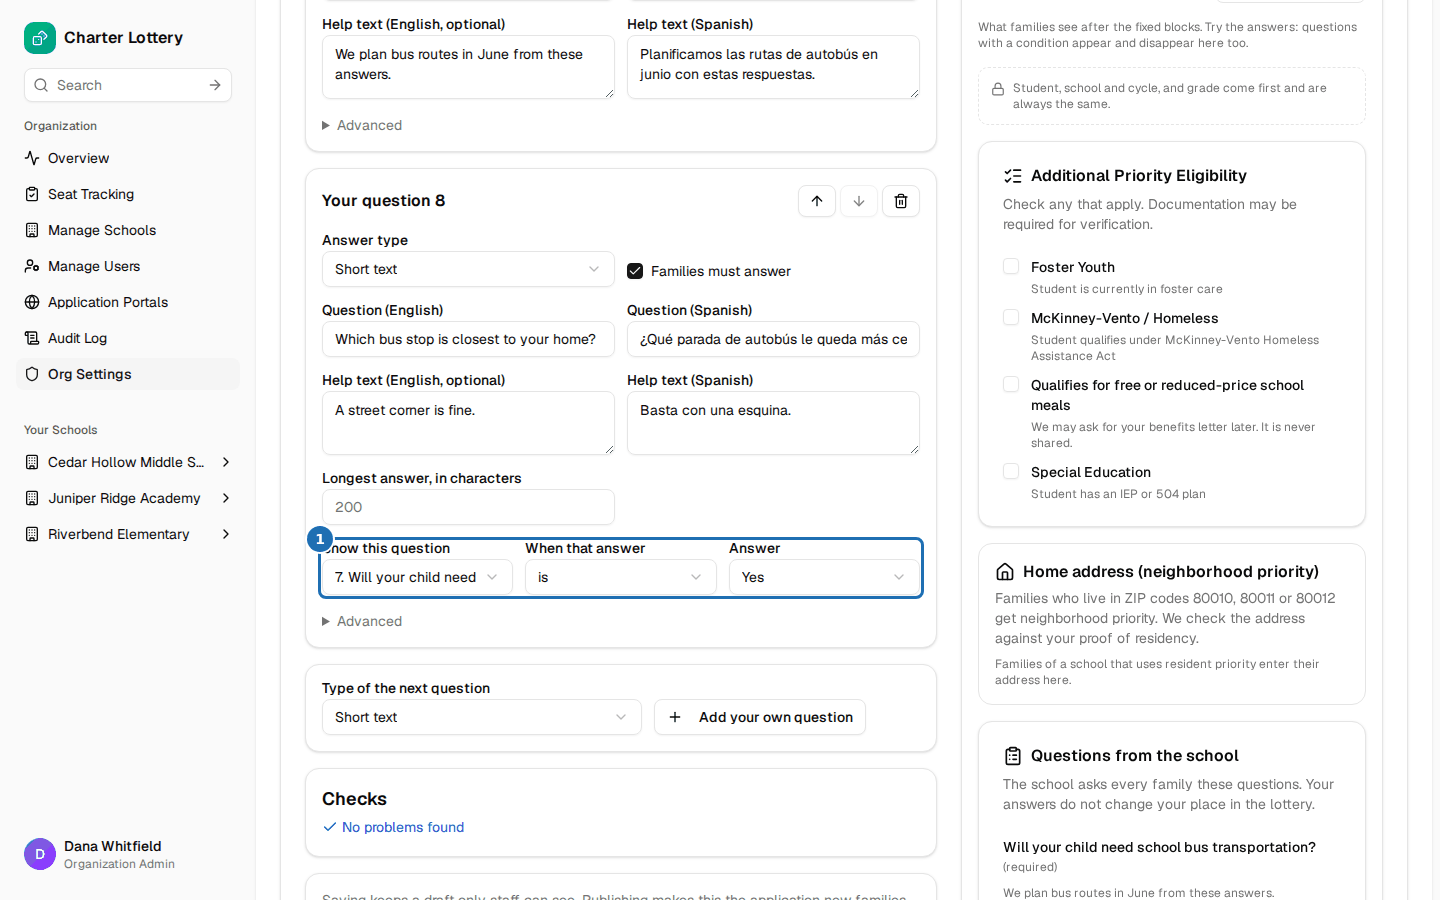
Step 19. Add a follow-up question
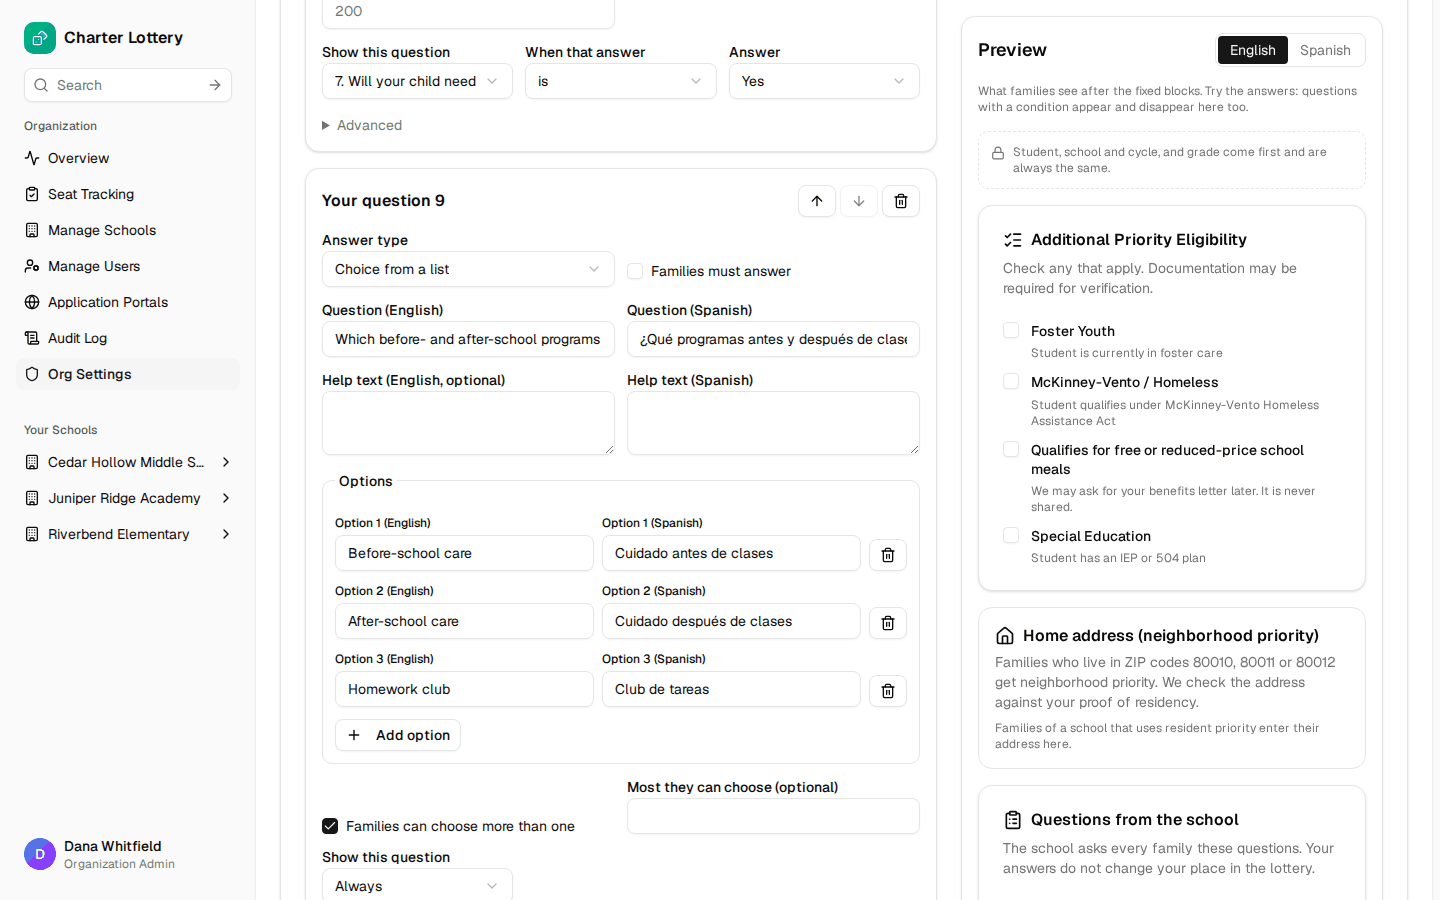
Under Show this question, pick an earlier question, then the answer that shows it (1). Here the bus-stop question appears only when a family answers Yes to bus transportation.
A condition can use only your own earlier questions, not a priority checkbox.
Step 20. Lists, long answers and limits
Each option of a Choice from a list needs English and Spanish text; tick Families can choose more than one if needed. Text, numbers and dates take limits.
Advanced → Export column ID names the question in exports. Avoid changing it after publishing.
Step 21. Let the checks guide you
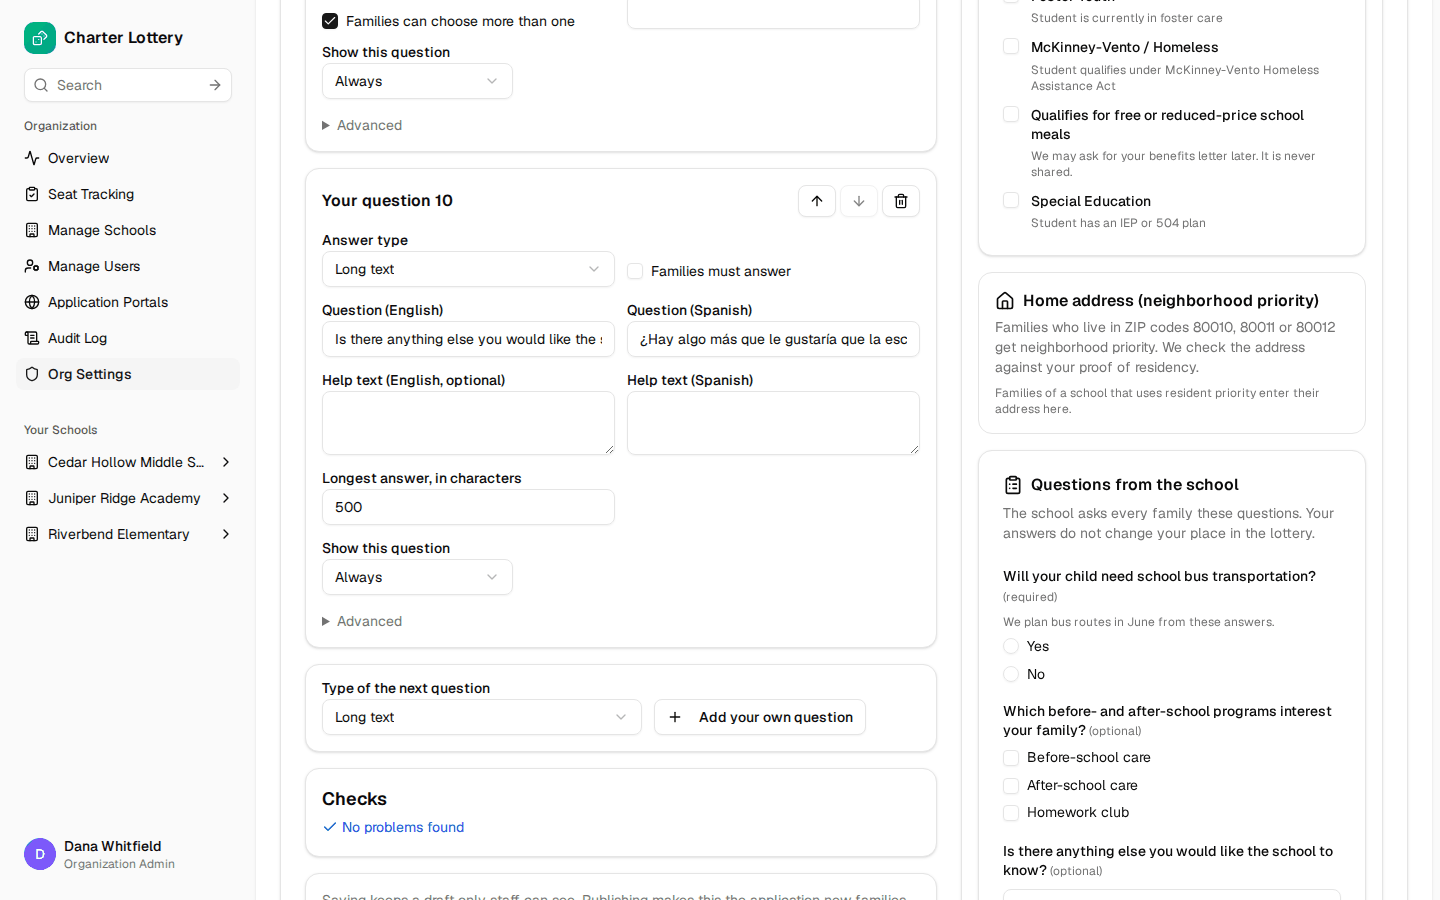
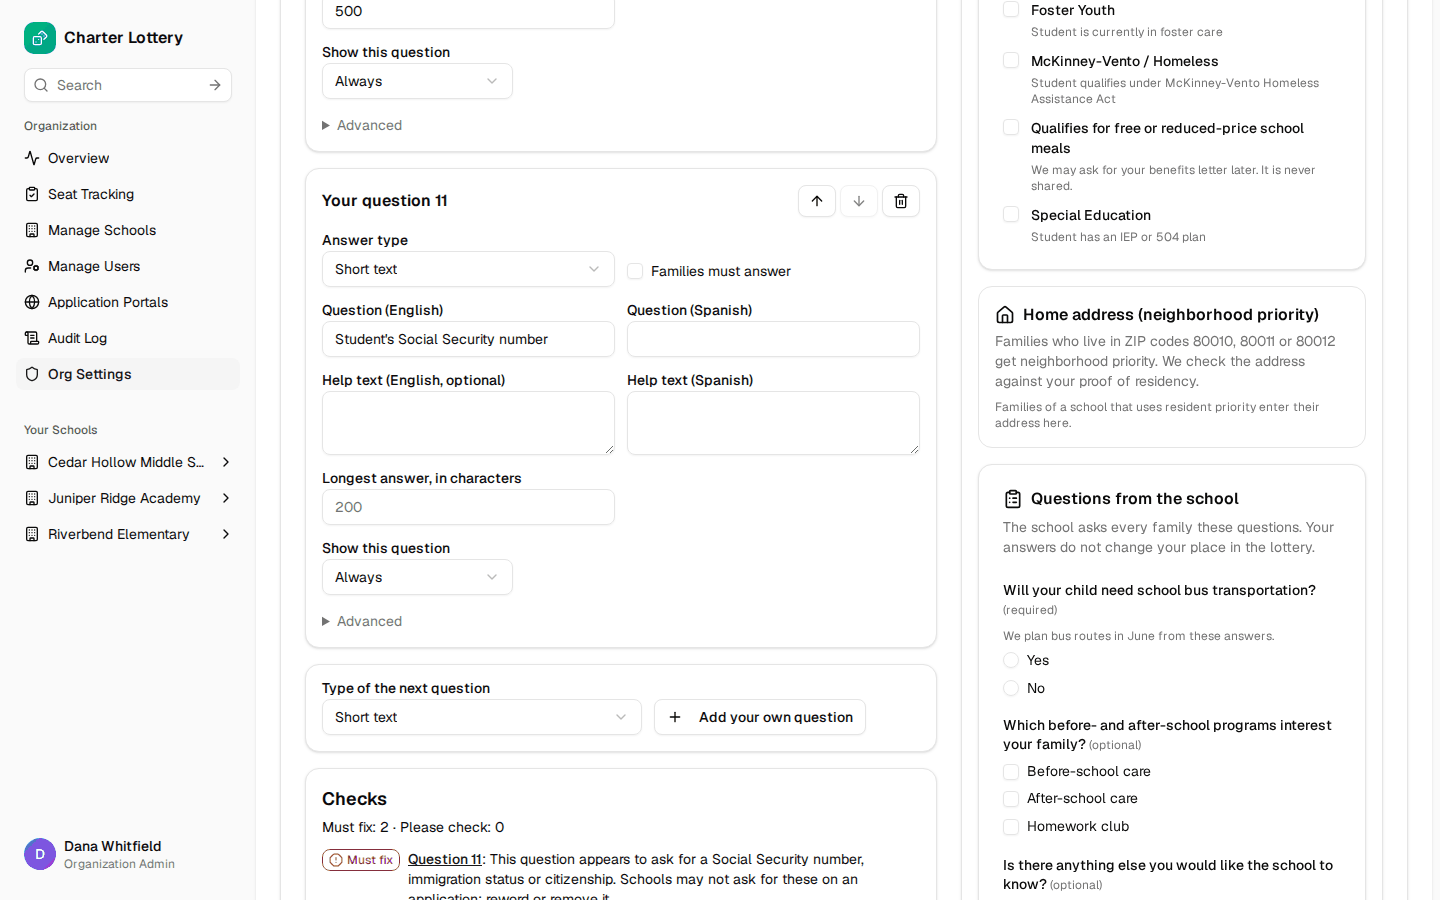
Checks lists anything to fix. Must fix blocks publishing; Please check is a warning, such as a missing Spanish translation. Here a question asking for a Social Security number is refused, so it is removed with the bin button.
Step 22. Change the order
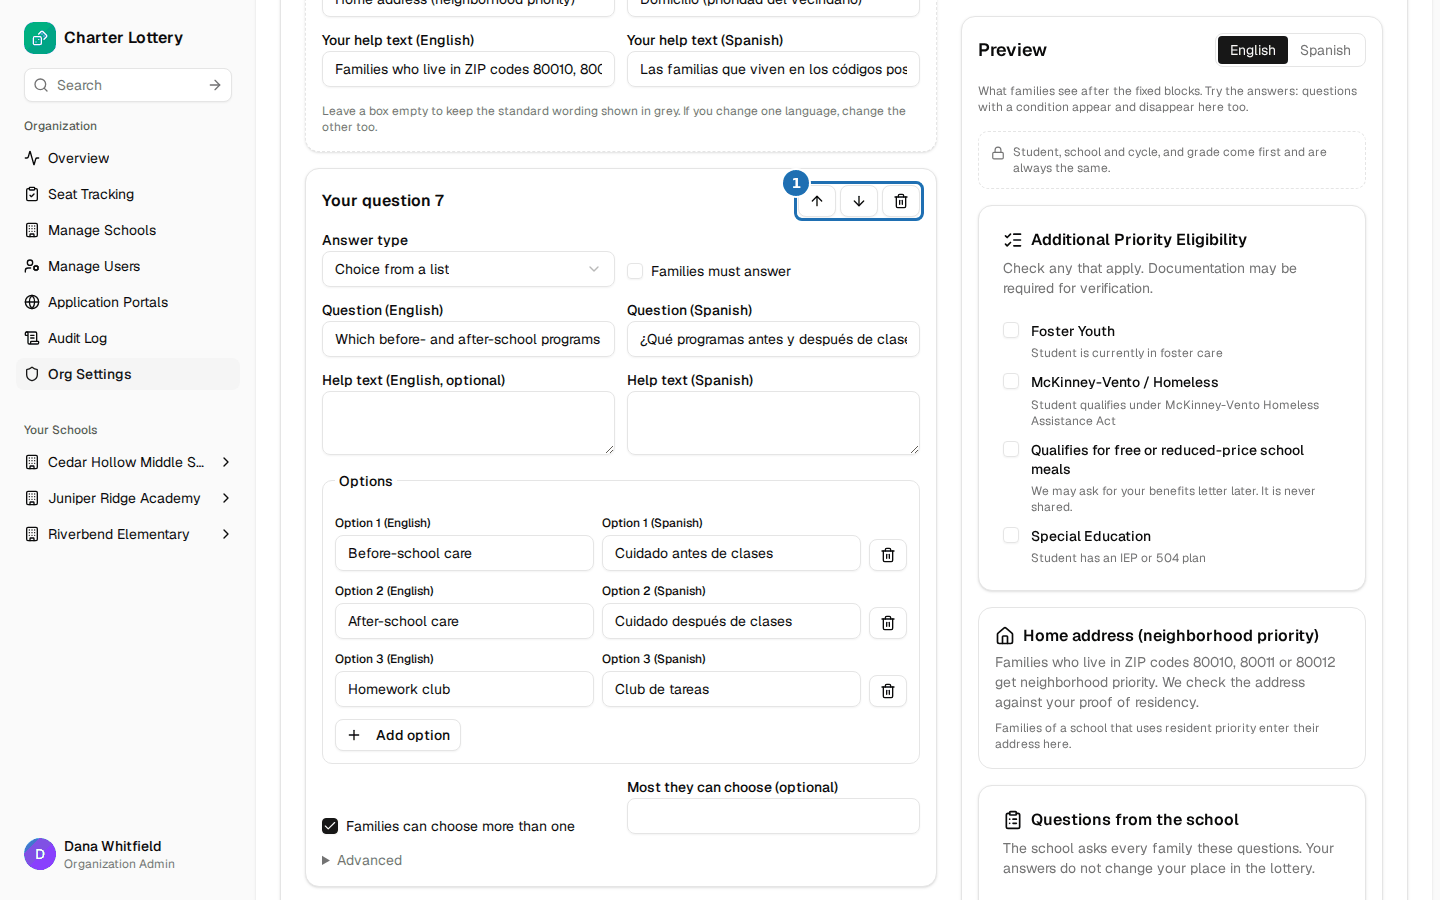
Use the arrows (1) to move any card up or down, standard ones included. Here the programs question now comes before the bus questions. A follow-up must stay below the question it depends on.
Step 23. Preview in English and Spanish
The preview is what families see after the fixed blocks, and its answers work: choosing Yes shows the bus-stop question (1). Select Spanish to read it in Spanish. Nothing typed in the preview is saved.
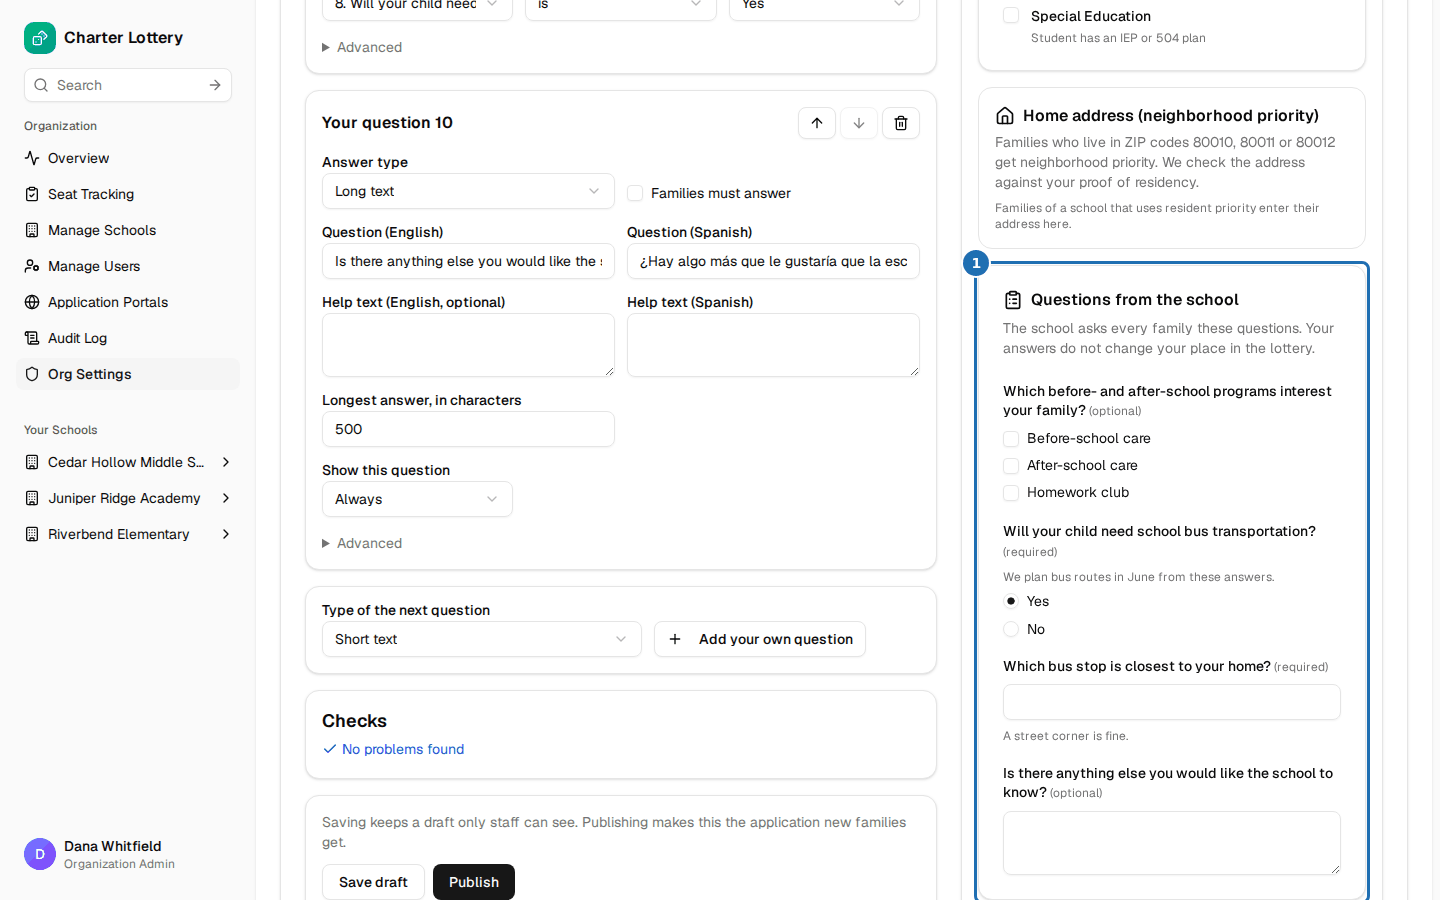
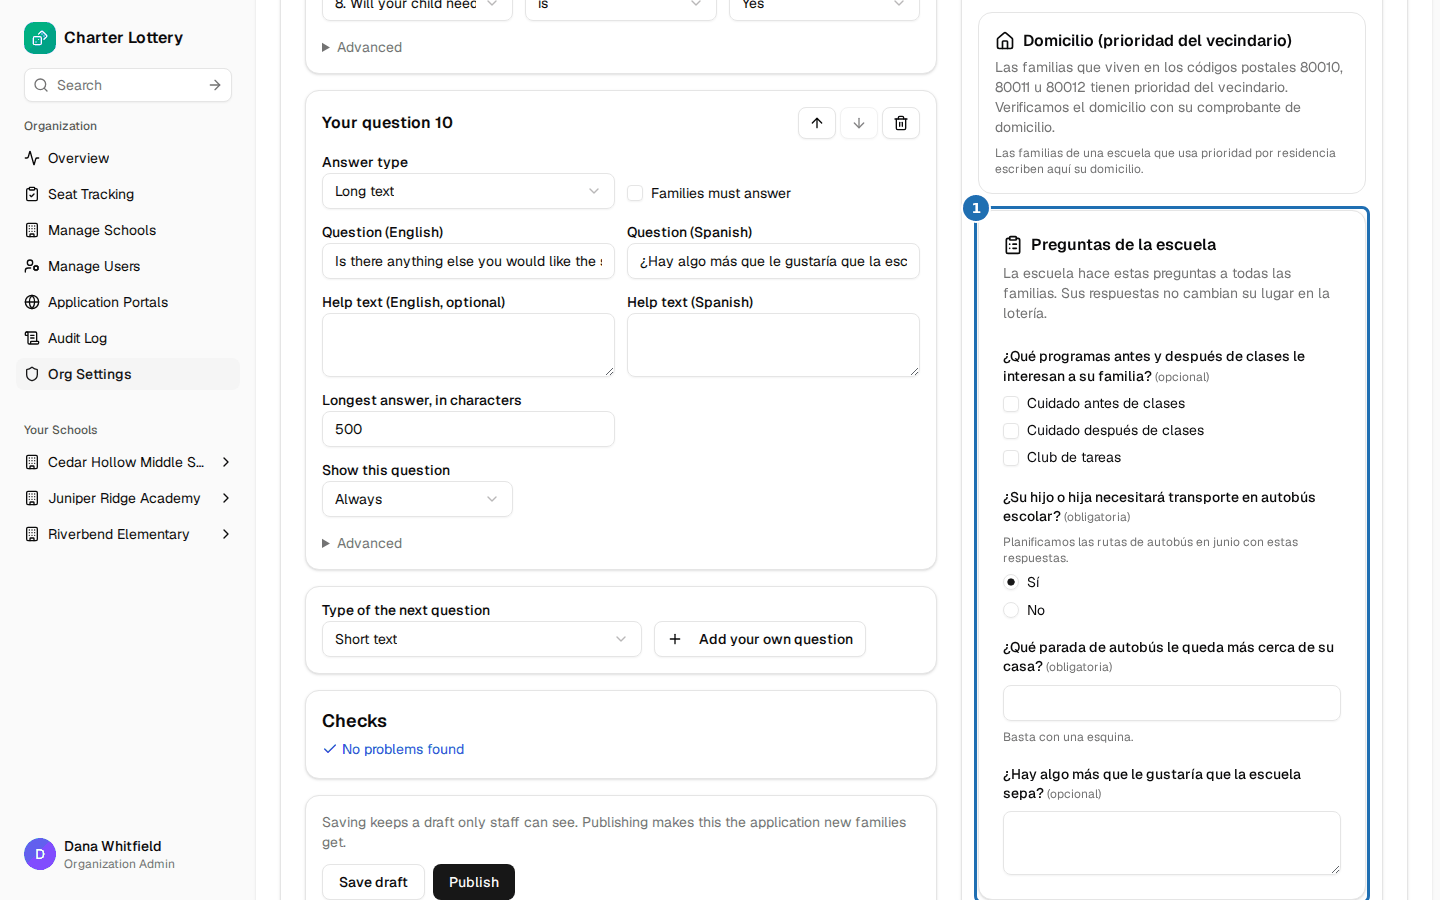
Step 24. Save a draft, then publish
Save draft keeps your work where only staff can see it. Publish creates version 1. A published version cannot be changed: to change it later you publish version 2.
While the organization is on Standard, the confirmation says no cycle will change.
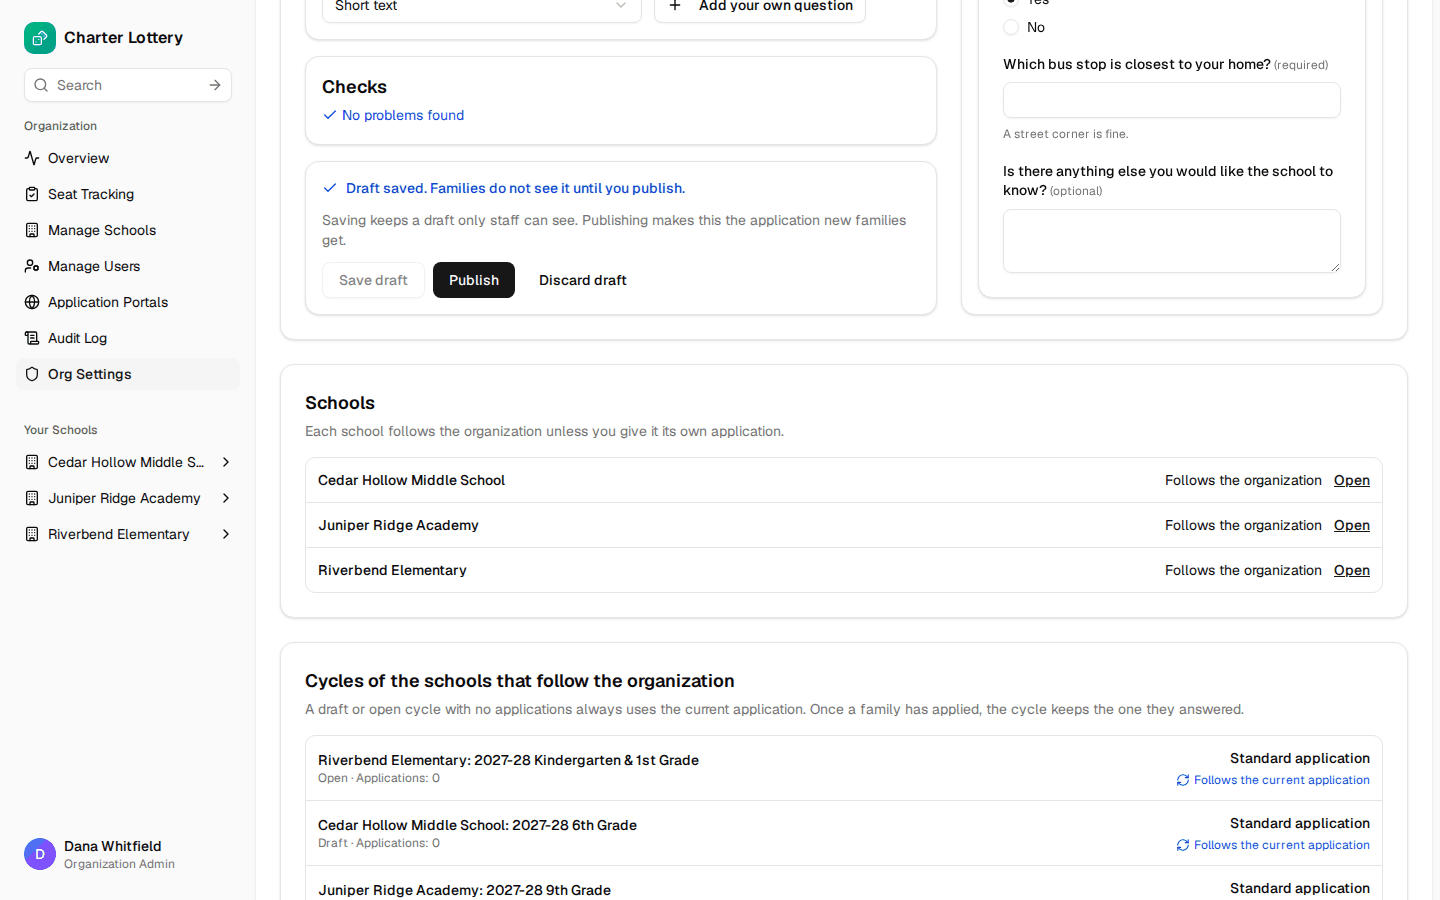
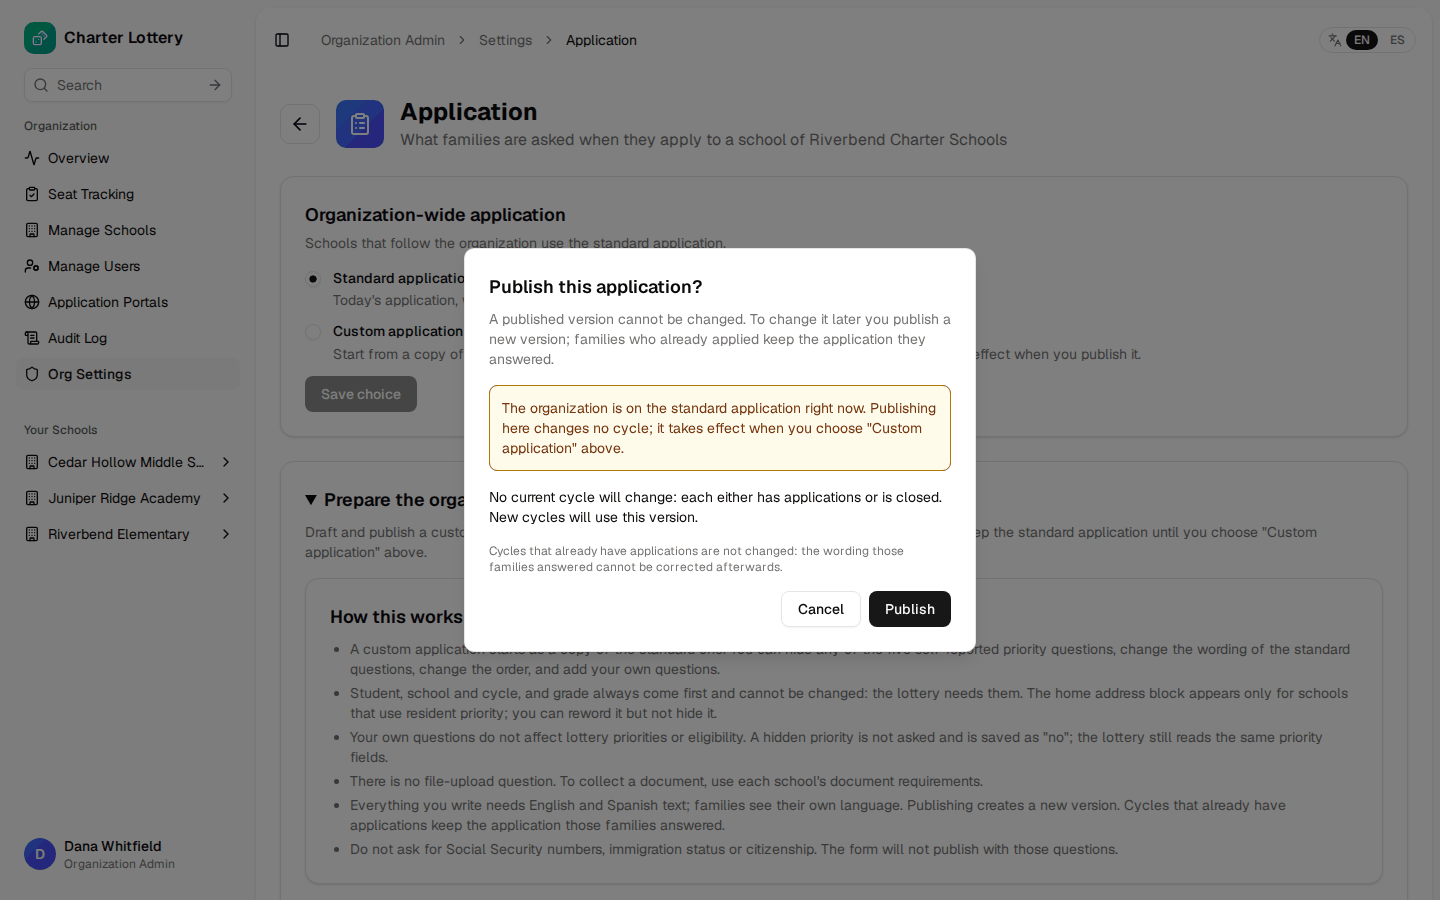
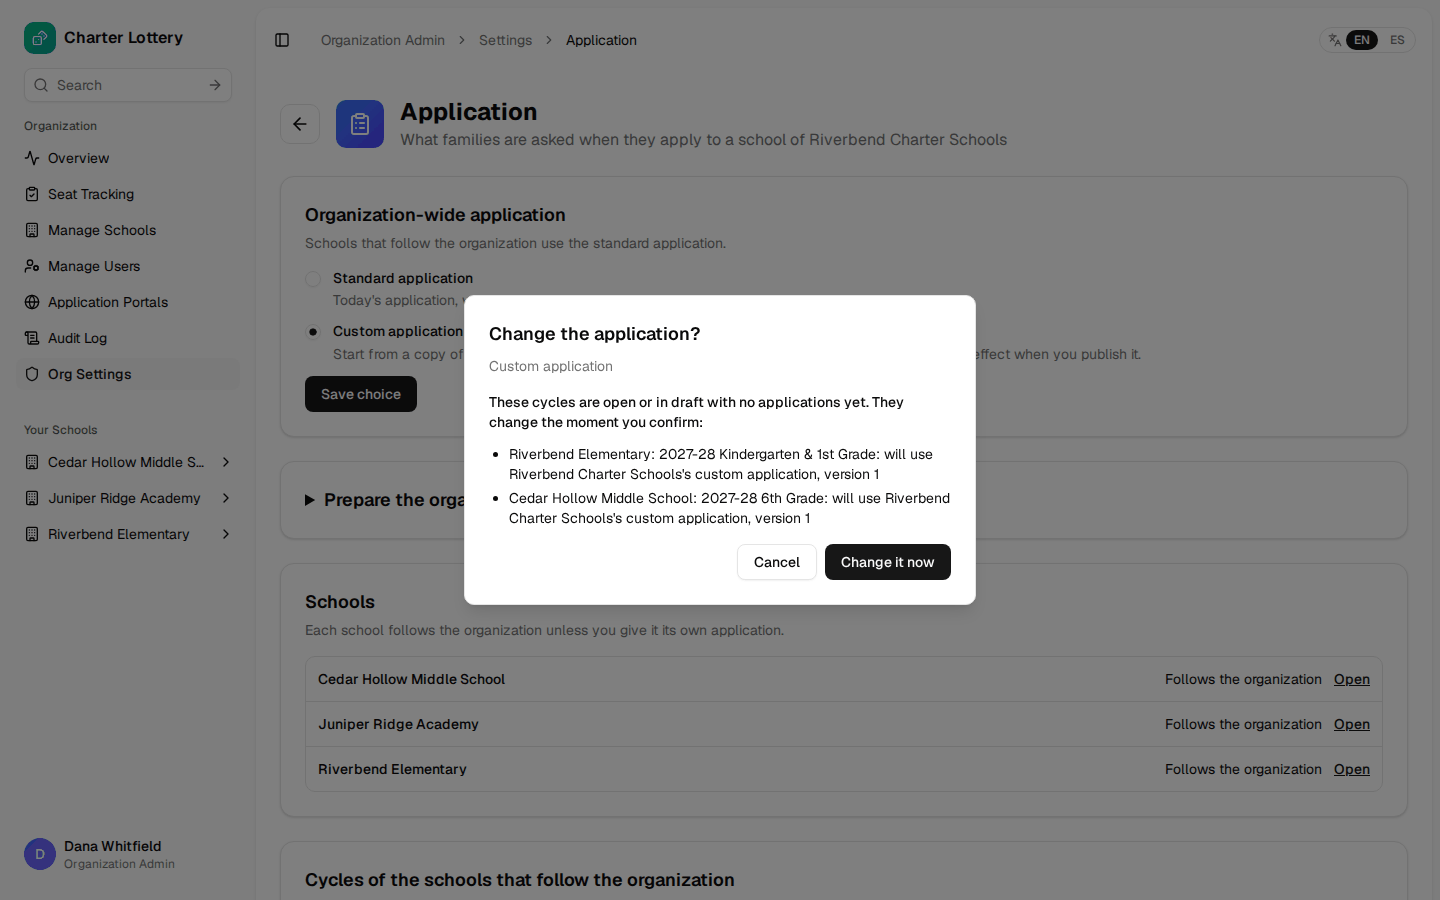
Step 25. Switch the organization to Custom
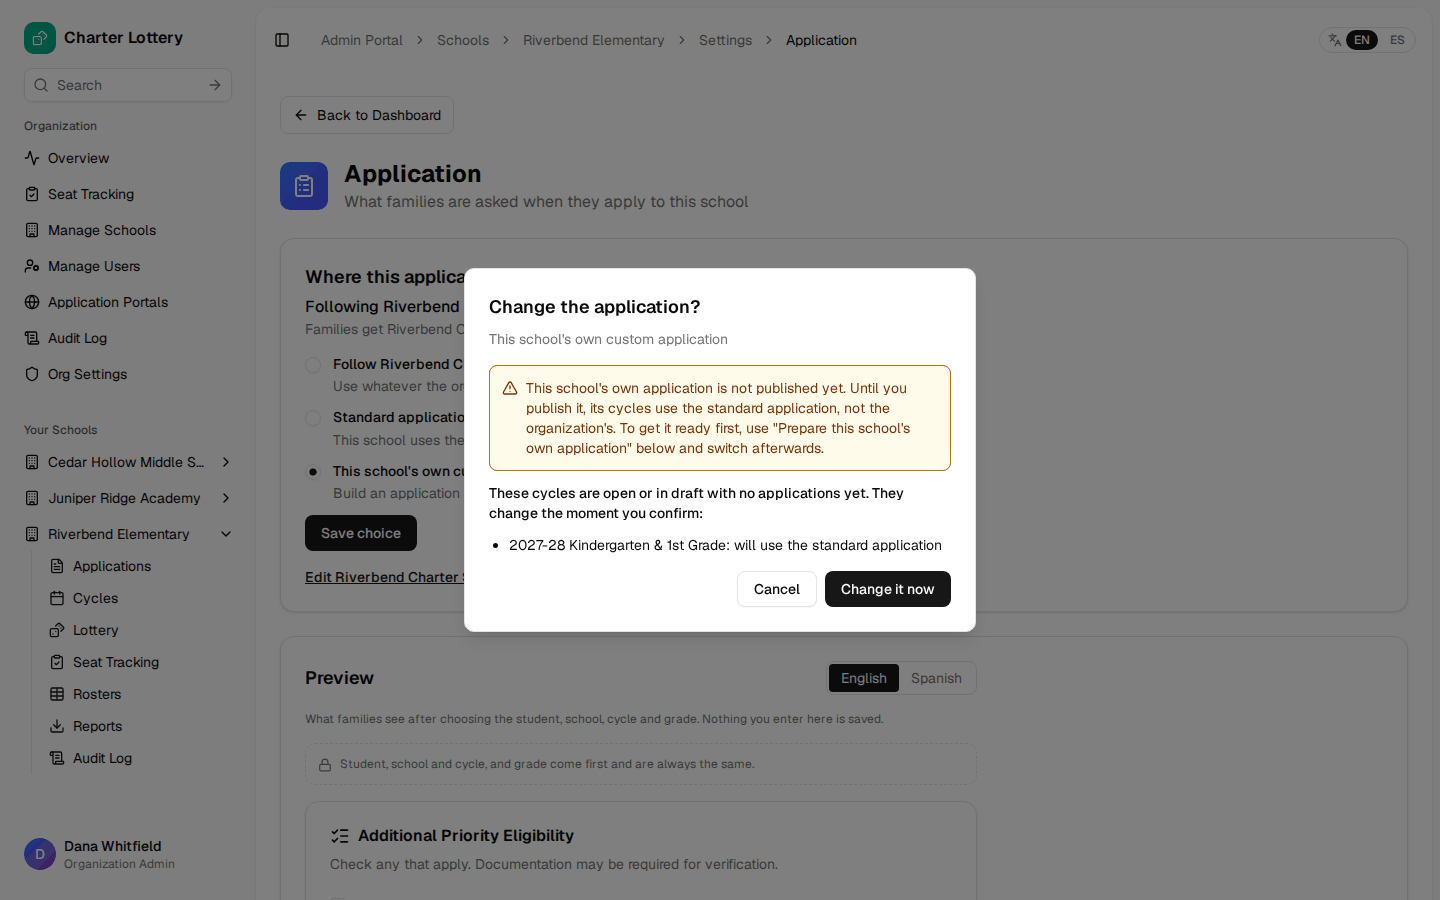
Select Custom application, then Save choice. The dialog lists each open or draft cycle with no applications; they change when you select Change it now.
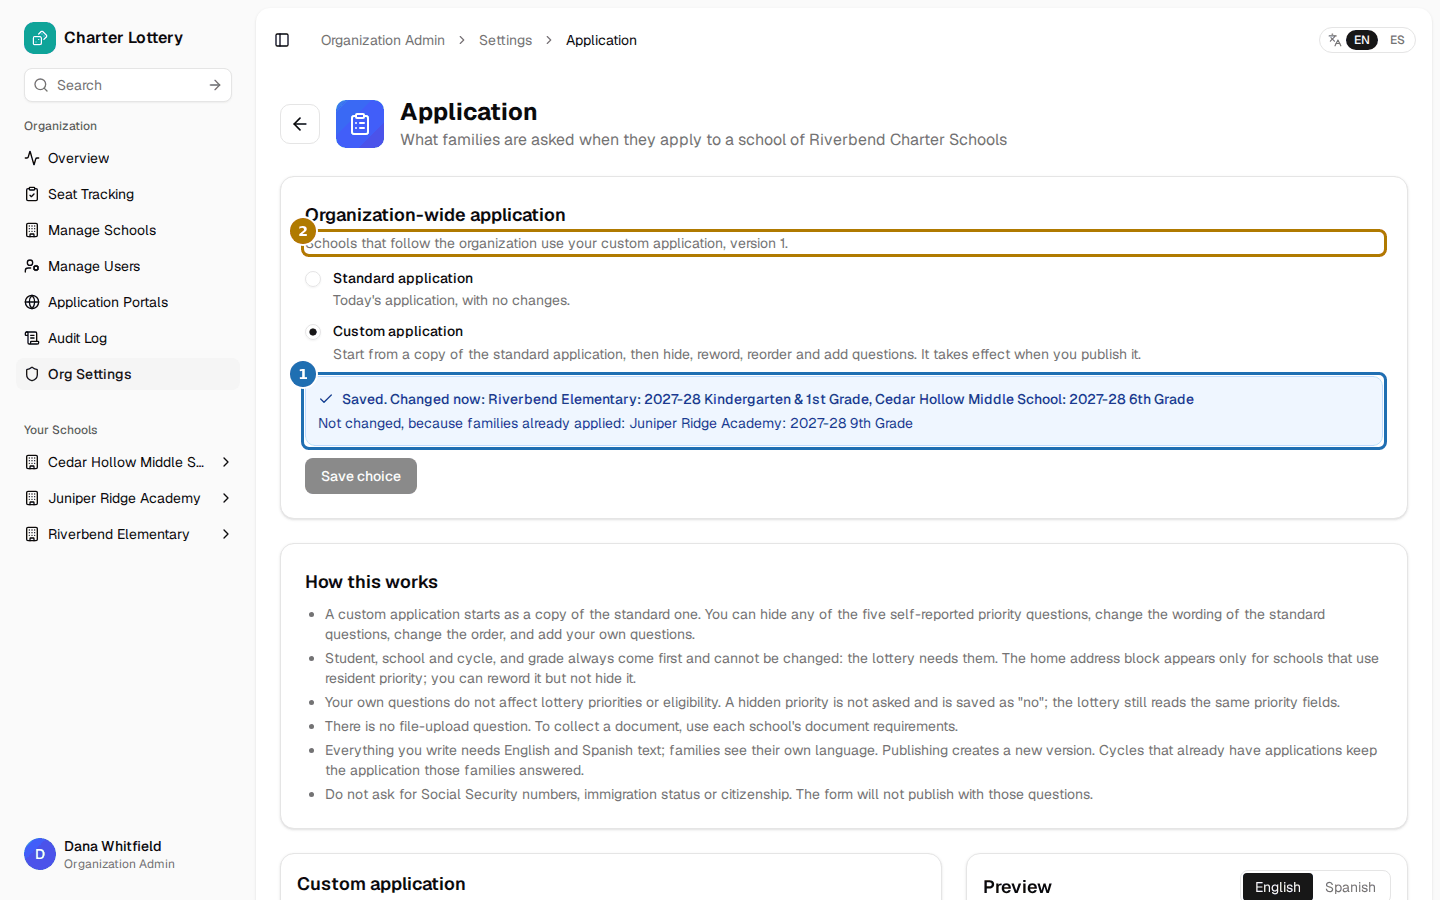
The result (1) also names cycles kept because families applied. The line under the heading (2) now names version 1.
Step 26. See each cycle's application
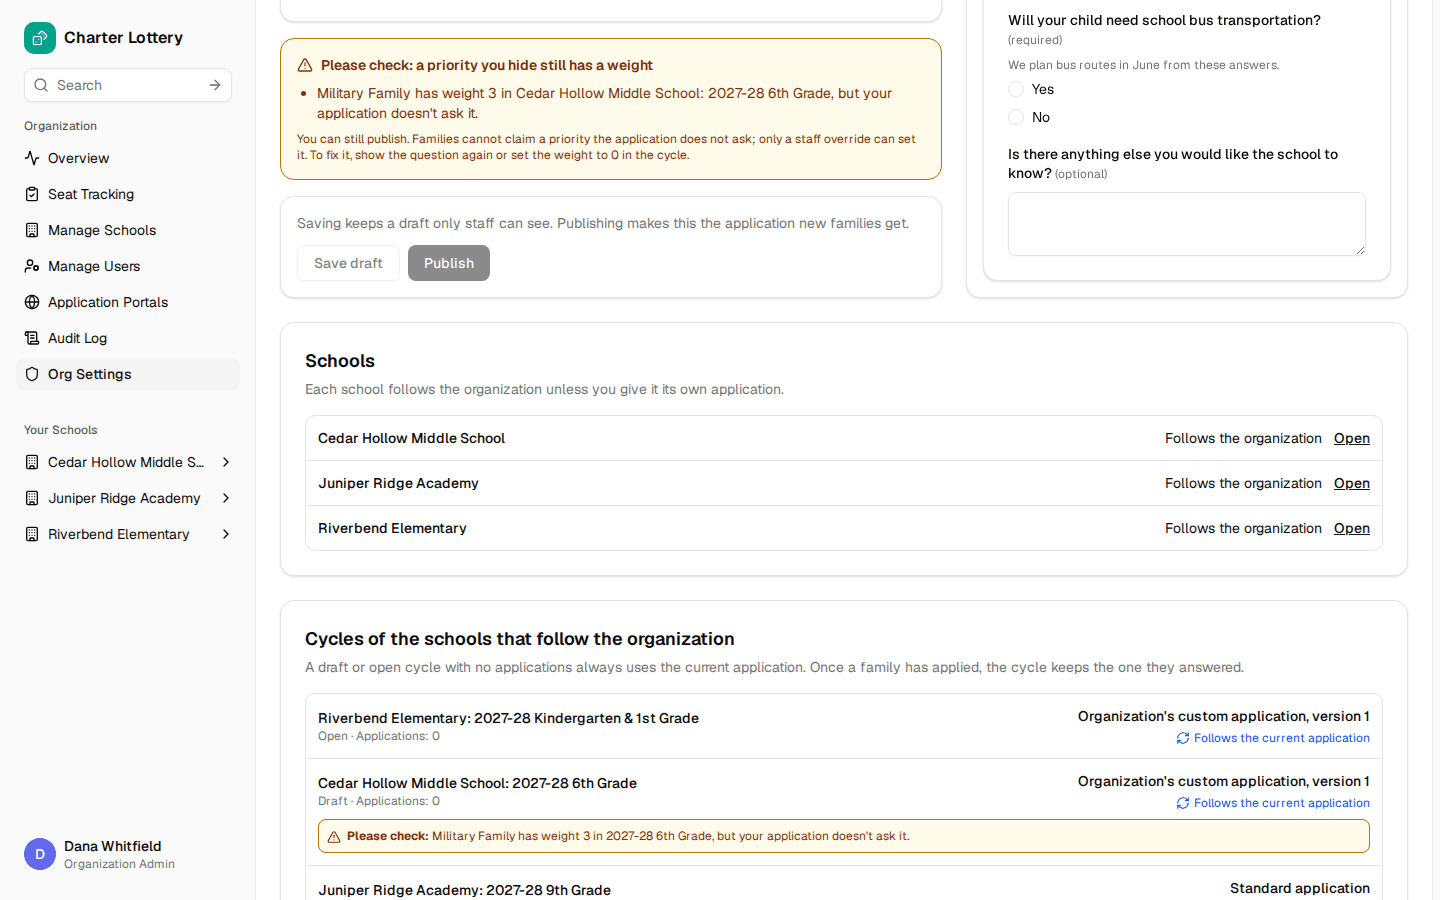
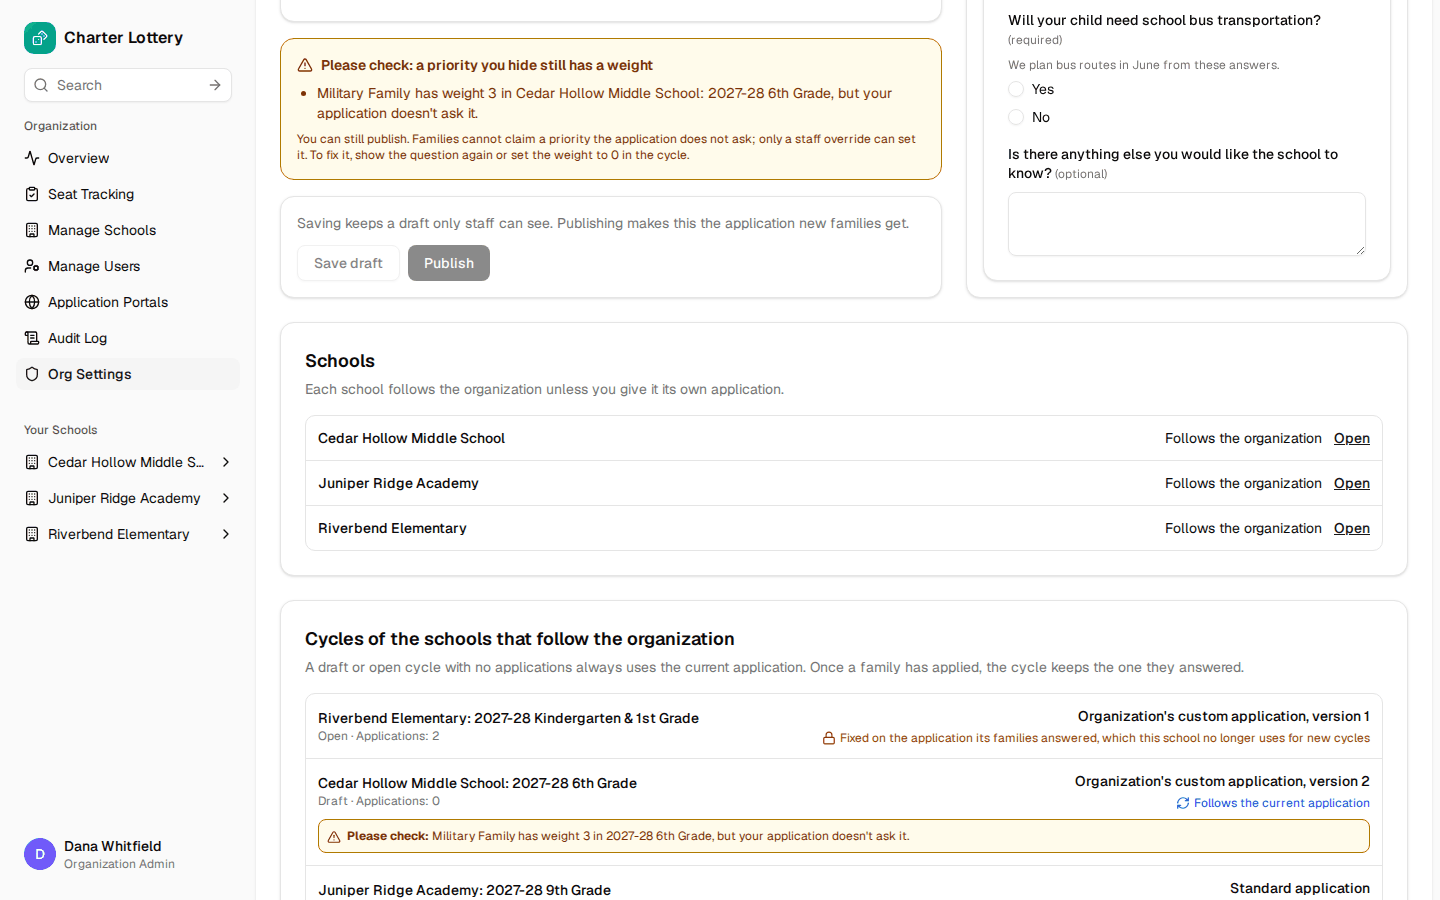
The cycles list shows what each cycle asks. Follows means it moves with your next version; Fixed means families have applied and it keeps theirs.
An amber Please check means a cycle weights a priority you hid. Show the question again or set the weight to 0.
Part 5 · Choices for each school
Step 27. A school's application
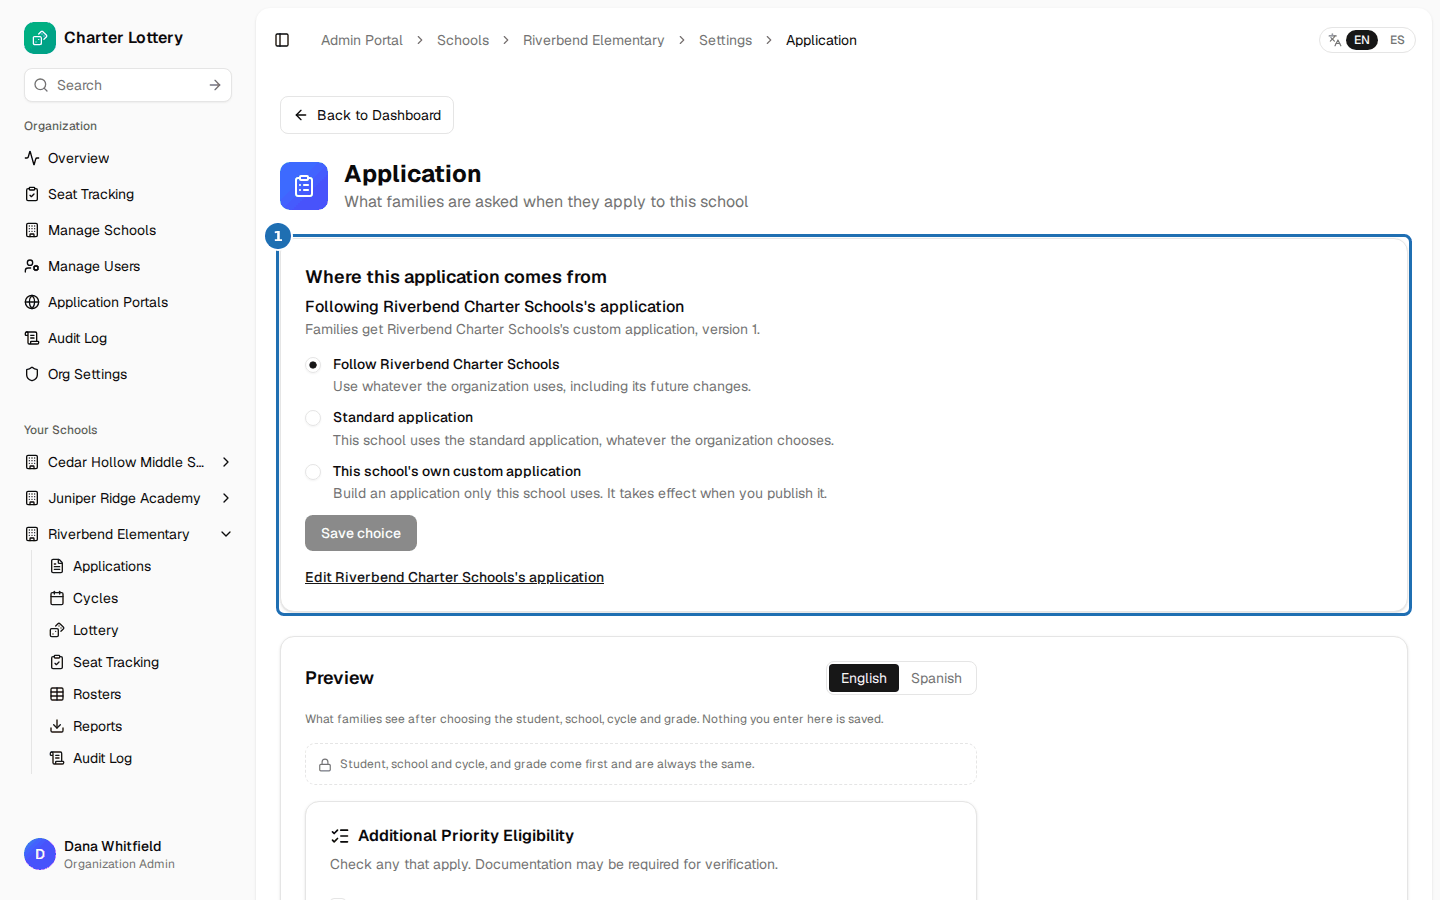
Open beside a school shows where its application comes from (1): Follow the organization, Standard, or This school's own custom application.
Choosing its own before it is published gives its cycles the standard application. Prepare and publish it lower on the page first.
Step 28. What a school admin sees
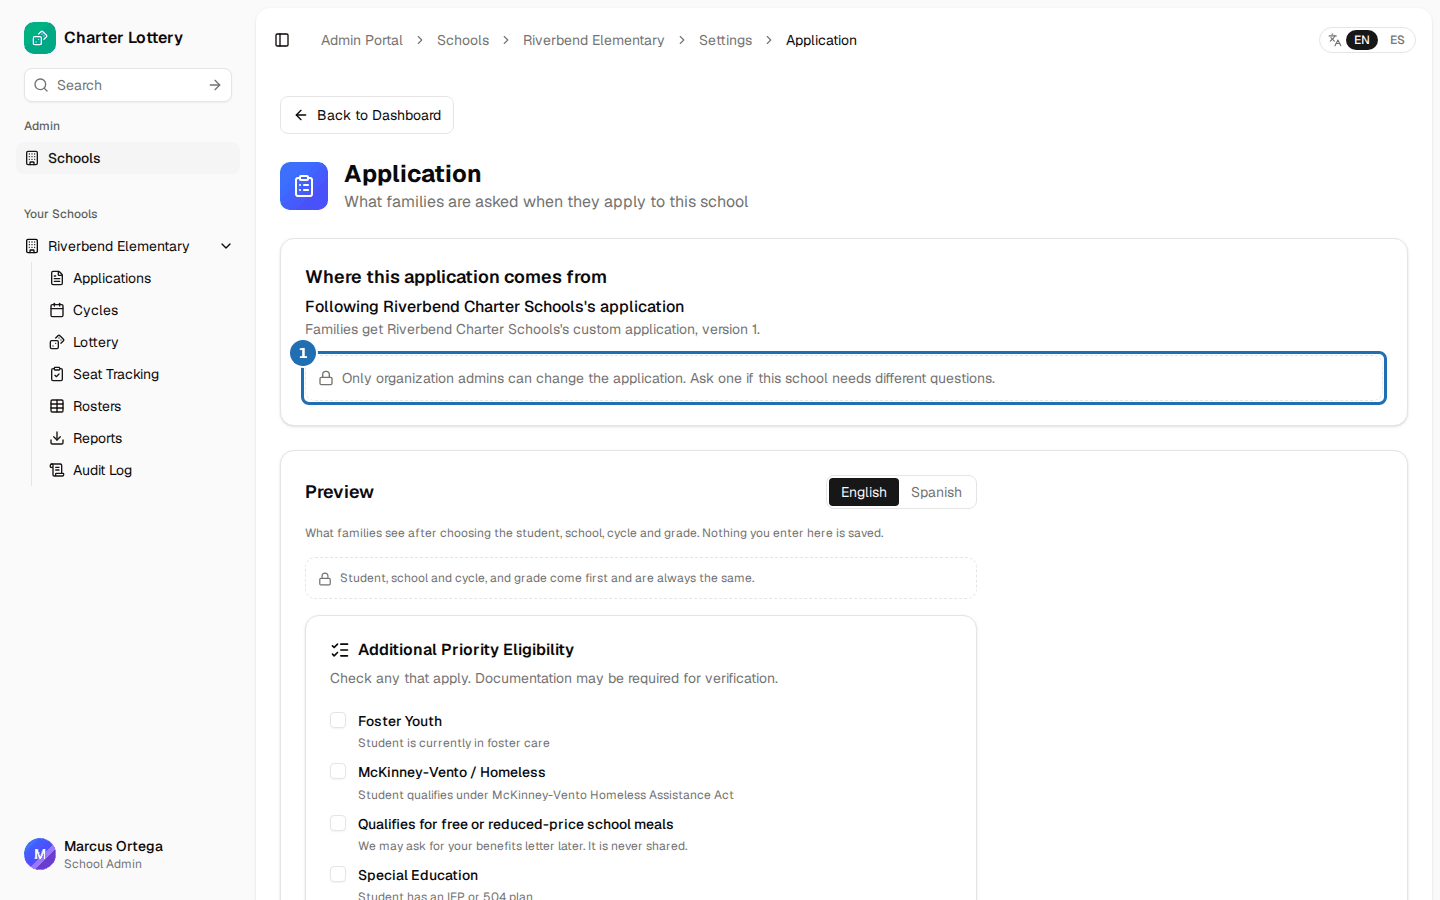
School admins see the same page read-only (1): where the application comes from, the version and a preview. Only organization admins can edit the application, so school admins ask you for changes.
Step 29. Required documents
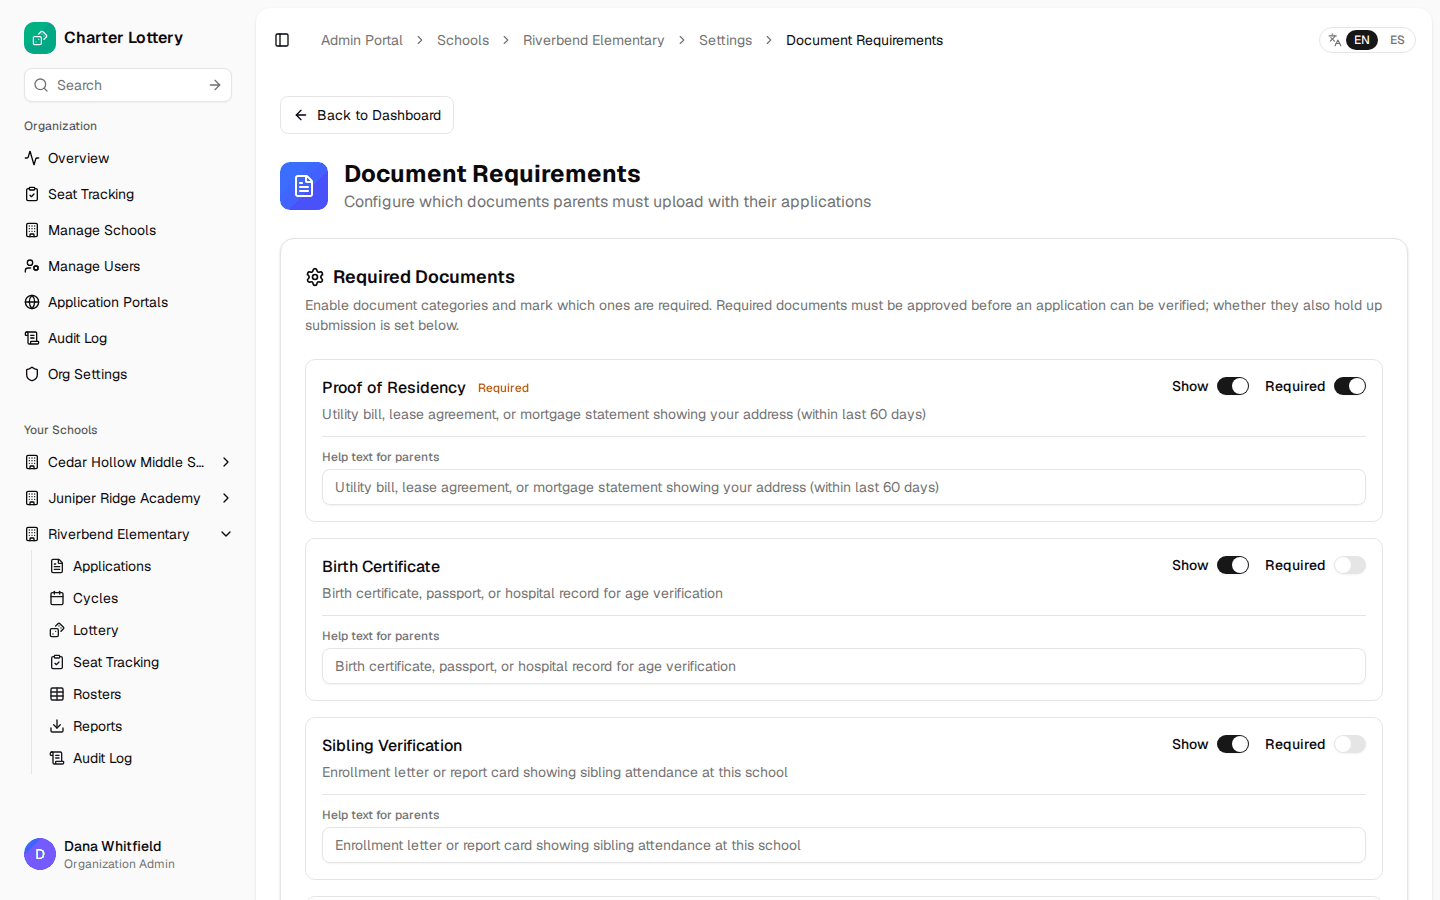
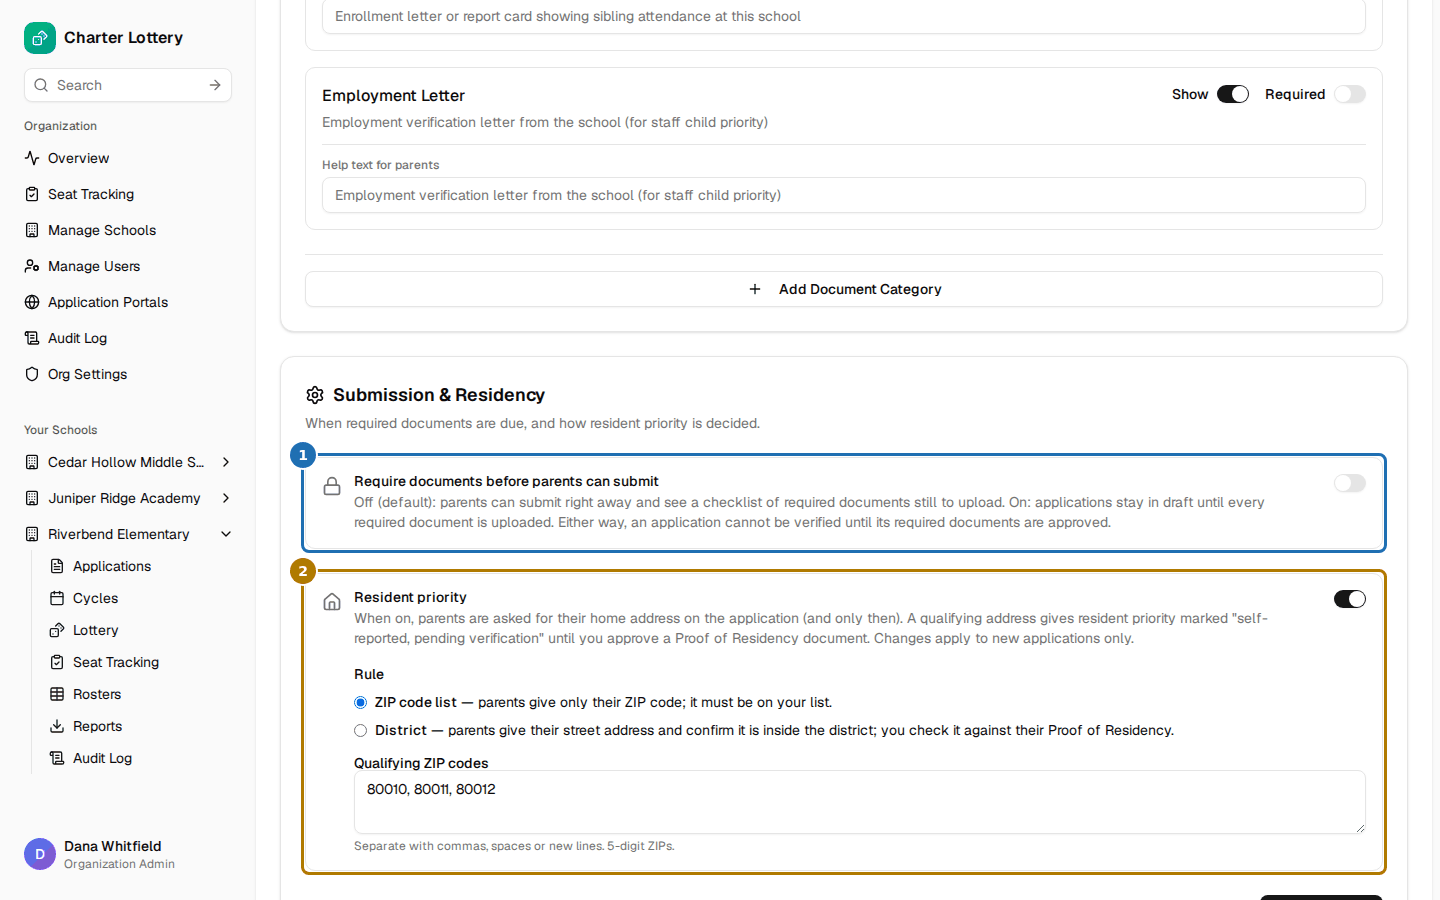
There is no file-upload question: under Documents → Configure, choose what families upload and what must be approved before you verify.
Require documents before parents can submit (1) holds applications in draft. Resident priority (2) adds the home address block.
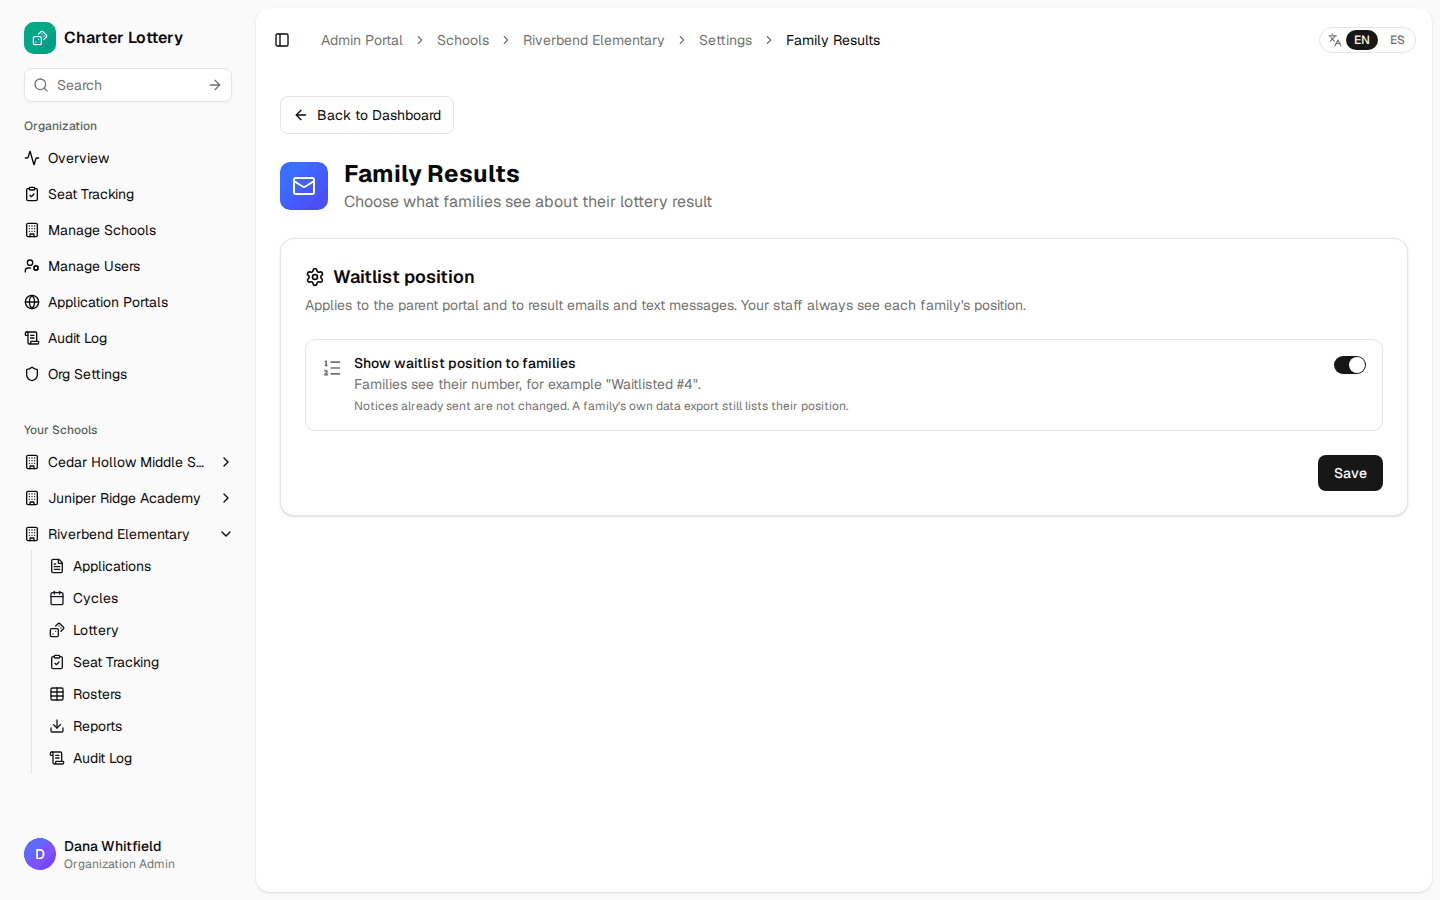
Step 30. The waitlist number
Under Family results, choose whether families see their waitlist position. Staff always see it.
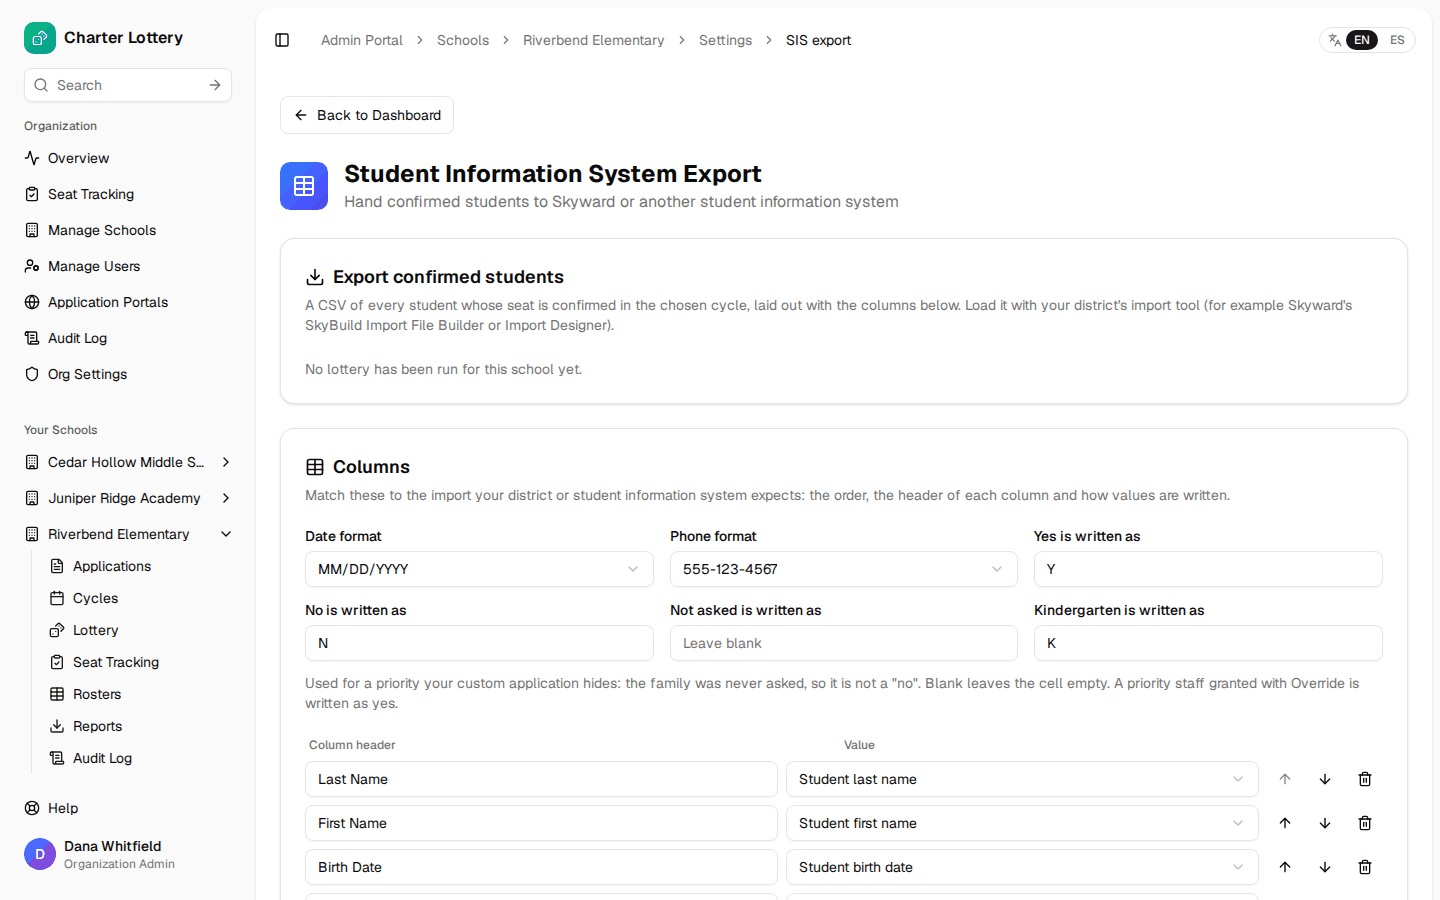
Step 31. Student information system export
Under Student information system, set the columns of the CSV of confirmed students for your district's import. A priority you hide was never asked, so it is not exported as "No": Not asked is written as sets its cell (blank unless you change it). Your own questions are not export columns yet.
Part 6 · See it as a family
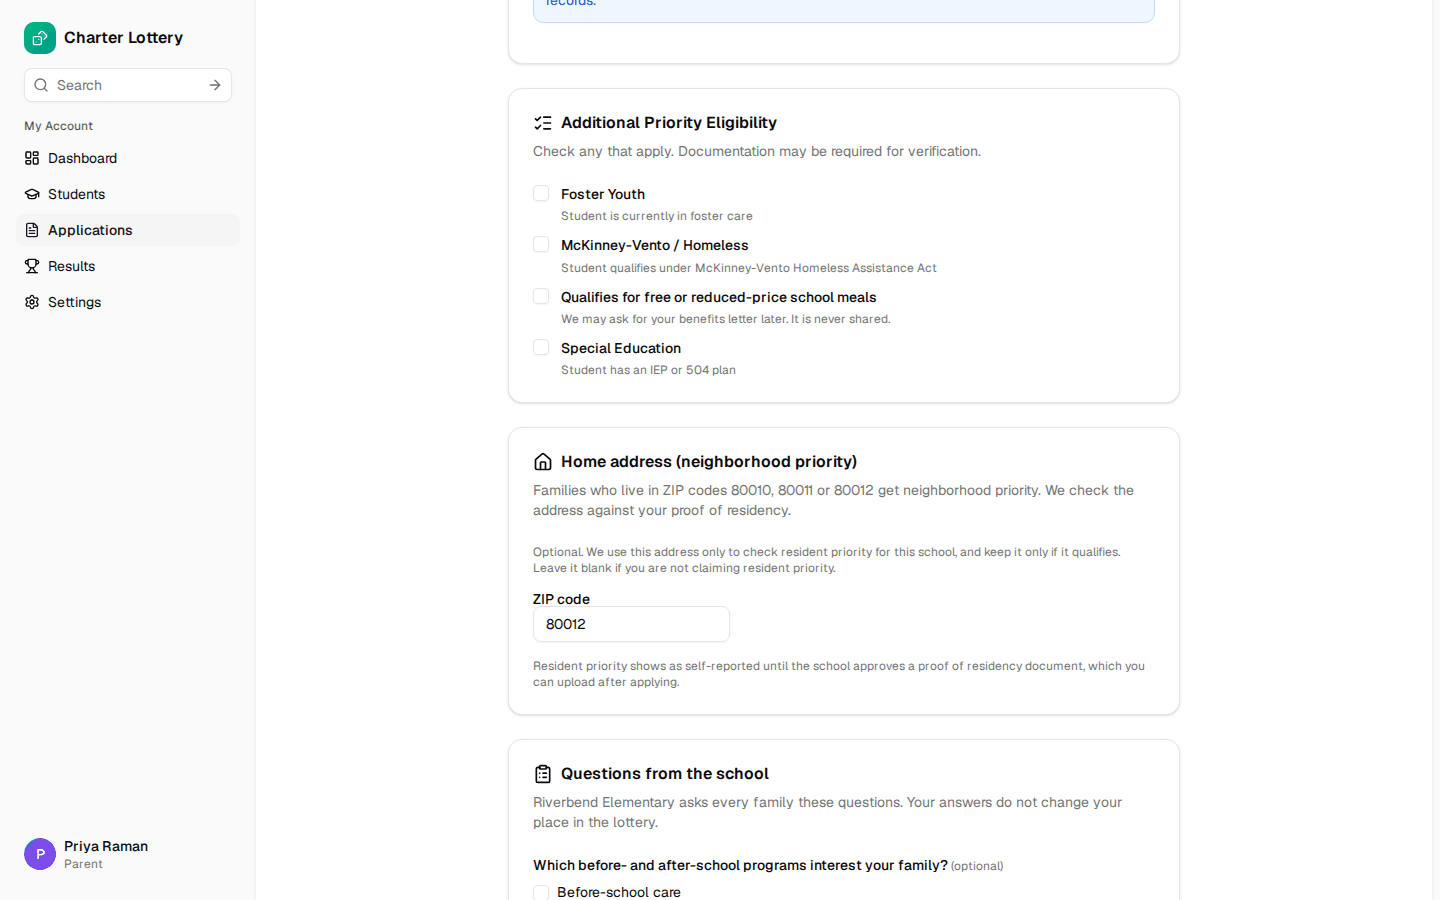
Step 32. On a laptop, in English
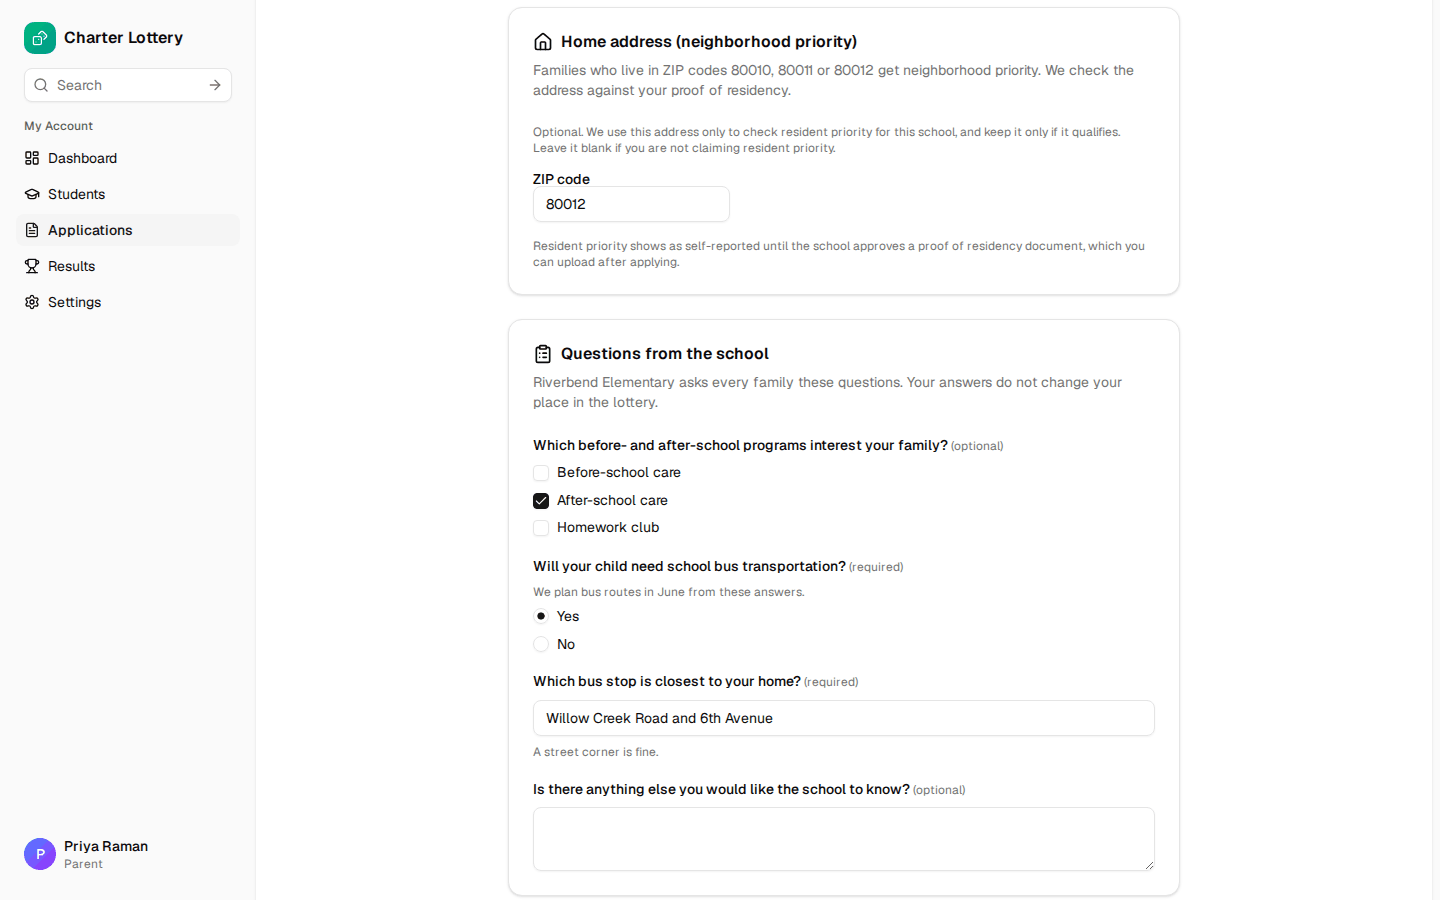
After choosing the student, school, cycle and grade, a family sees your priority questions, the home address block and Questions from the school, in your order and wording.
Step 33. After they submit
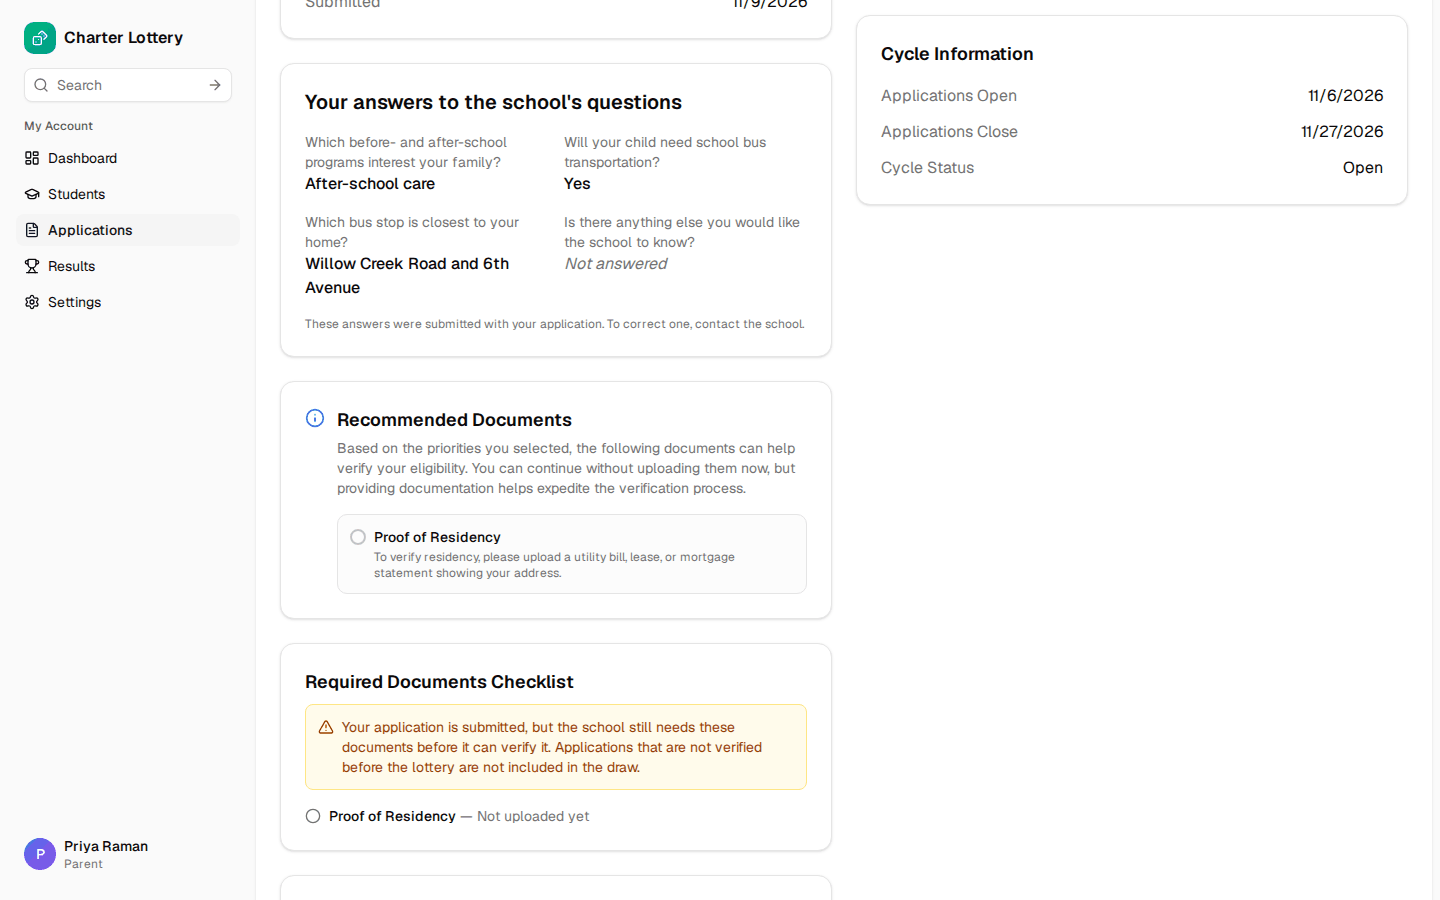
The family's application page lists their answers. Once submitted they cannot change them and are told to contact the school.
Step 34. On a phone, in Spanish
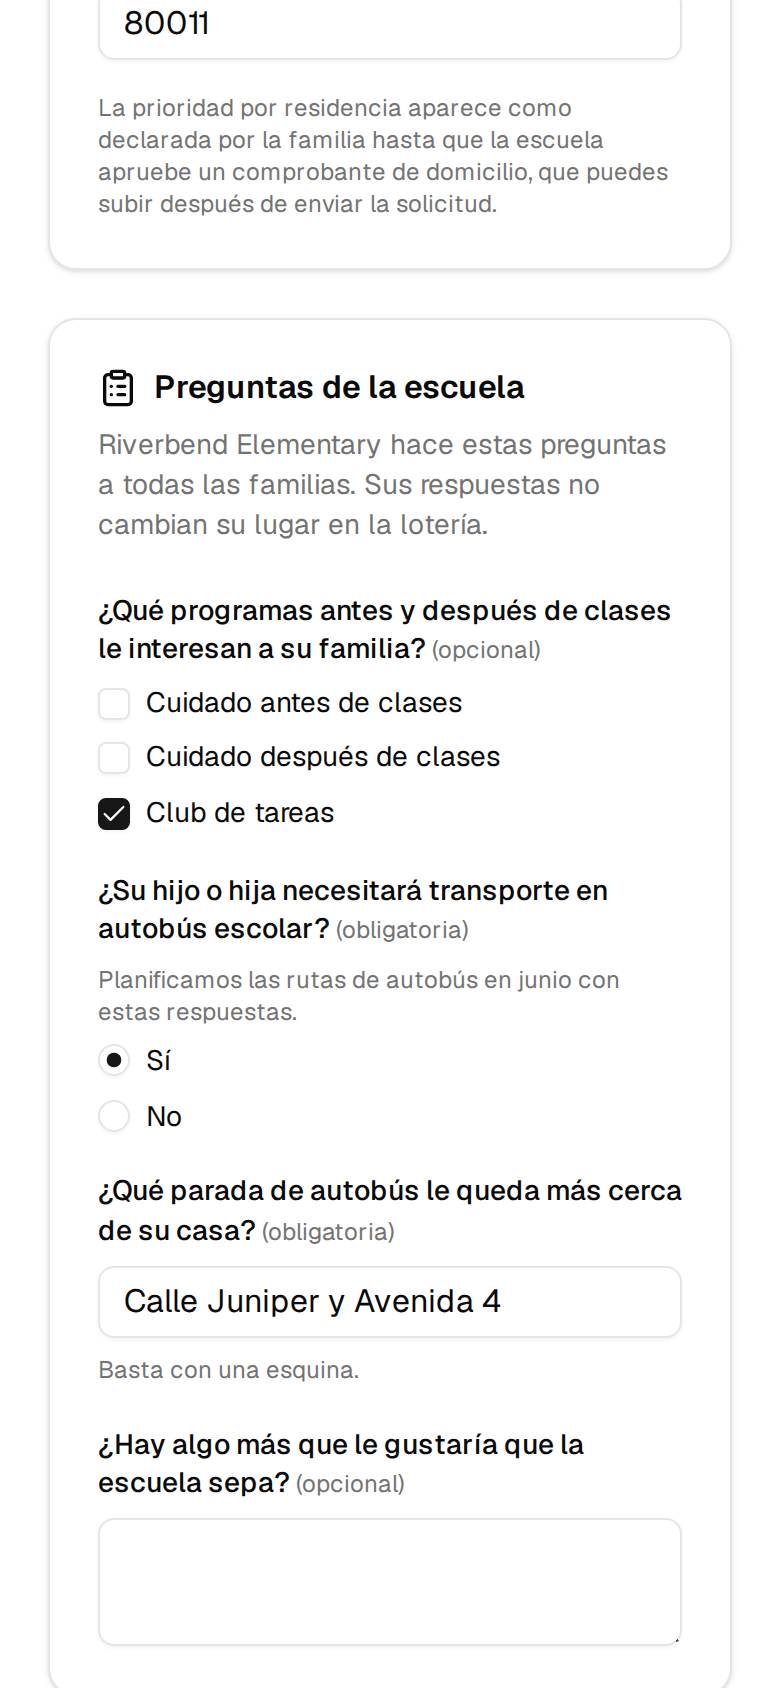
A family whose account is set to Spanish reads every question, option and help text in Spanish. Staff see the chosen options in their own language; typed answers appear as the family wrote them.
Part 7 · After applications arrive
Step 35. Answers on the application
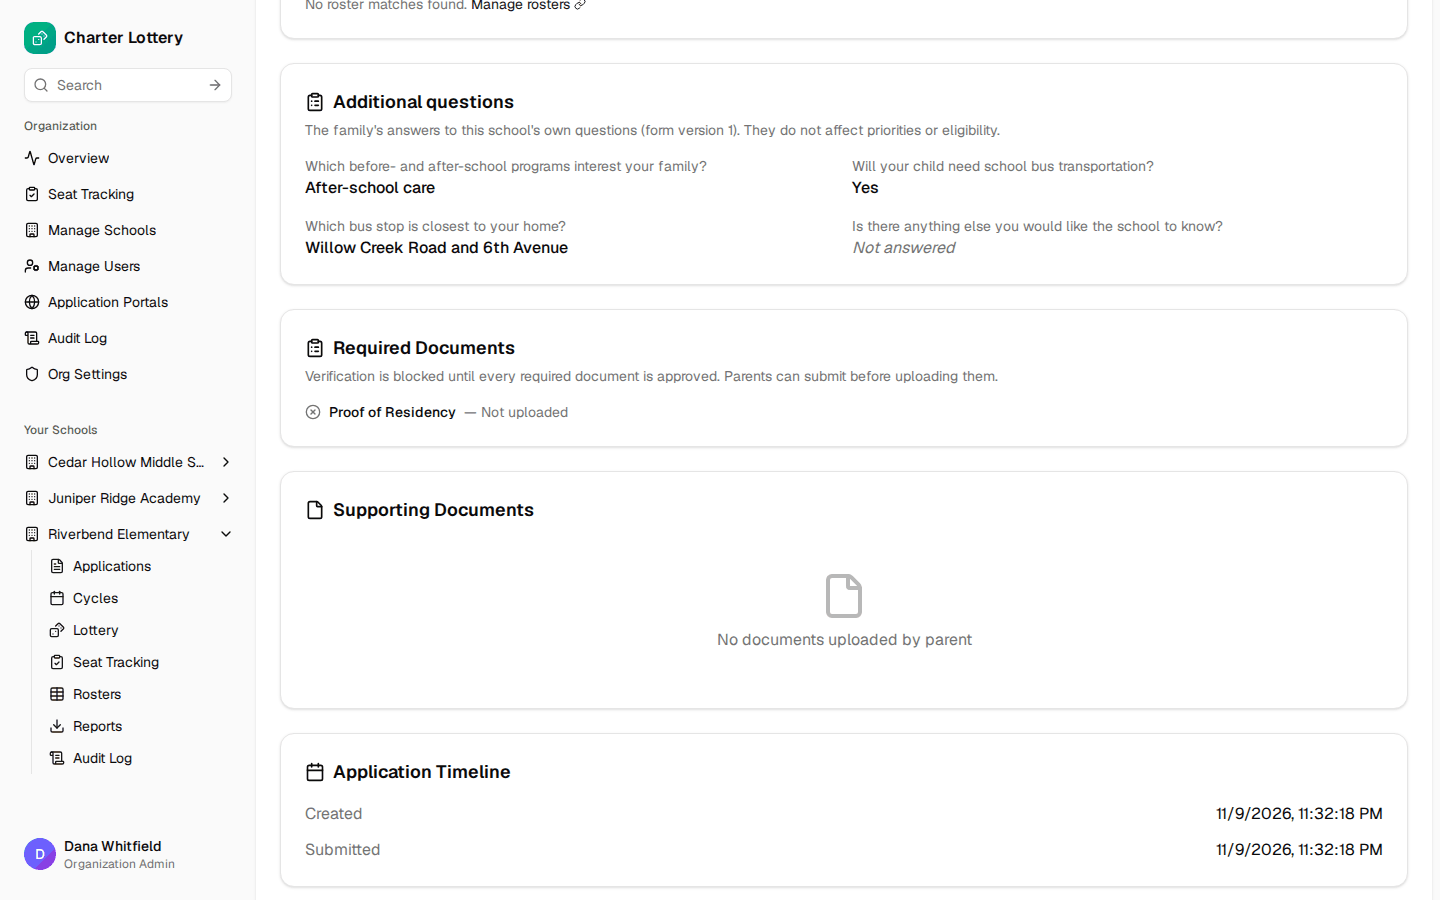
Each application shows Additional questions with the family's answers and the version they answered. Staff can correct an answer with Edit application, giving a reason, until the lottery runs. There is no filter or sort by an answer in the applications list yet.
Step 36. The print sheet and PDF
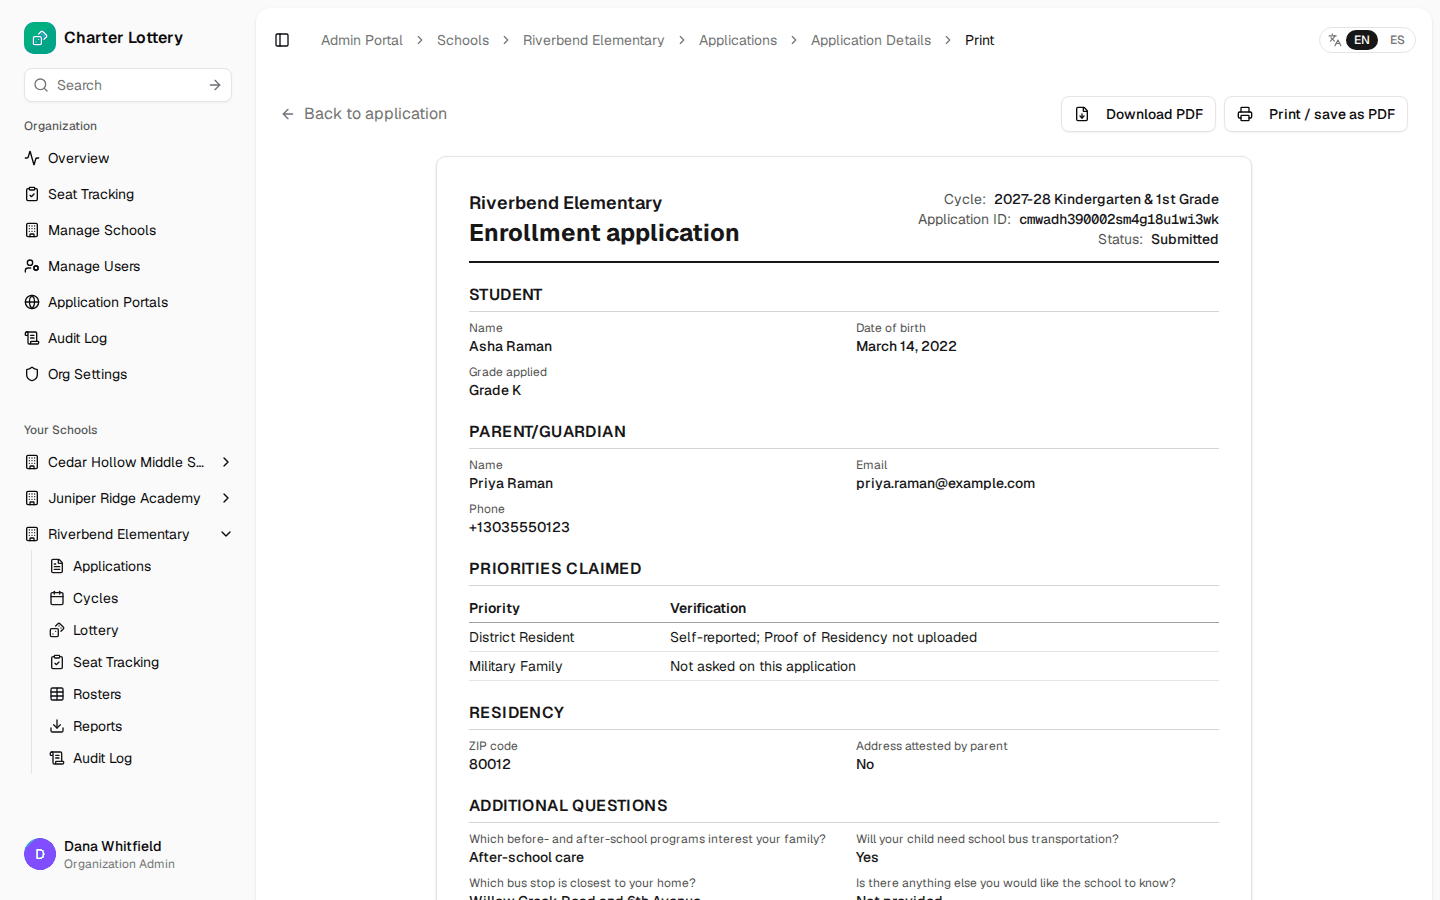
Print on an application opens a printable sheet with the answers, and Download PDF saves the same as a PDF. A hidden priority reads Not asked on this application.
Step 37. The applications CSV
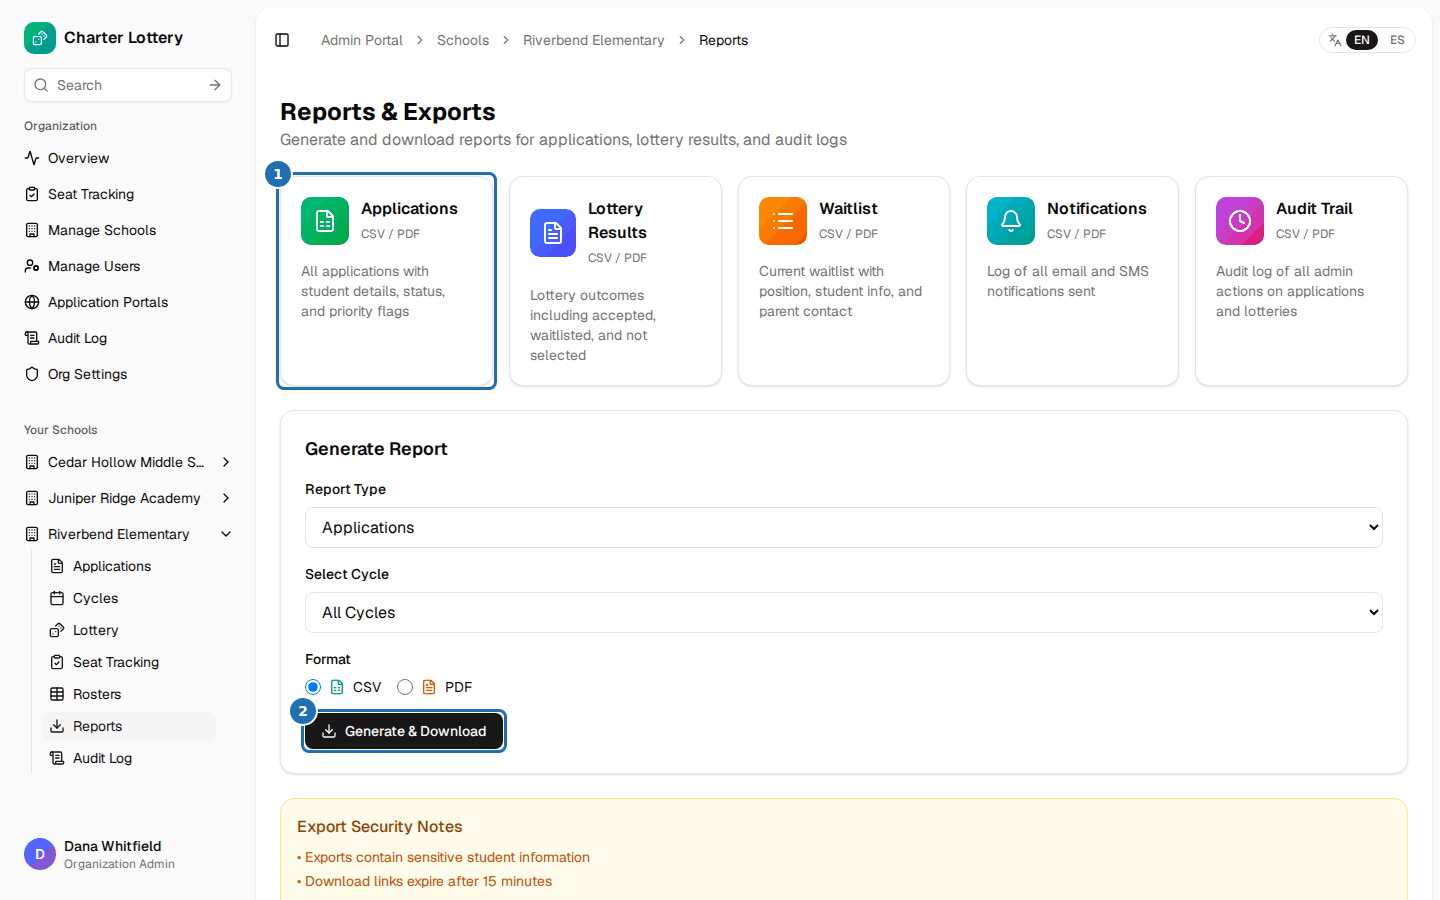
In Reports, choose Applications (1), a cycle and CSV, then Generate & Download (2). Each of your questions becomes a column headed by its English text and export column ID, with answers in English. The PDF list has no question columns.
Step 38. Change the application mid-season
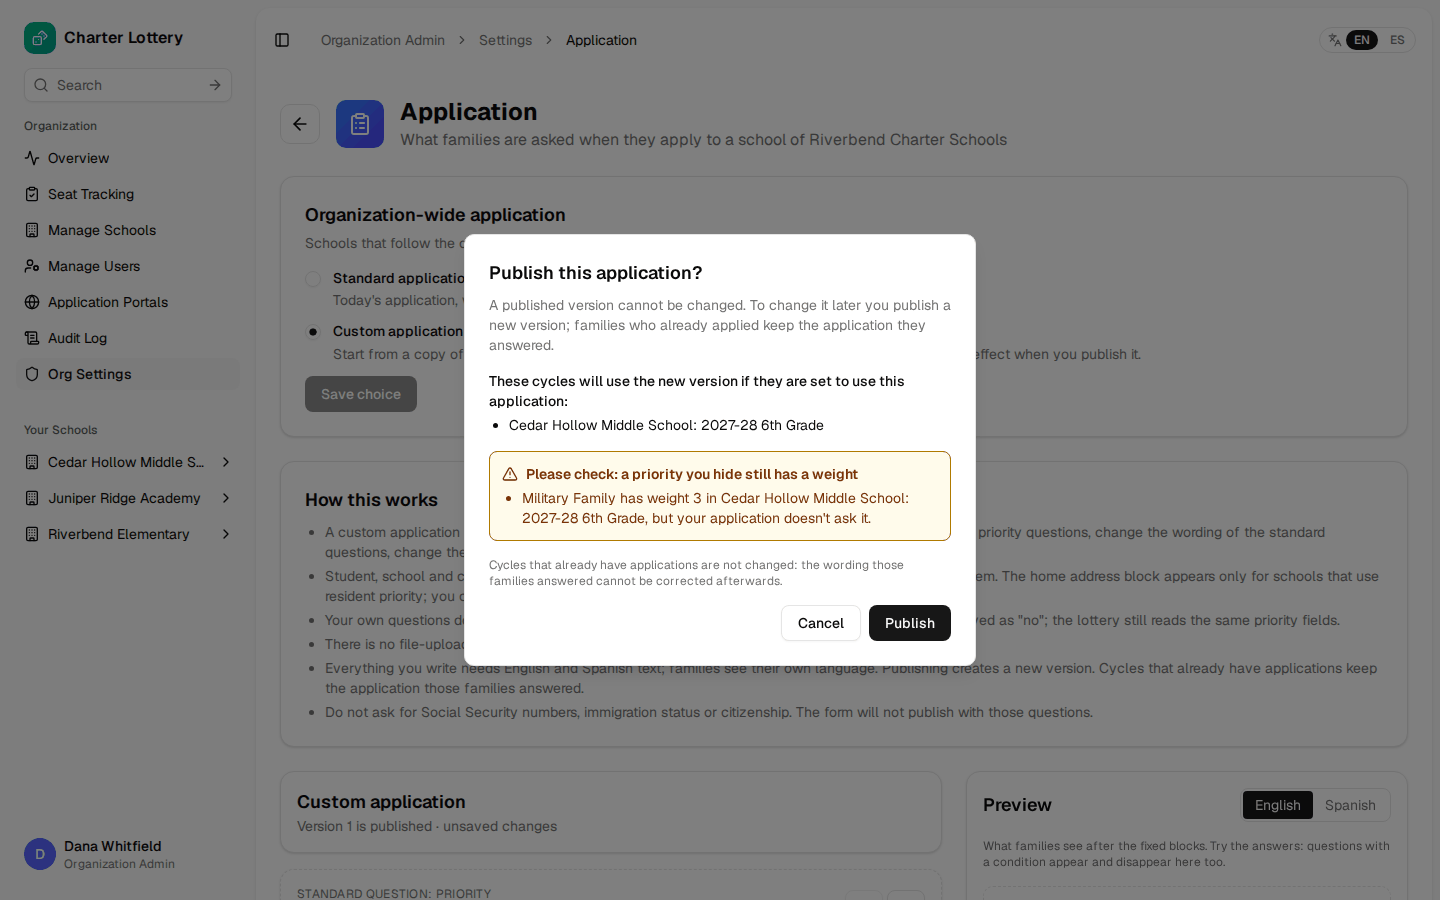
Edit and publish again. The confirmation lists the cycles that will move to version 2 and warns about hidden priorities that still have a weight.
Riverbend Elementary already has applications, so it stays on version 1 and everyone in that cycle answers the same questions.
Step 39. Hand over to the school admins
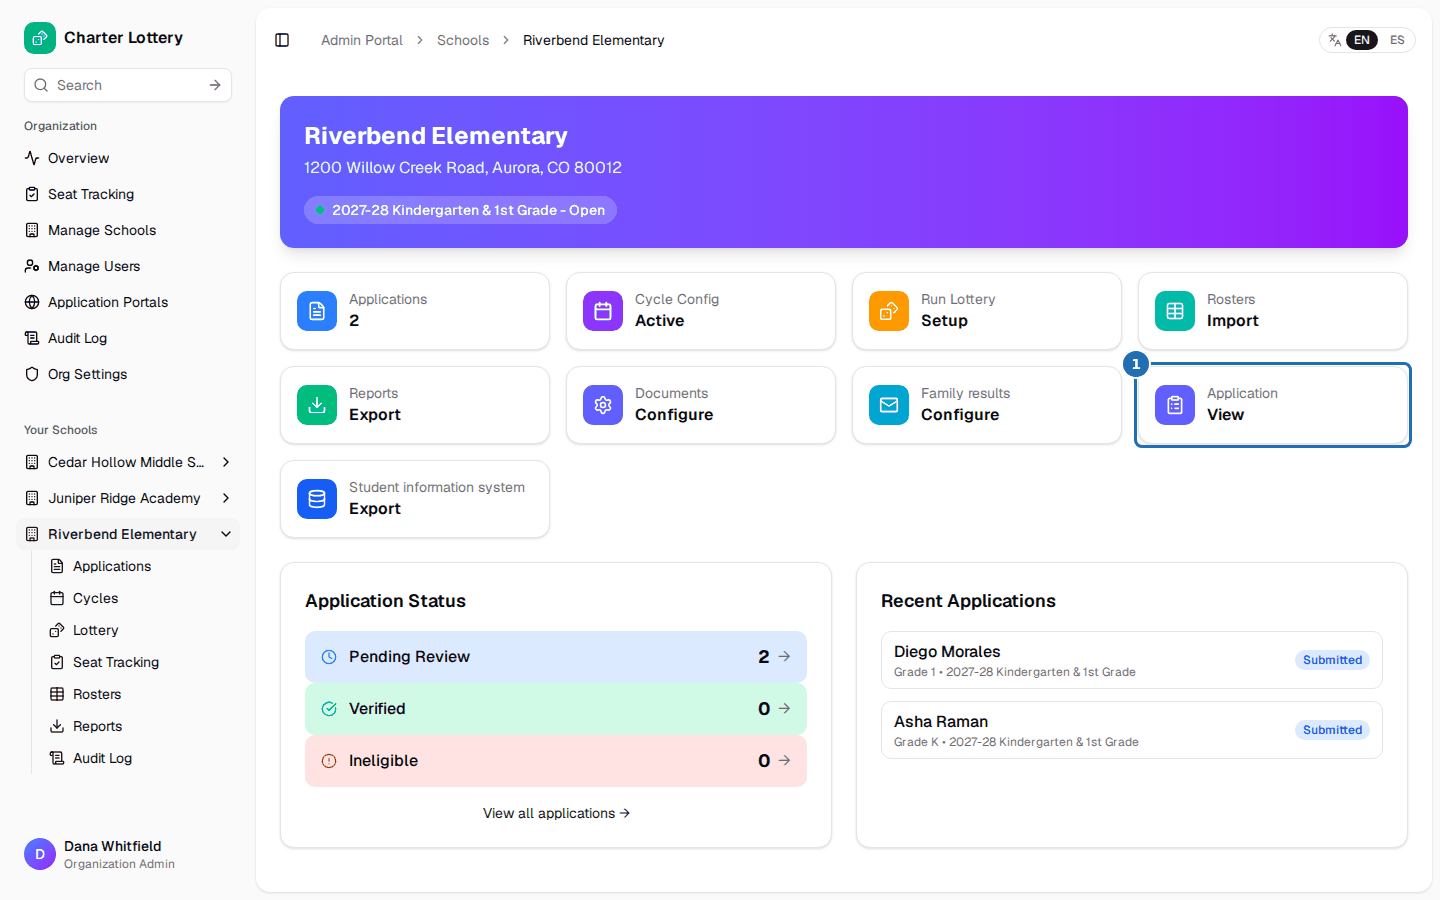
Each school's dashboard links to its application (1) and everything else for the season. The School Admin walkthrough covers review, the draw, results, the waitlist and finalizing.
Where answers appear
| Place | What it shows |
|---|---|
| The family's application page | Their answers, read-only once submitted |
| The admin application page | Additional questions, with the form version |
| The print sheet and PDF | Answers, and hidden priorities as "Not asked" |
| The applications CSV | One column per question, in English |
| The family's own data export | Their answers |
| The SIS export | Hidden priorities as your not-asked value (blank by default); your own questions are not columns yet |
Application go-live checklist
- At least two organization admins, each with two-step sign-in and saved recovery codes
- Every question has English and Spanish text, read by a Spanish speaker
- No Must fix, and every Please check read
- Preview tried in both languages, including each follow-up question
- No hidden priority still has a weight in a cycle, unless you meant it
- Version published and the organization switched before the first cycle opens
- Each school's choice is right, and a test application checked on the admin page and print sheet
Support
Help: support@charterlottery.com. Charter Lottery does not publish support hours or a response time. Every admin screen is covered in detail in the organization and school admin guide.